


There’s more than a little irony in the need to keep a fiberglass boat away from water. The reason revolves around chemistry and the fact that water is the universal solvent. Given enough time, H20 will dissolve granite. Fiber reinforced plastic (FRP) is a much easier target, partially because it relies on filaments of glass fiber being coated with a sizing in order to create a resin to fabric bond. Glass filaments are never saturated, they are only surrounded by resin.
The best defense against moisture intrusion is a well-executed, void free layup. A half century ago, the heroes of hull molding were those armed with serrated rollers who forced the resin into contact with the sizing that coats glass fibers. Their efforts improved the contact between inorganic glass and organic resin. Today, resin infusion and vacuum bagging are often used to further decrease the voids in a laminate.
Gel coat is another moisture blocker, but voids and porosity can become a weak link. This is why barrier coating has become a worthwhile effort aboard new and older vessels. For decades PS has been testing high solids epoxy barrier/primer coatings and their performance has been encouraging. Bottom line? Products like Interlux-Interprotect, Pettit’s Pettit Protect, Sherman William’s Seaguard are worth the trouble.
We just concluded a 10-year test run of Interprotect and Seaguard on a Chesapeake Bay based 41-foot sloop. The vessel winters wet stored and conditions on the bay include a staggering range of water temperature and salinity variation. The summer to winter temperature flux spans ice water at 30 degrees F to summer bath water at 84 F.
At the same time, mesohaline bay water and river flow bounce salinity through equally wide variations—ranging from 2 or 3 parts per thousand to 18 parts per thousand. This physical change of water chemistry combines with summer sunlight to encourage a biological attack on bottom coatings. The net result is a barnacle and bryozoan utopia and a real test of antifouling capacity along with an adhesion test of the bottom paint as well as the barrier coat. In short, the region is a good test bed for underwater coatings.
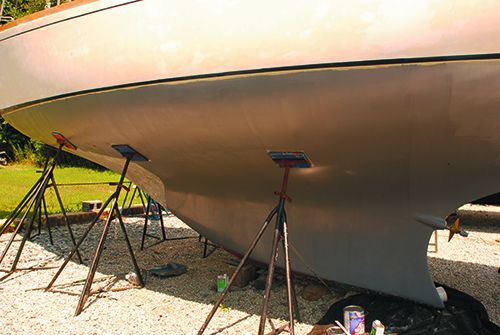
In 2009 the time had again arrived for me to remove Wind Shadow’s failing bottom coatings. The scrap-by-scrape details are spelled out in PS March 2009 issue. A decade later, in 2019, it was once again time to face another bottom ordeal. It’s a process I’ve become familiar with—a once-a-decade woe. But having owned Wind Shadow for 45 years, the 2009 redo held a nice surprise.
Once the biological demons—barnacles, bryozoans and tunicates were removed from the surface, along with some ablative antifouling residue, I discovered that hull areas protected by either Interprotect 2000E/2001E or Sherwin-Williams Seaguard 5000 barrier coats had done their job and the bottom was in far better shape than it was in 2009.
Your personal preference. If there aren’t that many layers of bottom paint, you can sand them off with an 8-inch, dual-action orbital sander and 60-grit sandpaper, but this is hard work and requires careful safety precautions. Overzealous sanding can lead to dings and divots in the gelcoat.
Another option is using a chemical paint stripper like Peel Away or Franmar Soy Strip (PS, October 2011). Chemical paint strippers break down the paint’s adhesive bond on the hull and make it easier to scrape down to clean substrate that can be repainted. This is messy and noxious work, but it’s less back-breaking than sanding. We’ve found that the strippers performance varies by boat (and temperature), so review the articles on strippers to see which one best fits your scenario. And if you’re not happy with one product, you might want to try another before giving up.
Both of these methods will be time-consuming on larger boats. Before tackling this project, check out our October 2011 article, “A Mathematical Decision Maker,” which outlines a formula for determining whether the DIY approach is right for you. On boats in the 40-foot range (or larger), we recommend looking into soda-blasting the hull (PS, October 2011). If you’ve got an old barrier coat that needs renewing, and are still considering a non-blasting regimen, then you’ll first want to read Ralph Naranjo’s account of his barrier coat removal project.
For owners of older boats with unknown, well-adhered coatings, a tie coat can help make sure successive coatings stick. The major bottom paint manufacturers—Interlux, Pettit, and Sea Hawk—all have priming/tie-coat products. One that we’ve recently used with success is Sea Hawks 1277 Barrier Coat Primer, a chlorinated rubber compound. Pettit’s version is called Tie Coat Primer 6627. Interlux markets its Primocon for this purpose.
How long you wait to strip down the old paint depends on how bad the adhesion issue is and your tolerance for a rough bottom; work boats go years without stripping. Eventually though, adhesion will suffer. The rough surface will also mean more drag in the water and slower boat speed. If you do start fresh, regular application of an ablative paint-one to two coats for a single season, no more than three for long-term cruising—can prevent paint build up. For help in selecting an ablative bottom paint that is best suited for where you sail, check out our March 2013 report on favorite bottom paints by region.
The durability of the 2009 barrier coating effort was quite apparent. The adhesive quality of Interprotect and Sherwin-Williams Seaguard epoxy were both excellent as was their ability to function as a moisture barrier. The dry film thickness of the Interprotect was greater than the Sherwin-Williams barrier coat, but after 10 years, this variant did not seem to affect barrier coat performance. Both coated sections revealed a minimal number of intra-paint layer minor blisters, only a dozen or so included sub-gelcoat penetration and the largest of these was only about one-half inch in diameter.
I tried a chemical barnacle base remover (On-Off) but preferred dry sanding with wire-grid sanding pads. A final 80-grit sanding with the Fein orbital vacuum sander, and I was ready to clean up, tape off, and apply a batch of new products to test.
This time I rolled and tipped two coats of Pettit Protect—an easily applied, high solids epoxy barrier coat. And followed up with two coats of Trinidad Pro bottom paint. Fouling has become so problematic in the summer months on the Chesapeake Bay, that I decided to see how a hard surface, high copper content paint will cope with the biological onslaught and increasing water temperature.
A year has gone by since last summer’s (2019) DIY bottom paint revamp and the initial results are quite encouraging. I haven’t scrubbed or hauled and washed down the bottom. During a recent dive and in situ inspection there were no barnacles, no tunicates and only a couple of spots on the rudder where a few small clusters of pioneering bryozoans were attempting to gain foothold. A sponge, not a scrub pad, evicted the intruders. Down the road we’ll see how the barrier coat fares.
Former boatyard manager and safety expert Ralph Naranjo is the author of “The Art of Seamanship: Evolving Skills, Exploring Oceans, and Handling Wind, Waves, and Weather,” available at www.practical-sailor/products.


")
The blisters might be due to epoxy coating. Applying epoxy before drying the hull might cause blisters due to the already trapped water inside the hull. Drying the hull is only possible if you remove the gell coat and dry thel hull.
A hull can be dried without removing polyester gelcoat, which is not a good water barrier. It takes time; think of a season of dry storage with a dehumidifier in the boat. Have the moisture content measured.
Agree with the recommendations!. Three years ago I had to remove 11(!) old coats of barriers, anti fouling and quite a lot of trapped barnacles bases in between at a boatyard in the Caribbean. Sandblasting was the only viable solution. It took two full days on a 43’ but the results were perfect. Not a single blister below. Based on the former PS testing I imported from the US the Seahawk Tuff Stuff epoxy primer-barrier, applied two coats by power spraying (all done by the Rodney Bay, Saint Lucia Boatyayard contractor) and then two coats of hard Sharkskin anti fouling. On the iron keel we applied 5 coats of Interprotect 2000E – also based on PS testing. Three years later and over 3,000 miles cruising to Boston, the bottom and keel still look (after a power wash) like in the launching day. Those interested in the process can see the results at the instagram: gdykidscontest
Have you ever looked at Coppercoat? I’m seriously considering it for my Florida based boat
Ditto John Cobb. I would like PS to look into coppercoat and other similar treatments. I’m intrigued, but not ready to believe all that I’ve read on it so far. I would like to know how it fairs with both constant wet and launch-and-retrieve. It may work for one but not the other I don’t know. How about on a fast hull (20kts) or a slow one. Practical Sailor are the results I trust.
I have tested Coppercoat in South Fla. waters. It was not effective as an antifouling paint. After 12 months it was fully covered with micro and macro fouling. If you cannot validate a products claim…….. stay away. I have had great testing results in the same waters with Trinidad as Ralph has.
Does anyone have experience thinning the barrier coat and using foam rollers to achieve a smoother finish? Our local yard applies it without thinning and with medium nap rollers and doesn’t tip, which yields a very rough surface. Can a better surface be achieved without spraying?
Summer of 2020, I had the bottom of my Baltic 51 media blasted and then my friends and I did the bottom job. We used interprotect. As per the instructions, we calculated the volume required to give the appropriate thickness. We put on a couple of coats with the recommended nap rollers, then we faired the bottom with either west system epoxy plus micro balloons for the deepest imperfections. We rolled on all but the last 2 coats and then we then skim coated the entire bottom with the interlux watertite filler and sanded the bottom with 80 grit. We also replaced some fairing on the lead keel. We then rolled on the last 2 coats un thinned with foam rollers followed by SeaHawk Biocop TF. We spent about 400 man-hours doing this after the media blasting. This gave us an excellent racing bottom.
Wouldn’t it be nice if the bottom paint companies produced a silver paint product that looks like the primer. I applied Primacon one year and everyone in the boatyard wanted to know where I got the silver bottom paint.
Some discussion of the laminating resin used is in order. Although more expensive vinylester and epoxy resins are less susceptible to dissolving in water. Many newer builds are avoiding polyester resin.
I tried Petit on my Shark 24 that I race in Ontario Canada. It was advertised as a product that could deal with cooler Canadian spring temperatures. What a disaster! Petit dud send me a replacement gallon but the results were the same. The epoxy would not adhere to the hull leaving and when it did the finish was simular to a pimple popping teens face. Petit is off my buy list for good.
If you use Epoxy in a Toronto Spring use a plug in infrared heater. I gavd my buddy one. The hull in the shade needs to be in the 50’s F. It also sounds like the surface of your shark was not prepped.
I don’t agree with sand blasting a Great Lake boat ever. Baking soda blast assured no tiny fractures or voids are opened. Petit will keep Great Lake zebras off. I helped a friend paint his dinghy in copper. He spend more on the paint than the 20+ year old hull is worth. Copper is used cause it’s toxic to life. Instead of hammering on sheets of copper we came up with a convenient paintable killer. Like a floating chlorine puck in your slip it will kill everything.
Systems west,micro balloons, or some cloth is the only solution to repair fibreglass. Nothing repairs corvettes better. Nothing locks into a pox hole better. The balloon are added to thicken. West will move for a long time so ballon change is work time to “ one pump batches”. De-wax the whole boat. No one in marine is better than Mother’s or McQuires.
RE-TAPE
Use really good tape and don’t be afraid to replace it each coat and feather the edge before you re-Tape. You don’t want a hard edge for the water to pick at. I use a 600 wet paper hose is one hand circular motion on the other. The thinner your first layer is the better.
If you are adding stripes just extent the Petit primer under them. I put a pearl blue pear grey stripe on a boat. Two base coats of pearl wet sand and another coat. They taped in the dual stripe. When the barrier coat was finished five coats of clear over the stripes with the upper hull taped. Over all appearance is the stripes and bottom coat were cast in the hull.
For paint wet sand second coat never first.
Even since Hanse used a 3D printer to print a hull I’m expecting to hear one has final printed layers in clear TPU. At end of life it could be recycled.
Interprotect may be easier for DIY. More coats are required, but they go on thin and smooth. It comes in two colors to help avoid holidays.
Like any paint, surface prep makes the job and takes the time.
I put mine on about a decade ago. It appears to be doing its job.
I am wondering about aluminum based paint for bottom paint . Is there such an animal ?
Petit Ultima works for me – Georgian Bay, winters in a cradle on the hard.
Great input and pointers from everyone.
If your hull is a carbon/epoxy matrix then you might want to be sure the coatings are built up enough to prevent galvanic corrosion. I have a photo if you’re interested.