

Sooner or later, chafe, UV rays, and sharp edges take their toll on our canvas. A misplaced screw or simple friction will eat holes in a dodger. A seam gives up, a boom rubs through the fabric, and a few snaps come loose.
A sewn repair is the gold standard, but perhaps it isn’t worth removing the dodger to fix it, the geometry is difficult for sewing, or perhaps the older canvas simply doesn’t justify all that work for such a small area. Older fabric may be too sun-rotted to allow another row of stitches, and the stitching may leak. Fortunately, the are some adhesives and tapes that can avoid these problems and still make long-lasting repairs.
Photo courtesy of Mahina Tiare

What We Tested
We tested polyester and nylon self-adhesive repair tapes, and a specialized repair product, Tear-Aid A. We tested adhesives, including polyurethane and polyether caulks, fabric glue, epoxies, and a specialized sail repair adhesive, Dr. Sails. We tested all materials on used Sunbrella canvas, which we laundered and scrubbed with TSP to remove any residual water repellent treatments prior to testing.
How We Tested
First, we tested several control samples of Sunbrella with sewn seams. Then we made up 2-inch wide cloth strips and created a seam for pull testing. For tapes we used a butt join with tape on both sides. The tape was firmly smoothed with a seam rubber and the samples allowed to rest overnight. For adhesives we allowed a 1-inch overlap and allowed the adhesives to cure for one week in hot humid conditions. These samples were slowly pulled to failure.
We then made up 6-by-8-inch flags from each material, with a seam running horizontally. These were aged in the sun for three months and then run them through a dozen laundry cycles, including three hours of tumbling dry with no heat and with tennis balls added to increase impact and flexing.
Observations
Matching the flexibility of the fastening method to the flexibility of the base material is vital to obtaining a strong, flexible repair. We learned this when testing sewn rope splices (see Stitching Versus Splicing, PS October 2014; Dyneema thread made weaker repairs than polyester twine because the force was not distributed, and it cut right through the polyester rope. Dr. Sails has maneuvered around this with a more flexible epoxy that cures to 80 percent strength within 30 minutes and completely within hours. When other epoxies would begin to peel at peak strain (the fabric stretched more than the glue), Dr. Sails held fast.
Although we did not quantify this, we believe that repairs should be made using used sailcloth or Sunbrella whenever possible. The glues do not soak as deeply into new fabrics and water-repellent finishes almost certainly interfere with bonding. At a minimum, new fabrics should be scrubbed vigorously with TSP before attempting a repair.
Tapes
Because they are made of materials similar to the Sunbrella, tapes avoid the flexibility problem. However, none of the tapes we tested held a sustained load without creeping, particularly in summer temperatures. They will be an acceptable solution for small repairs that have little or no strain. However, the patch must be secured with stitching after placement if sustained stress is involved.
Tear-Aid Type A takes the flexibility approach much farther, with a tape made of soft vinyl that can conform to radical curves and over seams. It is so flexible that Sailrite recommends reinforcing any edge repair with a bit of monofilament nylon folded into the crease of the patch.
Adhesive and tape-based repairs on dodger canvas don’t leak as a sewn patch may. For durability, it is important to round any corners repaired with tape.
Sailrite Nylon Rip-Stop
Sail Repair Tape
This is fine for spinnakers but it creeps at very low load and sticks poorly to the fuzzy surface of Sunbrella.
Bottom line: Not for canvas repair.
Sailrite Polyester Sail Repair Tape
Like the nylon tape, it readily creeps in hot weather. Since it must be secured with stitching, it is not much of a time-saver compared to a sewn repair.
Bottom Line: Not for canvas repair.
TEARepair Tear-Aid A
The problem with this stuff is that it is too stretchy and soft, particularly in hot weather. It is also too soft to take stitching. On the other hand, this softness helps it conform to sharp curves and folds like no other tape. It has worked for temporary patches on small holes.
Bottom line: Interesting product, but we havent found a good use for it yet on canvas.
Glued Patches
Once again polyurethane adhesives outperformed conventional epoxies and fabric glue. The downside of polyurethane is the mess, the short shelf life once they are open, and long curing time.
Because of its high viscosity, it is vital to work caulking-type adhesives deep into the fibers by working the patch side to side while pressing down with a seam rubber or credit card. Be sure to mask around the repair. Use plenty of adhesive, allowing the excess to squeeze out onto the masking tape. The more wrinkled the surface, the more excess adhesive is needed, particularly when crossing seams and irregularities.
You don’t need to clamp, but it will take 1-2 days before you can move the canvas, and up to one week to fully cure. The curing agent is water, so in dry climates you will want to mist lightly each day with water, or place under a tarp with a damp cloth. In hot, humid weather this is not required and curing times are shorter.
Do not rush the cure, otherwise strength will suffer. If you want to do a neat job, place a non-stick surface under the work area, mask, and place wax paper or similar over the work while rubbing together. The fabric must be flat for best results. If there is a tear, pull the edges together on the back side with tape.
Dr. Sails
Dr. Sails has an eight-minute working time, so make certain that all of the parts and tools are laid out before you begin, including paper towels and several plastic scrapers to spread the epoxy and press the layers together. The syringes built-in mixer requires a firm hand, but the flow rate works for smaller projects.
The kits come with two in-line mixers, allowing two repair jobs if you store it carefully. The repair was considerably more flexible than the G-Flex repair, and it cures much faster. We liked that the glue did not show through the fabric, making for a neat job if we masked the work area.
Because it is an epoxy, clean-up is easy-just use vinegar, followed by soap and water. With Dr. Sails less resin is required, since the working time is short and its tendency to wick away from the joint is much less. In fact, it was the adhesive that was least prone to show through to the other side of the repaired fabric.
Bottom Line: Recommended for fast, clean, and neat Sunbrella repairs.
West Systems G/5 Epoxy
A five-minute epoxy, it is easy to work with and fast. However, because the epoxy is very stiff compared to the fabric, it does not distribute force evenly as the cloth stretches, resulting in a weak bond. In addition, it was so stiff that it did not advance to fatigue testing.
Bottom Line: Not for sails or canvas.
G-Flex Epoxy
Similar to G/5. Not sufficiently flexible to move with the canvas, it failed at high load.
Bottom Line: Not for canvas.
3M 5200
We have used 5200 for years to stiffen areas where grommets were to be installed. It has never let us down, and dependable test results support that experience. Its inherent stiffness is an advantage when mounting snaps or grommets (better support), and a disadvantage for repairs in other areas. Its messy to use, so always mask well.
Bottom Line: Best Choice polyurethane for Sunbrella repair.
Loctite Marine Sealant
Much like Loctite PL S40, but a little stronger with a quicker setting time.
Bottom Line: Recommended for Sunbrella repair.
Loctite PL S40
This has become a personal favorite around the boat and the house, performing as well as higher-priced marine sealants at a fraction of the price.
Bottom Line: The Budget Buy for Sunbrella repair.
Sikaflex 291
Another well-respected polyurethane sealant, it does not disappoint.
Bottom Line: Recommended for Sunbrella repair.
Dap Weldwood Contact Cement
Recommended by cruisers, we found that it was lightening fast and easy to work with. Just wet both sides, wait for a tack, and rub it down hard. Other cruisers suggested that UV resistance would be a problem, and we have observed this in unrelated outdoor applications. On the other hand, sails are generally covered when not in use, and reports say it holds up in the tropics for many years.
Bottom line: Were going to need to carry further long-term testing before we can recommended this for repair.
Aleenes multi-Surface Adhesive
This was suggested to us by a cruiser who had used it successfully for both sail and dodger repairs. Sure enough, when applied carefully on a flat work surface in the lab, we got respectable results. However, when we tried it in the field to repair a number of holes in a dodger it was a complete failure. We simply could not get the patches to stay on.
Bottom Line: Leave it in the craft department.
Conclusions
A needle and thread will always be king for canvas repair. However, there are situations when adhesive can have considerable advantages in labor and even quality, if properly applied.
Weve found polyurethane adhesive sealants very useful repairing failed grommets and snaps. Although 3M 5200 is still our favorite, almost any high-strength polyurethane will probably work. Tapes, on the other hand, generally disappointed.
So pull out your palm and twine, and your glue pot and tape, and see if you can’t stretch the life of the canvas just a bit farther.
Next, we will test these materials and others on polyester sailcloth. The requirements are a little different and the smoother finish changes some of the rules.
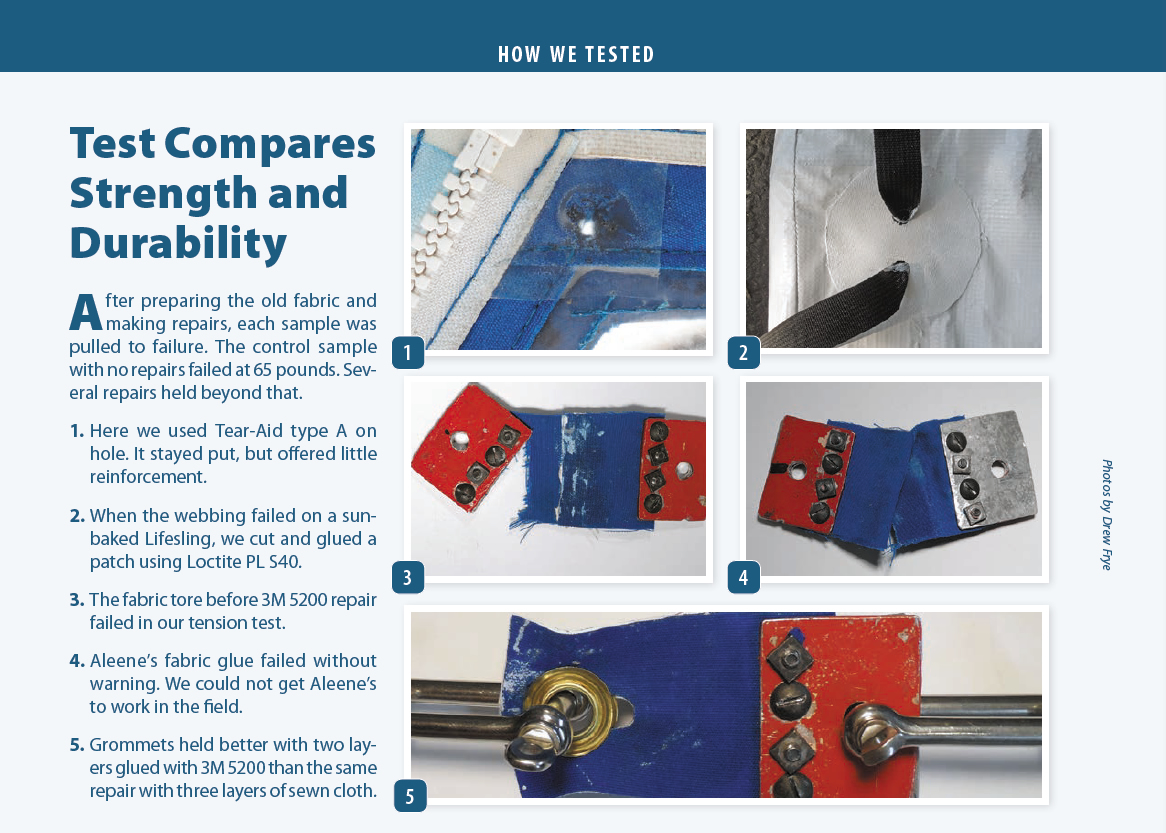
After preparing the old fabric and making repairs, each sample was pulled to failure. The control sample with no repairs failed at 65 pounds. Several repairs held beyond that.
- Here we used Tear-Aid type A on hole. It stayed put, but offered little reinforcement.
- When the webbing failed on a sun-baked Lifesling, we cut and glued a patch using Loctite PL S40.
- The fabric tore before 3M 5200 repair failed in our tension test.
- Aleene’s fabric glue failed without warning. We could not get Aleene’s to work in the field.
- Grommets held better with two layers glued with 3M 5200 than the same repair with three layers of sewn cloth.