

A wildly flailing boom is one of the most dangerous objects aboard a sailboat. If you could completely control the boom at anchor and under power, and while raising, lowering, and reefing the sail you’d avoid worry, save energy and be much safer. For this reason, many serious cruising boats have traditionally carried permanent boom gallows. They usually take the form of metal pillars bridg ed across the top by a wooden cross member. Bolted to the deck at the aft end of the cockpit or on the aft deck itself, they serve several functions: holding the boom firmly when the sail is down; catching the boom easily as the sail is lowered; and, perhaps most importantly, keeping the boom steady during reefing operations.
288
Unfortunately the traditional gallows can’t reasonably be used on most modern cruisers because the short boom on modern boats doesn’t reach anywhere near the aft end of the boat. A boom gallows sprouting from the middle of the cockpit or bridged neck might be possible, but it would be damned awkward.
A Modern Approach
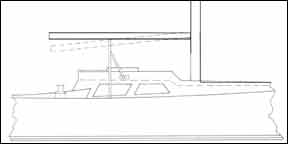
A modern version of the boom gallows is shown in the illustrations. Located at the forward end of the main hatch, its point of support will be well aft of the boom’s midpoint on many modern rigs. In addition, a gallows so located supplies an additional, valuable handhold, and can support the aft end of a set of heavy weather inner lifelines.
The design and construction of such a gallows is a major project, but one that will repay those who value ease of sail handling, security, and safety.
Because each boat is different, the illustrations are intended only as a general guide. Each boat will have to be designed for individually.
The first decision to be made is the height of the cross piece of the gallows. You want it to catch and support the boom at a useful height, but you must also ensure that even in a deeply reefed, droopy boom condition the boom will always clear the gallows when sailing. This height measurement can only be arrived at with the main sail up and in its lowest possible sailing position, with the mainsheet bowsed down tight.
Once the height of the cross piece is determined, the rest of the design process is relatively simple.
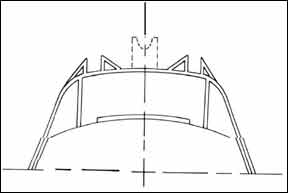
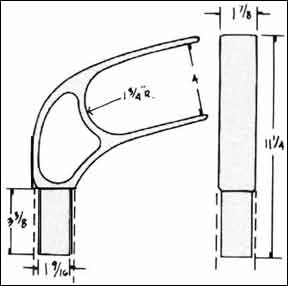
The main legs or uprights need to be angled sharply inward as they rise; otherwise they can be a dangerous obstacle to anyone moving along the side decks. The legs may parallel the sides of a steeply raked cabin side as shown. Alternatively, for a boat with vertical or nearly vertical cabin sides, the legs can be planted on the house top or, if on deck, they can angle sharply in as soon as they breast the cabin side. On some boats it might be best to fasten the main legs to the cabin sides rather than to the deck or cabin top. In all of this there’s no answer which will serve for all. You must design the gallows to best suit your boat.
The secondary, forward angled brace is necessary for support unless the main legs are really massive. The angle and best transverse location for the braces will have to be worked out on the basis of individual cabin top layouts, but bear in mind that an angle close to 45 should be striven for to supply both vertical and longitudinal support.
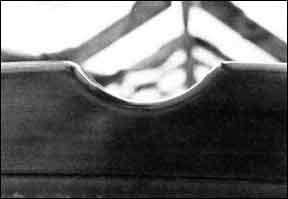
The illustration shows an all metal gallows with niches at either end of the cross piece to hold the boom off center when under power or when reefing. The dashed line shows the traditional, removable riser piece to hold the boom up when at anchor. This riser can, of course, be off center. Two pins running out of the bottom of the riser and fitting into holes drilled in the cross piece will hold the riser when it’s to be used.
288
As shown, the gallows would have to be carefully made by bending in an accurate jig. Alternatively, the gallows could be made by welding together a separate cross piece and legs.
Another alternative, good except for added windage, would be a traditional wood cross piece bolted to the legs. Such a cross piece would have end niches cut into it instead of rising above it.
The best metal to use for the gallows is either bronze pipe or, more usual today, thick-walled stainless steel tubing.
The minimum feasible outside diameter would be the 1” stuff used for pulpits, but, because of the long, unsupported lengths involved, going up to 1 l/2″ or 2” is a better idea.
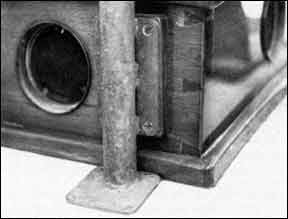
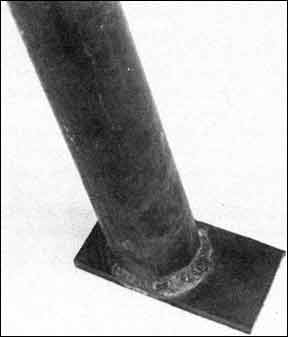
The base plates should be large, at least 9 square inches in area; 16 square inches isn’t overkill in helping to distribute the strain. The plates should be drilled for fastener holes (four each) before being welded to the legs.
Good welds are vital, and, as stainless steel is a difficult material to weld well, only an expert welder accustomed to working with stainless should be employed. Because of the odd angles found on boats, accurate jigging will be necessary during the welding. A good idea is to jig for approximate angles and then pad each of the base plates with teak pads which can be worked to fit the landing place.
After final fitting, the base plates should be through bolted to adequate backing plates of wood or metal, as described in the February issue of Better Boat.
A boom gallows is a big job but is worth it to the serious cruiser.
-J. Pazereskis
For a More Traditional Look. . .
A slightly different version of the modern boom gallows looks more at home on a boat of traditional appearance. In this design, a single piece of pipe is used, bent to the desired shape using a template. Bending stainless steel or bronze pipe requires a heavy duty hydraulic pipe bender, and someone who knows how to operate it: it is too easy to kink the pipe if you don’t know what you’re doing.
If the boat uses traditional bronze hardware, a gallows of thick-walled red brass pipe with an outside diameter of 1 1/2” will fit in better than stainless steel. Red brass pipe is commonly referred to as bronze pipe, and is available at metals distributors. Look in the Yellow Pages under “Pipe.”
288
On the other hand, if all the hardware is stainless steel and aluminum, don’t complicate matters: use stainless steel pipe instead.
A full size pattern will make it far easier to get the bends in exactly the right place -the hardest part of making the frame. Once again, the Yellow Pages will be a help. Look under “Pipe bending and fabricating”. If you have a friend who is a plumber and is used to bending pipe, he may be able to help out here. A plumber may have a bender strong enough to do brass pipe, but stainless may require outside help.
The esthetics of a pipe frame gallows require a little thought. The uprights should never be parallel to each other, but should can’t inward. The amount of can’t will depend on the individual installation, but at least 5 of inward slope is required to keep the frame from looking wider at the top than at the bottom.
A boom gallows is a big job, but it is worth it to the serious cruiser.
Likewise, the thwart ships section of the frame should not be flat, but should have a slight arc. If you make it flat, it will always look like it dips down in the middle because of the camber of the decks and deckhouse. An arc of about 1″ in 4′ of span will almost look flat on the boat.
If large diameter pipe is used, and if the frame can be an chored to the side of the deckhouse as well as the deck, diagonal bracing will not be necessary. As in the gallows described in the first part of this article, the largest possible mounting plates should be made for mounting both on the deck and the cabin sides.
When using red brass pipe, the mounting plates should be cut from 1/4” silicon bronze flat plate, which is readily available from larger metal suppliers under trade names such as Everdur and Herculloy.
You should supply the fabricator with accurate scale drawings showing the positioning and angles of the mounting plates, as well as the bevels on the ends of the pipe to match the crown of the deck. These drawings need not be complex, but should be as accurate as you can make them.
You should always buy pipe just a little longer than you need, and have the legs (sides) of the frame made a couple of inches longer than necessary. That way, positioning of the bend on the pipe isn’t quite as critical. Nothing is more frustrating than making careful planning for the height of the frame, then discovering that one side is an inch too short because you tried to make the pipe exactly the right length before bending.
288
When using stainless steel, the welding of the flanges to the pipe is a simple matter for any good welder. Red brass presents other problems, however. A really good welder can weld the silicon bronze plates to the red brass frame. Yes, weld not braze. Brazing has only a fraction of the strength of welding. The problem in welding these two slightly different metals is their different melting temperatures, which makes it difficult to get both metals to the same state at the same time. It can be done, but only by someone with a lot of experience. It will behoove you to have bought enough extra pipe and flat stock to let the welder have a piece to practice on before he starts melting your $100 piece of brass pipe. It will take the pressure off both him and you.
If you want the gallows to look traditional, a wooden cross piece can be bolted to the top of the metal frame. This should be mahogany if the exterior trim of the boat is mahogany, teak if the exterior wood is teak. The wood should be about the same thickness as the outside diameter of the metal pipe frame. The camber of the bottom of the wood cross member should be cut to match the arc of the metal cross piece. The top of the wooden piece must have more crown than the bottom. If the bottom has 1” of crown in 4’, the top should have at least a l/2” more.
The bottom of the wooden member should be hollowed to fit down over the pipe slightly. This isn’t as hard as it sounds. A few hours of careful work with a sharp, fairly large gouge will do the job. Final inside smoothing can be done using sandpaper wrapped around a dowel the same size as the pipe.
There are a few tricks in making the hollow in the bottom of the wooden piece. First, draw a centerline down the middle of the wood. Then, draw two lines parallel to the centerline, about 1/4” in from the edges of the wood. These two lines are as far out as you want to cut with the gouge. It is not necessary to fully recess the pipe. On pipe with an outside diameter of 1 l/2”, a recess 1/2” deep is about right. The groove in the underside of the wooden piece allows it to be pulled down tightly against the pipe, adding considerable stiffness and stability to the whole assembly.
Notches for the boom are easily cut in the wooden cross member with a saber saw or bandsaw. If you have a round boom, the easiest way to mark the gallows for cutting is to find a tin can that is just about the same diameter as the boom, and use the bottom of the can as a template. The cross piece need not be deeply notched to receive the boom. The notch need be no more than one third the boom diameter in depth. The same principles apply for booms of other shapes.
288
If you have a wooden boom, either the boom or the notches in the cross piece should be leathered to keep from damaging the two surfaces. Elkhide, available from any sailmaker, is the best type of leather to use, as it is easily shaped and very resistant to weather. The leather can be attached to either boom or cross member with small brass tacks. Use bedding compound on the underside of the leather in any case to keep the wood beneath the leather from rotting.
The only disadvantage to a boom gallows is that it can get in the way while racing. The answer to this problem is to make it removable. This is fairly simple, and does not require unbolting the frame from the deck.
When buying the pipe for the gallows frame, buy a short piece of the same pipe of a diameter that just fits inside the larger pipe.
The uprights of the gallows can be cut off just about at the level of the top of the deckhouse, and the smaller diameter pipe slipped inside as a sleeve, giving a good, solid unit when the frame is reassembled. The small diameter pipe sleeve should be permanently affixed inside the upper, removable part of the gallows frame. You can make teak or mahogany caps to cover the exposed ends of the pipe which are permanently affixed to the boat.
A drain hole must be drilled in the side of the pipe upright just above the base plate if the upper part of the frame is removable, as water will inevitably get inside the pipe at some time. This drain hole should be at the lowest point possible in the pipe.
In addition, the lower pipe and the inside sleeve should be cross drilled for the insertion of a retaining bolt when the gallows is assembled.
It is critical that a removable gallows be a good, tight fit in its base. Don’t be afraid to shim the sleeve to get a good fit. A slathering of grease on the inside of the lower pipe will keep the whole unit from seizing tight. Periodic removal of the top part of the gallows is suggested to make sure the whole assembly can come apart.
Readymade Fittings -Another Solution
Another solution to the boom gallows problem is to use readymade fittings. Very traditional in appearance, they would be totally out of place on a modern-looking boat.
Although these fittings are made by several companies, and vary slightly in design, they are all basically copies of the old Merriman boom gallows frame fittings. A set of the fittings consists of a pair of cast bronze bases, and a pair of cast bronze arch supports. You must make a wooden cross member to fit the end fittings.
288
The same esthetic considerations must be taken into account when making a cross member using readymade end fittings as when designing any type of boom gallows. The advantage is that no pipe bending is required. You simply buy pipe or tubing of the appropriate inside diameter to fit the end fittings and bases, and saw the pipe to the appropriate length. In addition, it is not necessary to relieve the bottom of the cross member to allow a good fit over the pipe.
The convenience of readymade fittings comes at a price. A pair of end fittings and bases will set you back from $175 to 8400, depending on the manufacturer, and 1 1/2″ inside diameter brass pipe -the standard for most fittings – costs about $10 to $12 per foot. In addition, the wood for the cross member should cost about $20 for Honduras mahogany, or about $40 for teak.
Building a bent pipe frame from brass pipe should cost about $100 to $150 for the pipe shop around -plus perhaps $75 or $100 for the labor of pipe bending, cutting bases, and welding. You’ll still have to buy the wood for the cross member.
A boom gallows can be a substantial investment. For this reason, a lot of planning time should go into the job before you spend a nickel. Make sure that the gallows doesn’t interfere with the boom, the hatches, traveler, or any sheet leads. Make sure that it’s possible to through bolt to the deck, and preferably the cabin sides, without tearing the boat apart.
The planning must also concentrate on esthetics. An improperly designed gallows can ruin the looks of a boat very quickly. Remember the basic rule of thumb for any “improvement” you make in the boat: when it’s done, it should look like it has always been there.
-N. Nicholson


