
Every year I read of near-drowning episodes that were compounded by the deficiency or complete absence of a boarding ladder. A fall from a dinghy, a slip while anchoring, or an MOB recovery underway made more difficult by the absence of a ladder. If there was a ladder, it had to be deployed by someone on-board, or even worse, dug out of a locker. ISO 15085 section 16 says you must have an installed ladder, with certain exceptions:
‘Any craft shall be provided with a means of re-boarding. Either it shall be equipped with a specific means of re-boarding from the water, e.g. ladders, steps, handholds, brackets; or it need not be equipped with a specific device if its characteristics (e.g. low freeboard or part of the hull) facilitate re-boarding from the water without a specific device. This shall be demonstrated by a physical test performed by one person (75 kg) alone…
“On a craft where the specific means of re-boarding is not deployable by a person in the water, additional information shall be included in the owner’s manual, warning that the means of re-boarding shall be permanently deployed if the craft is used singlehanded, whether anchored, moored, stationary, or under way. This shall also be explained by a label close to the helm station.
The last paragraph is irrelevant in any practical sense. A “means of reboarding” that must be “permanently deployed” when singlehanded (which includes at anchor with crew asleep) had better be installed and deployed at all times, or it will be forgotten. I’m not a believer in portable boarding ladders, unless it is to supplement one that is already fixed in place and ready to use.

The American Boat and Yacht Council requires that all boats have a means by which a person in the water can reboard the boat. Originally, the standard required 12 inches of ladder in the water, but in 2017 this was increased to 22 inches, along with the advice that 34 inches is better. Very short ladders can require gymnastics to climb, and difficult or impossible for tired, elderly, or unfit swimmers. We have found 34 inches is the minimum length for comfort for the full range of users.
This means that a ladder mounted as low as practical on a swim platform must have a minimum of three steps. Since the first step will likely be at the water’s surface, we recommend 4 steps. There must also be elevated handholds above the waterline; a swim platform ladder with only two steps below the water is very difficult to use.
OBSERVATIONS
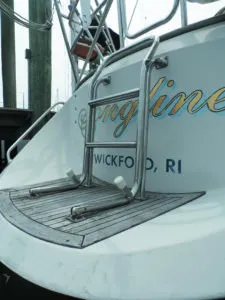
A long boarding ladder can also be handy when on the hard. I dislike having to leave a ladder under the boat through the winter, just because I might need to go aboard. And unlike a portable ladder, it can’t slip (see “Showing Good Ladder Sense,” PS January 2022). A small step ladder should be enough to reach the boarding ladder; tie them together for safety.
Each of the boats I’ve owned came with a deficient ladder, and I rebuilt all of them. It was an upgrade that every swimmer praised because they were more comfortable to climb.
Stiletto 27. The factory ladder was the pontoon boat type that fit brackets near the rail and stored in a locker. It took up valuable space, could not be deployed from the water, and was difficult to climb without adding more steps. Then we built a fold-down ladder on the transom, eliminating the storage problem.
Another problem was that the Stilet-to has transom-hung rudders, the transoms were narrow, requiring a ladder only 8 inches wide to avoid extending outboard or interfering with the rudder. The ladder, extending 22 inches into the water, was built from 1-inch aluminum square tube and Starboard. The steps above the waterline were Seadog Step Handles.
PDQ 32. The factory ladder hinged down from a low swim platform with three steps, reaching about 26 inches into the water. But because the platform protrudes aft and there are no handholds, it was difficult to climb and didn’t meet the intent of the rule in our opinion. We added a fourth step, extending it 36 inches in the water, which made up for the lack of elevated hand holds. The extension was added by fitting smaller stainless tubing inside the existing side rails and adding a plastic tread fabricated from LDPE.
F-24 MK I. The factory ladder has only two rungs, but because of the way it hinges, the ladder extends a full 22 inches into the water. However, like too many ladders, the rungs are bare 1-inch stainless tubing. These are painful to use. The solution was wider treads, an easy DIY project. Here are some pre-fabricated solutions:
C. S. JOHNSON SOLE MATE TREADS
Made of molded plastic, the Sole Mate treads are 2 inches deep, 5 inches wide, and clamp to each side of the ladder. Johnson advises alternating one per rung, but you can also install them in pairs. They install with a screwdriver and pliers. The cost is $25 per pair.
APROPOS MARINE
Apropos uses Seaboard (similar to Starboard) to make a variety of rugged boat accessories, including a ladder tread kit that easily fits into place on most ladders. The treads are 2½ inches deep and a range of width from 10-14 inches. The standard treads are made of ½-inch Seaboard and can fit 7/8-inch or 1-inch tubing. They install with a screwdriver and pliers. Cost is $25 per rung.
SEADOG STEP HANDLE
The tread on this Step is only 1.25 inches deep and about 5 inches wide, but we found it acceptable as a handle or step for the ball of the foot. They are handy for installing a narrow ladder up a transom. Cost is $12.00 each.
CONCLUSIONS
Every boat should have a ladder that can be deployed from the water by a swimmer, and which extends at least 22 inches below the surface. The treads should be at least 1.5 inches wide and non-skid. If you don’t like the look of a folding ladder, design something clever that can be reached from the water.
Cellular PVC board such as Azek is just one more proven material to add to your building and repair arsenal. Consider its properties and only use it where it has the right stuff for the specific job.
As with just about everything on a boat, the distinction between useless and life-saving often boils down to small details.
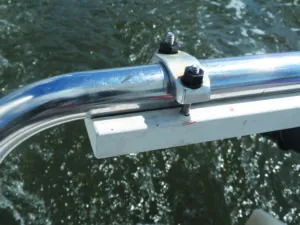
1. Hardware options. Ladder treads must be firmly clamped in place so they won’t rotate. On this ladder, a stainless steel conduit clamp (also called pipe strap or u-bracket) secures the tread to the ladder’s horizontal tube. A short length of stainless steel z-bar with a semi-circle cut into it fits over the vertical tube to prevent rotation. An appropriately sized eye strap (made by Schaefer Marine and others) will also work.
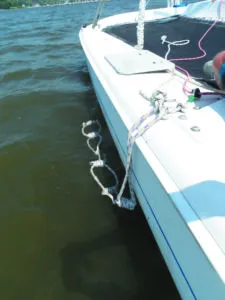
2. Deployment fail. This ladder lacks a pull line so it can be deployed from the water.
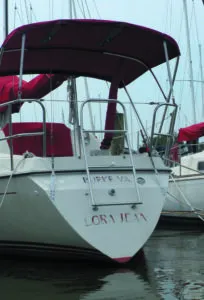
3. Short Step. This ladder also lacks a way to be deployed by a swimmer. It could also benefit from a deeper bottom rung.
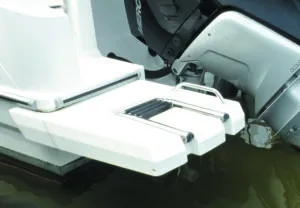
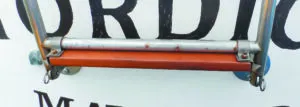
4. Telescoping ladder. Telescoping ladders should be kept well lubricated so they deploy easily. Even when fully extended this ladder is still short.

To make our ladder treads, we chose Azek, a cellular PVC trim board material (see “Is Azek the New Starboard?” PS December 2021), in part because we had scrap on hand, but mostly because it checked all the right boxes.
Deeper is more comfortable, but at some point they become ungainly, and deeper treads are more susceptible to rolling. A depth of 1.5-2 inches is a common compromise. Deeper treads can be attached by drilling through the tube, but most owners prefer a clampon solution.
We used aluminum bicycle tubing clamps, but stainless-steel conduit clamps, with countersunk nuts will work. To ensure a tight fit, we wanted a half round groove in the underside to match the tubing. A router is the standard approach, but you can also run the board across a table saw at a slight angle, creating the desired concave groove.
A better way to secure the step is to cut a half-round in each end of the tread where it meets the vertical tubes. You can also use a router to create grooves in the step. We just added non-skid tape (see “Non-skid Tape for Boats,” PS August 2018.) To use a table saw to make the curve:
• Set the blade to about ¼-inch height.
• Sight across the table at an angle until the blade appears as a quarter round of the desired width.
• Clamp a fence to the table with the correct angle and spacing.
• Saw a test board and adjust. Because the blade is cutting at an angle, the feed must be gentle, advancing only as the blade takes it. Do not force the board and hold down firmly with push boards.
• Cut to length and width, and drill for the clamps. Azek has enough compressive strength for counter sinks and does not require washers in this application. We used #10 machine screws.
• Sand with 100 grit. Finer won’t really help, since it is a foam structure.
• To protect the tubing and protect the aluminum clamps from galvanic corrosion, we applied 1 x 1.5-inch pads of polyurethane racer tape (see “Chafe Tape Plan,” PS December 2020).
The finished surfaces are smooth and require no finishing. The cut ends and the side that was ripped to width will attract some dirt and can be painted if desired. Krylon Fusion, which is optimized for PVC lawn furniture, gets good reports, although we’ve not tested it.
Another reason to have your boat’s ladder easy to deploy from the water at all times is the boat-dock gap, which can cause the sailor as much grief as an underway mishap. It’s much better to prevent a fall in the first place. Here are some simple measures that can reduce the risk of the shore-boat transfer.
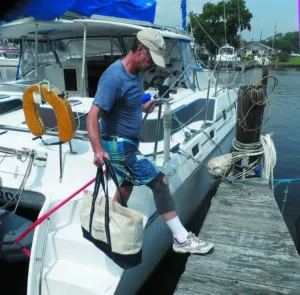
1. Transfers can be especially challenging when carrying gear or supplies. Even at the dock, “one hand for yourself, one hand for the ship” still rules the day. This catamaran is oriented to make use of the transom steps and a stanchion/handrail. Adding a temporary vertical extension to a well-reinforced stanchion for an improvised handrail is also an option.
2. Boarding stairs from Taylor Made StepSafe Dock Steps ($90- $240) suit high-freeboard boats. The multi-step models offer an optional handrail.
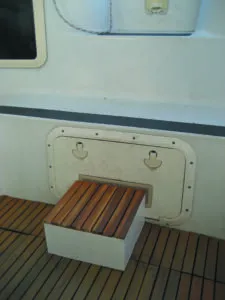
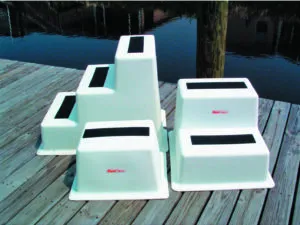
3. For cruising, you can make your own “runt box” that can be carried in the lazarette, and deployed as needed when dockside.
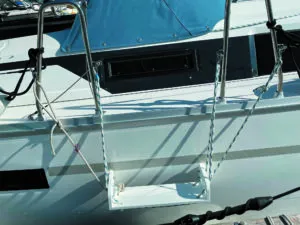
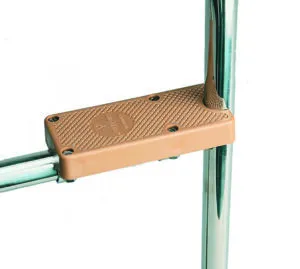
4. Apropos Marine makes a Seaboard boarding step ($160) that suspends from the stanchions or a slotted toe rail.


Do you have pictures of examples of a good ladder installed ?
The first time we used our new to us Hunter 26.5 we rescued a capsized kayaker in 1 1/2 ft. waves. He had tipped over and was panicking when we luffed up beside him. We threw the life ring on a floating rope and pulled him to the stern. With the open transom and built in stern ladder we had him out of the water in 3 or 4 minutes from capsize to on deck. Getting his kayak full of water, drained and onto the boat, would have been impossible without close access to the water from the ladder.
Our little group of 4 Hunter sailors regularly raft up and spend hours in and out of the water bobbing around happily while others struggle with nasty hook-on ladders over high freeboards. We have all added wood treads to the rungs for comfort.
I would like to know more about catamarans
Hello Drew, I enjoy your tips and have a need for one I have not seen addressed. We are in our mid 80s. We have a Fuji 35 Ketch with davits on stern. In order to access the dinghy my practice was to lower the dinghy then climb over the stern and literally drop several feet into it. That is getting a little concerning now and especially since we live and boat out of Juneau AK. I asked the davit manufacture if they had any idea on how to release the dinghy without me leaving the deck so that I could use the painter to bring it amidship where we have folding ladders. They had no solution. The stern shape of the Fuji 35 does not make an easy way to place a stern ladder. Any ideas?
Interesting. Overhanging transoms do make stern ladders more difficult. In my case, I had a catamaran, so I built transom extensions; you then walk down the transom staircase, use the davit tackle for a hand hold, and step aboard the dinghy. For less able passengers, I then release the dinghy and bring it ageist the extensions, like a floating dinghy dock. That won’t work for you. A few half-baked ideas that perhaps you can build on.
Perhaps you could disconnect the top end of the davit tackle (which I presume you can reach) after the dinghy is lowered into the water and drop it into the dingy. Long extension cords to the top shackles will allow you to hold them, along with the painter, as you walk the dinghy around to midships ladder. When you return you revers the process, using the extension to re-attach the tackles. Wire gate carabiners may be the handiest connector for the top end of the tackle, since they are strong and easily clipped on and off with one hand. They will NOT release under tension and I have used them on the bottom connectors for 20 years.
Perhaps a short, fixed transom ladder, just enough to enter the dinghy but not for swimming. It need not be normal ladder width, just wide enough for the feet. A gate in the stern rail will help. Then it will be just a few steps down to the dinghy. If there are waves and when I get older, I think I prefer my first suggestion; less fall potential.
As for pulling the dingy alongside, a long painter will do. don’t forget fore and aft spring lines from the dingy to cleats or the toe rail, so that it does not move around while under the midships ladder.
With respect to the section about DIY boarding ladder treads:
– A notched end will only work with intermediate treads where the rung is a butt joint against the vertical stile. The notch is easily cut with a coping saw, or a hole saw, forstner bit or spade bit. In cases using these drilling techniques, to avoid the bit “walking” since it’s center will be a half circle hanging off the end of the tread, simply butt two treads’ ends to each other with clamps on top of a single sacrificial board underneath two. Now, drill your hole on center of their mating seam cutting two half circle notches at once.
– For the situation where the tread is for the bottom of the ladder and the ladder’s stiles are one continuous loop of stainless steel, the corners of this loop will not be sharp 90 degree butt joints and the notch will not fit into the upright sections. In this case, a router with half-round bit (1/2″ shank only) and a fence on the router or, the table saw technique mentioned can “carve a roundish groove over the length of the tread. But…there is more to the table saw approach than simply clamping a board diagonally to the tablesaw’s top. First. the height of the saw’s blade is the final depth of the groove. Don’t start at that height–it’s too much for the blade to cut with its side as you force the wood diagonally against it. Begin with an 1/8″ which also allows you to confirm your jig’s position. Adjust as necessary then proceed in 1/8″ increments. Secondly, use two fence boards, one on each side of your tread stock to contain the stock securely. Otherwise, the wood could inadvertently get away from and be dangerously catch the blade and create havoc. For further safety, the jig should be positioned diagonally beginning at the lower right (nearest you) and progress away to the upper left–from SE to NW approximately.
Note: Most table saws’ tops will not provide a simple method to secure these two fences. Therefore, use a larger sheet of 3/8″-3/4” plywood to cover the table saw with the blade completely lowered. Fasten the plywood down to the table then turn on the saw and raise the blade while its running to at least the minimum final height. Now you have an excellent surface to attach both fences and can easily lay out their location(s) easily adjust their position, too.
Note: The table saw technique will create an elliptical, not a circular arc. The more diagonal versus a fixed blade height, the more circular it will become but you will quickly exceed the width of the rung before you hit the depth of the groove you wish for.
Finally, for fastening these rungs down, I like to secure them with a counterbore on the centerline two holes for oval-head SS machine screws. Drill both holes first on the tread confirming they pass through the center of the groove you’ve milled. Then clamp onto each rung and drill one hole through the tread and the rung. Fasten one screw with at least a nylock nut and better still, an “acorn” cap nut. Drill the second hole and fasten.