

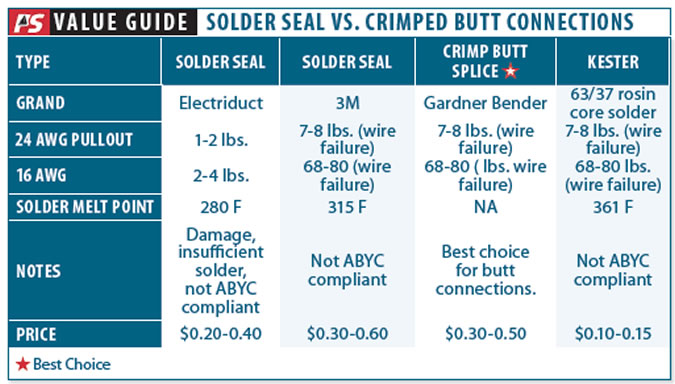
The popularity of micro-electronics and LEDs has greatly increased the number of small wires on board, and whether the added eyestrain is a fair trade-off for a lighter, more energy efficient boat depends upon your perspective. Fortunately, some welcome accessories are relieving the headaches associated with joining two wires of tiny diameters-at times as small as button thread.
We have reported on crimps, screw terminal blocks, corrosion inhibitors, soldering, solder seal, and wire nuts. Here we address the growing number of clamp and friction connectors for joining one or more wires.
Most new boats contain at least some rail-mounted terminal blocks (aka terminal strips), connections strips designed to join multiple conductors, often from the same cable, at one location. These blocks typically indicate compliance with DIN (German Institute for Standards), or UL (Underwriters Laboratory), two widely applied standards for electrical connectors. DIN terminal blocks come in a variety of connector types. A KEMA-KEUR certification (a prelude to approval in the European Union) is another indicator of quality, as is the NEMA stamp (National Electrical Manufacturers Association).
In damp locations-in the bilge or up the mast-a tight crimp made using a properly adjusted ratchet crimper and sealed with adhesive-lined heat shrink remains the gold standard. Not much else will hold up for long. But in dry cabin spaces, such efforts, especially for non-essential systems, may be overkill.
ABYC Standards
The American Boat & Yacht Council (ABYC) is fairly explicit about what connections are permissible under its voluntary guidelines, but there is a lot of wiggle room:
Wiring connections shall be designed and installed to make mechanical and electrical joints without damage to the conductors. [No solder-only connections.] The connector cannot breaks or damage fine strands]
Metals used for the terminal studs, nuts, and washers shall be corrosion resistant and galvanically compatible with the conductor and terminal lug. Aluminum and un-plated steel shall not be used for studs, nuts, and washers.
Terminal connectors shall be the ring or captive spade types.
EXCEPTION: Friction-type connectors may be used on components if:
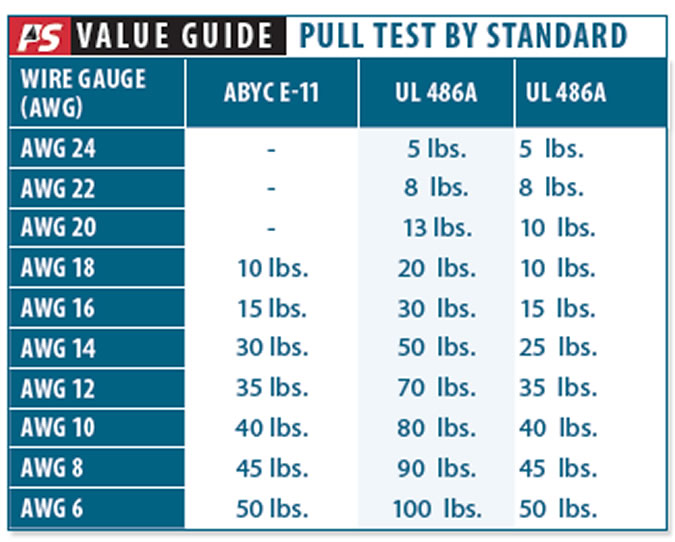
1) The circuit is rated not more than 20 amperes or the manufacturers rating for a terminal designed to meet the requirements of UL 310, Electrical Quick-Connect Terminals; or UL 1059, Terminal Blocks, and 2) The voltage drop from terminal to terminal does not exceed 50 millivolts for a 20-amp current flow, and 3) The connection does not separate if subjected for one minute to a six-pound (27 Newton) tensile force along the axial direction of the connector, on the first withdrawal. [The UL 486C requirement is 10-25 pounds for wire nuts and spring clamp splices, depending on wire size, and 30-70 pounds for screw-clamped terminal strips.]
Connections may be made using a set-screw pressure-type conductor connector, provided a means is used to prevent the set-screw from bearing directly on the conductor strands. Some choc block and DIN rail connectors have these, and some do not . UL 486A and C, referenced by the Coast Guard, also emphasize the need for protecting wire strands from direct screw contact.
Types of Fittings
Based on our testing, barrier blocks (aka terminal strips) with screws for joining ring-eye terminals are the preferred option. The connections are easy to inspect, clean, and protect with a thin coating of corrosion-inhibiting grease. But this option isn’t always the most practical. Lets look at the alternatives.
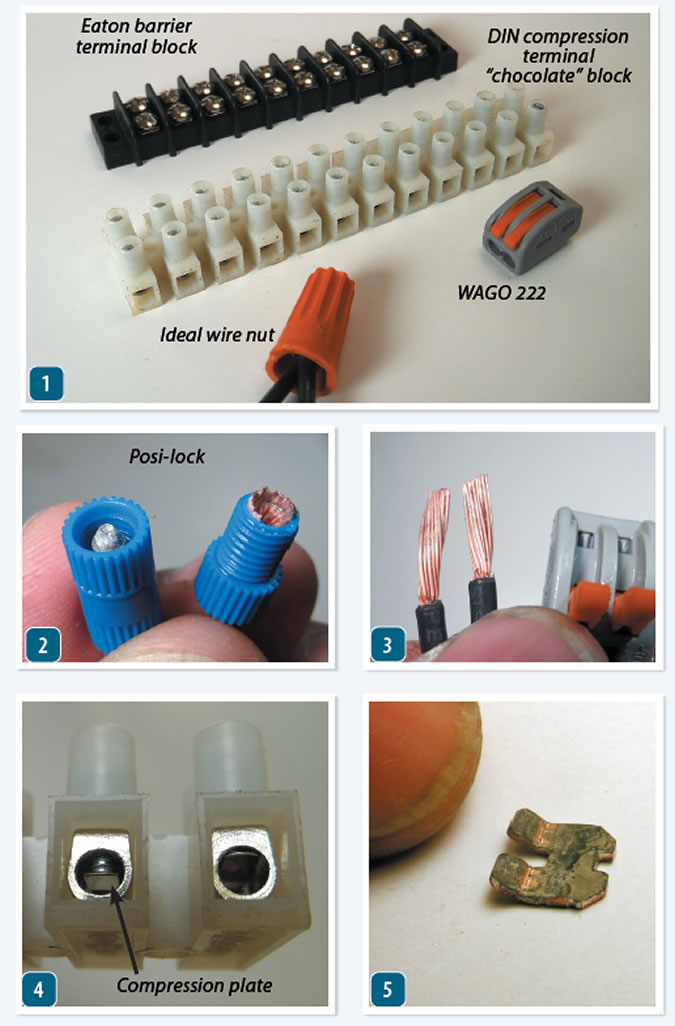
DIN rails. These rails provide a modular platform for terminal blocks. Newer boats use these rails to mount wires, connectors, and switches. They provide a compact, orderly way to organize wiring. Use aluminum rails; thinly galvanized rails sometimes corrode, making service difficult.
Spring-loaded connections. Common in household 120 volt wiring, the wire is simply stripped and forced into a hole. These are only rated for solid wire. They may be compliant if you crimp pins onto the wire ends, but we avoid them. This problem is most often encountered when installing 120-volt outlets using what amount to household outlets; use only receptacles that accept ring terminals.
Screw Terminal Block. This group includes so-called choco blocks, short for chocolate blocks, because they can be snapped to length. If there are at least six screws, they can be screwed to a panel with two screws. A set screw bears directly on the wire strands. They are only suitable for solid wire, which are explicitly banned by ABYC. Coarser strands (16 AWG larger) THHN wire will hold up reasonably well, but fine instrument wires are normally ruined.
A preferable subset of the screw-terminal block style includes a compression plate. The set screw pushes on the plate, and the plate secures the wire. There may be a few subtle grooves to increase friction, but nothing that can damage the strands. For wires smaller than 20 gauge, consider neatly doubling the end if you can’t get a good bite. These are ABYC compliant, so long as the components are tin plated and meet the corrosion resistance and galvanic compatibility requirements, which they ordinarily do. It may be acceptable to insert more than one wire to add branches, but only in smaller gauges.
Barrier Blocks. The standard for most marine applications, these are very secure if the wires terminate with crimped-on rings or retained fork fittings. Better quality blocks are constructed of tin-plated copper and stainless steel, and are very corrosion resistant. With the addition of jumpers, you can add branch circuits.
Wago Lever-Style Connectors. These are most often used free floating as a wire nut replacement, but they can be DIN rail mounted with addition of a matching mounting bracket and can be panel-mounted using a matching strain relief bracket. They operate much like a rope clutch; raising a lever lifts a spring loaded clamp, allowing even thinly stranded wires to be easily inserted. Lowering the lever locks the wire firmly in place. Like a jammer, if the lever is raised again, the wire can be removed, and they can be used over and over again.
Soldering the ends stiff is often suggested as a way of increasing durability with many of these connector types, perhaps even making the push-in, spring loaded type safe. This is not true. Under high mechanical load the solder will deform, loosening the connection and allowing strands to cut. If the connection is overheated (and this does not need to be to the solder melting point) only enough to soften it ever so slightly-the wire will deform and the joint will come loose. Cycled a few times, they can literally fall apart. Tinned wire is OK, but do not prep the wire ends in any way other than twisting. Crimping a pin onto the wire end should be a last resort, and weve never seen the need for it on a boat.
Because there is no crimp or heat shrink to provide strain relief, be careful to support wires within a few inches. Weve seen a lot of small instrument wires snap off due to vibration.
Posi-lock. Superficially resembling Sta-loc rigging terminals, we had high hopes. To install on SAE wire, strip the wire back as directed. For tinned marine and THHN machine wire, strip about 1/16 inch less than described by the instructions, or a bit of uninsulated wire may be exposed. Insert the wire until it extends about 1/16 inch past the opening. Thread the ferrule onto the center portion and snug tightly.
There are other types, but they are not suitable for stranded wire.
How We Tested
The UL 486 procedures require cycling to 150 percent of rated current. We pull tested our samples cold. We left samples semi-immersed in seawater for one month to simulate a few drips and condensation. These connector styles should never be exposed to weather or used in damp locations, but for our purposes, it is always best to seek the most water resistant type.
Eaton Barrier Block
We used these same blocks in PS saltwater spray chamber testing of crimp connectors in 2008 and know them to be effectively corrosion proof. They are as strong as the wire and can be firmly screwed down to a panel. These take more time to install than other methods, but when combined with crimped and sealed rings, they are suitable in humid environments.
Bottom line: These connectors take more time, but with care they are bullet proof and Best Choice.
Eaton Terminal Block
Although barrier blocks are our first choice for landing larger wire gauges, this these serve a definite purpose for terminating smaller wires and transitioning from fine instrument and lighting wires to larger wire (fits 26-14 AWG). Make sure there is a compression plate and snug very firmly.
Bottom line: Recommended. Look for KEMA-KEUR certification.
Ideal Wire Nut
Although a little strenuous to get tight, they tested well, passing UL requirements. And yet, weve seen them turn into rusted blobs and fall off inside a box in our house because they either were not twisted on tightly enough, the wrong size was used, the wires were not properly pre-twisted, or the stripped length was too short. ABYC does not allow them and the US Coast Guard only allows them inside electrical boxes. Available in a wide range of sizes.
Bottom line: Not for use on boats.
Wago 222
These connectors fit 24-12 AWG, you can easily change wires, and you can test voltage while they are connected. Only wire 18 AWG and larger meet the ABYC pull out strength requirement (6 pounds) for the category. They are not waterproof and the corrosion resistance of the buss bar is limited. Although handy, theyre not as secure as a wire nut.
Bottom line: If you use these, relieve from all strain and install inside a junction box, preferably sealed.
Posi-lock
Although they resemble rigging terminals, the pullout strength is less than that of a good crimp. You could seal them with adhesive-lined heat shrink, but this eliminates the convenience and ease of disconnection. Without sealing, our corrosion testing revealed a poor connection and damage to the internal cone. Motorcycle and car enthusiasts seem to like them, but they don’t have to face salt. Tool-free installation is handy, but not enough. Available from 26-6 AWG, each unit fitting several sizes.
Bottom line: We wont be using them.
Conclusions
When connecting to equipment, you arent always given much choice, but at the very least, examine the terminals and add additional strain relief as needed. We can see the attraction in terms of time savings, reduced reliance on operator skill, and fewer errors. Crimping, soldering, attaching wire nuts, and even tightening screws in terminal blocks require learning skills and attention to detail. However, neither the Wago 222 and Posi-lock lived up to expectations.
When transitioning from small wires to running wires, we use crimps in wet locations, barrier blocks with ring terminals in humid locations, and terminal blocks and other pressure terminals in dry locations. As for lever connectors, in our view, tight, clean connections triumph over clever design.

We looked at the wide range of connector styles on the market, and found weaknesses with each. No matter which style you choose be aware of its vulnerabilities, inspect regularly, and protect against corrosion.
- Eaton barrier terminal blocks with screws terminals and insulating barrier walls between conductors, are our preferred means of joining most wires. Set screws on the DIN chocolate block adjust the compression plate. The Wago buss bar uses levers to control compression. Although the Coast Guard allows wire nuts (in enclosures), they are a poor choice for yachts.
- Posi-lock connectors allowed too much corrosion and wire damage.
- Wago connectors are difficult to seal, allowing water to wick up the wire. Note signs of wire corrosion after one month
- Screw terminal choco block showing compression plate. Cheaper blocks simply have a screw bearing directly on the wirea poor design.
- The internal Wago buss bars show considerable corrosion of the tin coating after one month.
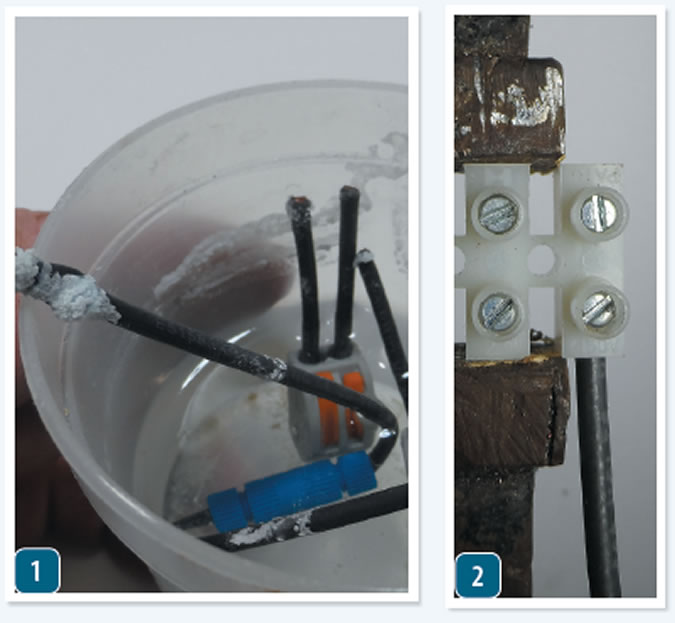
As part of our wire connector test, we left samples semi-immersed in seawater for one month to simulate a few drips and condensation. These connector styles should never be exposed to weather or used in damp locations, but condensation or splash can happen anywhere; best to be safe.
-Both the Wago and Posi-lock connectors allowed moisture to wick up the wire inside the insulation, allowing to corrosion to invisibly spread.
-The terminal “chocolate” block is set up in the vise for pull testing. All pull tests results were recorded with a digital scale.


