

As most sailors have found, trying to use a typical laptop WiFi card to connect to a marina or yacht club hotspot doesn’t cut it. A more acceptable compromise is an amplified WiFi card which can theoretically boost transmission power to about 1,000 milliwatts.
Practical Sailor has reviewed several solutions for boosting your WiFi connectivity on board, including the 5MileWiFi (January 2009), the Bitstorm, Wave WiFi, and The Wirie (April 2010). Reader Ed Mini of Mystic, Conn., recently wrote us about his DIY approach to ending his frustrations with lackluster Internet connections while aboard Margalo, his Columbia 8.7 (bought new in 1977). His setup includes some of the same components as systems weve tested, but his is more affordable than the off-the-shelf systems that PS has tested, and is easy to set up. Although PS has not yet tested this particular device, we have used some of the components. Mini said it has given him flawless performance for two seasons.
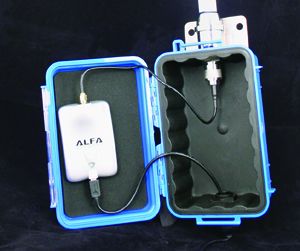
Minis setup uses the same amplifier as The Wirie but it costs less than $100, compared to The Wiries $250 pricetag. The installation takes about an hour and requires no electrical know-how. Instead of using a watertight box as The Wirie does, Mini uses PVC fittings from Home Depot, which he claims are completely watertight. Except for the PVC, he bought all of his materials online at Data Alliance. Data Alliance also sells the Ubiquiti Bullet2 wireless access point ($40) used in the two other WiFi systems we reviewed in the January 2009 article on marine WiFi systems.
INSTALLATION DETAILS
Amplified WiFi Card: The card is an Alfa AWUS036H ($27.50); Minis is rated at 500 milliwatts, but the latest version is rated by the manufacturer at 1,000 milliwatts.
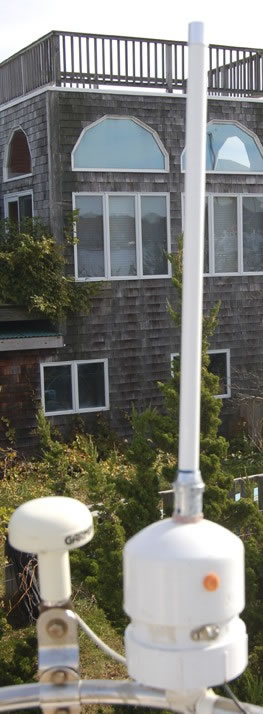
Antenna: The antenna is a 2.4 gHz, 24-inch, 8.5-decibel vertical antenna ($18) with an N-type female connector at the bottom. Although Mini did not buy the marine antenna listed on the Data Alliance website, the marine version is only a few dollars more.
Software: You will need to install the driver and interface for the chipset in the new Alfa card. This cards chipset is a Realtek 8187L; the proper PC or Mac driver and the interface utility can be found on the Realtek website, if its not included with the card. [Owners of newer Macs should check Alfa website for software, see comment below.]
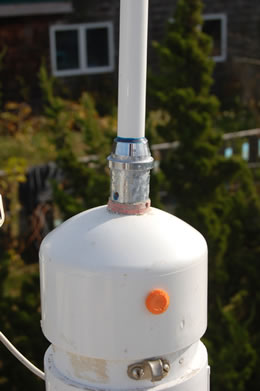
Housing: The PVC container assembly comprises a 3-inch diameter pipe that is 6 inches long, with a matching domed cap and a screw-on base. (About $10 total for the parts.)
Accessories: Mini used a 10-inch-long coaxial pigtail (RP-SMA male to N male) to connect the card to the antenna. To connect the Alfa Wi-Fi booster to his computer, he used a 2-foot-long USB male mini-B to male mini-A adapter cable to start the cable run. After that, he used an an active repeater USB cable to connect to the computer. The active USB cable contains a small booster that is needed to overcome any signal loss over the length of the wire run. The cable is only 12 feet long, but multiple active USB cables can be daisy-chained together for longer runs. Although most instructions for this sort of installation call for a coaxial cable, using it would quickly negate any signal gain from your new amplified antenna.

INSTALLATION DETAILS
1. Install the driver and utility to the computer. (If you need help with this, find the nearest teenager and ask for help).
2. Using the USB cables, coaxial pigtail and required adapter, assemble the antenna components for testing. The sequence of components, working from your computer to the 8.5 dB antenna is as follows: computer, active USB cable (2 or more if needed), USB male mini-B to USB male mini-A adapter cable, Alfa WiFi adapter, pigtail adapter, 8.5 dB antenna. Be sure the booster in the active USB cable (a conspicuous bulge) is at the end farthest from the computer. When testing, remember that you will NOT be using the internal WiFi software; you will be using the Realtek utility that comes with the card. Click on its icon; the Realtek management screen will appear.
3. To build the PVC housing, first drill a hole in the domed PVC cap to take the base of the antenna. The base of the antenna is too short to leave enough threads for screwing on the retaining ring, but Mini was able to secure his by snugging up the coaxial pigtail to hold it all together.
4. Cut a hole in the screw-on base-cap to let the USB cable exit the bottom. This hole should not be in the center of the base-cap, as it might interfere with any threaded center-mounting arrangement.
5. To secure the card inside the PVC pipe, cut a 2-inch-long piece of scrap wood so that it fits snugly inside the pipe, then glue it in place. Mini glued the card to the wood insert, but one could easily use adhesive Velcro tape, which would allow you to more easily remove the WiFi adapter, if needed.
6. Cut a hole in the base to hold a mounting clamp if you intend to mount the antenna on deck. (Mini modified a standard antenna rail clamp.)
7. Drill a couple of quarter-inch holes in the cap to make it easy to disassemble using a long screwdriver for leverage. Fill the holes with earplugs to keep water out.
8. Put everything together. The antenna will stick out the top, the USB cable will come out of the bottom, and the antenna mounting clamp will be on the bottom-center-and all will be waterproof.
9. If you want to be able to hang the antenna in the rigging for greater range in some places, you can screw on a small ring-eye.


Needs more pictures or a detail presentation of the actual build process