

If you are looking at your hull and thinking about stripping back all the bottom paint and perhaps applying a barrier coat, here are some practical tips on getting it done quickly using a paint stripper, with the least amount of pain. Before you embark on this project, you’ll want to look at our recent article on estimating the amount of work that is required, as well as our in-depth report on chemical paint strippers, which looks at the best chemicals to use. This article, redacted from PS Technical Editor Ralph Naranjo’s extensive report on removing paint in the March 2009 issue, looks exclusively at the tools and techniques that add some mechanical umph to the chemical paint removal process. If you have your own specialized tools or techniques for this tedious work, we’d appreciate your input.
Paint removal using a paint stripper is a little like dental work in that there’s no one perfect tool and getting the job done usually requires a tray full of devices-from multiple scrapers to sanding tools and sanding discs.
The arsenal of hand-scraping weapons used during our test of paint strippers ranged in caliber from a lightweight, extra-thin and narrow scraper sharpened to a knifes edge to what old shipwrights referred to as a slick. This heavyweight king of the chisel family was kept sharpened with a whetstone and had the mass to plow into thick paint buildup and peel the substrate evenly. Drag scrapers utilize a pulling motion, and the key trick-of-the-trade is keeping a file handy to regularly sharpen the blade.
The downside of scraping paint from a surface goes beyond the drudgery and sore arms and shoulders associated with such toil. The real drawbacks are the nicks and gouges that result from even a slightly misaligned scraper. When the paint removal is completed and the surface has been thoroughly washed and inspected, its time to repair the scraper damage with an epoxy filler. This is done at the same time blisters in the laminate are repaired. To reduce the potential damage from scrapers, you can round the scraper corners and be very careful when a chisel is used for heavy-duty paint removal.
Sanders
We found that Feins 120-volt AC random orbital vacuum-assist sander is a double-barrel winner. Not only is it a vigorous, efficient sander, but the dust and residue collection system is superb. Even so, we did need a conventional disc sander to tackle the really tough stuff, and not having Feins version of this tool, we were content with using a medium-duty, two-speed Hitachi sander/polisher-a tool for many occasions.
A heavy and powerful Bosch grinder is an aggressive option, but it needs to be used with a deft hand and would be good for removing coatings from a steel hull.
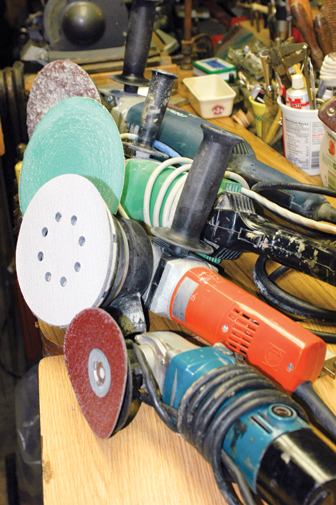
Sanding Discs
Heavy-duty sanding discs used on soft pads transmit considerable torque, and conventional Stikit type adhesive-backed discs often fly off soft pads like sharp-edged Frisbees. To solve this problem, 3M (www.3m.com) and others have switched to backing discs with an attachment system called Hookit. This three-dimensional securing system provides a Velcro-like connection between the disc and pad. Even 36-grit paint buster abrasive discs stay stuck to the pad. When it comes to less abrasive grits, the product from 3M was a favorite. Fein offers 150-millimeter diameter discs with a hole pattern matched to its soft pad. These abrasives are expensive, but they allow the vacuum system to work at its optimum level.
Here are a few tips that can help you save time in your bottom-paint stripping enterprise.
- A file and a whetstone for sharpening scrapers are the bottom strippers best friend.
- Heavy-duty rubber gloves, leather work gloves, and disposable latex gloves are a must. A hat, eye protection, and particle mask round out the required safety gear.
- The choice of drag scraping or push scraping depends on the hull contour and your body position.
- A small stool and step ladder can make the job easier.
- Roll on the paint stripper using a thick-nap roller and a wide dabbing brush.
- Use masking tape to help hold the stripper covering-paper or plastic-in place.
- Remove blistered and flaking paint by first dry scraping, and then attack more reluctant areas with stripper.
- Lightweight, back-vented coveralls effectively balance the need for heat dissipation and skin protection.
If the paint-stripper process seems too overwhelming, you may want to consider hiring someone to soda-blast or peel your hull. In our review of soda-blasting services, we got a first-hand look at how these operations work. In the end, we determined that the price of this service was well worth the time (and back muscles) saved.


Two years back, I decided to take my hull down to the fiberglass and redo it all. I’d stayed with CSC Micron, which the previous owner had used, and it was miserable stuff to sand – at the first touch of a sander, I would vanish in a choking cloud of pink dust.
I made the best decision ever, and decided to try soda blasting. I was their first sailboat, but they did an excellent job, and, in a day, had completed a job that would have taken me most of a week of misery. They left a tiny strip just below the boot stripe, and the nuisance of taking just that much off the next day confirmed that it was money well spent.
Assuming that you have competent people doing it, I highly recommend soda blasting.
I removed 40+ years of botom paint from ½ of my Catalina 27 hull over the weekend.
We laid down poly dropcloths, peeled off as much as possible with stiff narrow putty knives (sharpened with a file every few minutes) then sanded…and sanded. I may use a stripper for the trickyest spots, but one thing is for sure. I would not sand an inch of it without a good quality sander/grinder with excellent dust pickup from a hepa filter vac. I am a woodworker and use the Festool line of sanders and vacs, but there are others out there that doo the job just as well.
I guess my point is Err on the side of gaurding your health and local environment. We collected about 70 pounds of paint chips and more in the vac. The cleanup after would have been nearly impossible without those precautions. Inside our tyvek suits, gloves, and respirators, we stayed clean. Outside we looked like blue Smerfs.
Hoping to have the same result on the starboard side.
Apparently doing everything the right way. Principally, using a respirator.
save your lungs and the environment 😎
The above statement is incorrect:
“The random orbital sander spins in an elliptical pattern to minimize swirl marks.“
The pattern is actually “orbital“, as the tool’s name suggests.
Swirl marks mostly result from failure to advance to successively finer grits.