

Practical Sailor Technical Editor Ralph Naranjo sets out to remove a few layers of bottom paint and the underlying Interlux InterProtect epoxy barrier coat, which was applied to his boat hull in 1982. While non-toxic, eco-friendly paint removers work well on removing antifouling paints, one-part enamels, and varnish, all bets are off with epoxy coatings. With a good selection of chisels, a penchant for keeping them sharp and no aversion to hard work, Naranjo battles the pock-marked, blistered barrier coat. His arsenal included three chemical strippers-Peel Away Marine Safety Strip, Peel Away Smart Strip, and Franmar Soy Strip, an array of sanding disks, and random orbital sanders. His report offers how-tos, tool tips, and a rundown of the costs associated with the DIY barrier coat removal to answer the question: Is it really worth doing it yourself?
****

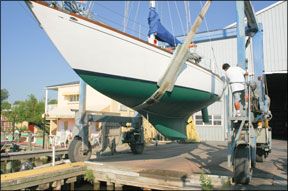
Photos by Ralph Naranjo
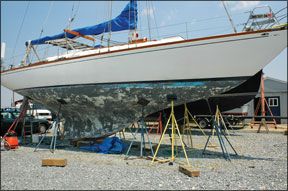
Peeling off bottom paint is a miserable job, but tackling five coats of barrier coat can make a root canal something to look forward to. Last year, Practical Sailor Technical Editor Ralph Naranjo took on this unenviable task to rid the bottom of his Ericson 41, Wind Shadow, of antifouling and decades-old Interlux InterProtect.
Sizing Up The Job
Barrier coating was a new concept in 1982, and by the time Wind Shadows retrofit after an around-the-world cruise was complete, the bottom had been scraped and sanded down to bare gelcoat, some minor blistering had been repaired with an epoxy filler, and five coats of Interluxs first rendition of InterProtect had been applied.
Since then, antifouling paint layers, like geological strata, have ranged from Interlux Micron 22 and 44 to Micron CSC-each product happily stacked on top of an enduring InterProtect barrier coat.
Twenty-five years later, the paint began to blister, and it was time to roll up my sleeves and tackle a challenge dreaded by every boat owner.
A bit of poking and prodding revealed blistering between barrier coats only, rather than deeper blistering between the laminate layers. Only a few blisters penetrated the still intact gelcoat, and for the owner of a 39-year-old Ericson 41, this was as good as bad news could be.
The project was a good candidate for grit blasting. Soda blasting would likely not be abrasive enough to remove the epoxy barrier coat, and a coarser aggregate would have to be chosen. The cost estimate would be in the $50- to $100-per-foot range. Unfortunately, the blasting process would eliminate the evidence I was looking to investigate. And so, like some sort of coatings archaeologist, I diligently began exploring the blistered and flaking regions of the hull.
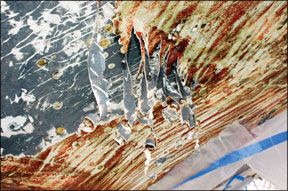
My evaluation found that the failure mode with 98 percent of the blistering was uniform and manifested itself as a loss of adhesion between the first and second layers of barrier coat. In this strata, the blisters ranged from pea to quarter size, and many had been torn open under the pressure of the washdown that followed the haulout.
The majority of the others easily flaked open with the prodding of a scraper, causing me to think that manual removal of the coatings would be an easy task after all.
As soon as I moved from the blisters to the area immediately adjacent-which was still intact-epoxy reasserted its reputation as an enduring adhesive. The intact barrier coat stuck to the hull like a thumb and forefinger bonded with Super Glue. After some misleading easy scraping of flaking barrier coat, the epoxy paint proved to be immune to assaults with a scraper. This meant that 75 percent of the paint removal process would be anything but a walk in the park.
Stripper Showdown
Modern non-toxic, eco-friendly paint removers do a wonderful job of removing antifouling paint, one-part enamels, and varnish, but when it comes to epoxy, all bets are off.
So, with a good selection of chisels, a penchant for keeping them sharp, and no aversion to hard work, I prepared to do battle with the pock-marked barrier coat. The first dry-scraping resulted in some slow progress-the effort seemed a sequel to sawing through jail-cell bars with a fingernail file. As my shoulders and arms grew weary, the thought of using a chemical stripper grew more and more appealing.
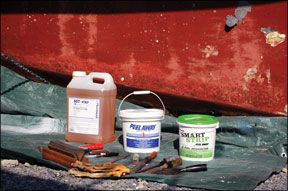
I had three popular products to test, Soystrip by Franmar, and Dumond Chemicals Peel Away Marine Safety Strip and Peel Away Smart Strip. The ensuing comparison led to a better understanding of how to put these products to best use.
Practical Sailor
previously tested Marine Safety Strip and the Soy Strip on
antifouling paints in the April 2008 and November 2006 issues. Past tests suggest both work well on various paints, and that temperature can affect their performance. But overall, testers favorites were the Soy Strip and another product made by Dumond, West Marine Paint Remover.
The paint strippers in this test werent as quick to take off the epoxy barrier coating as they had antifouling paints. The dwell times to remove bottom paint in past tests and this evaluation ranged from 30 minutes to 24 hours. But against the epoxy coating, dwell times stretched up to 36 hours.
Because of the longer dwell times needed to soften the epoxy coating, we tried testing them with and without a covering-Peel Aways proprietary paper for the Dumond products and a 1-mil clear plastic for the Franmar stripper. The coverings helped reduce solvent evaporation and kept the coating moist and chemically active. (See “How We Tested.”)
The table above shows how each product fared against the barrier coat at certain dwell times. Note that none made the barrier coat easy to remove, even after 36 hours. However, all of these products were superb antifouling paint removers. In just a few hours, the bottom paint softened and the residue could be scraped easily from the surface. But at that point, the epoxy barrier coat remained as hard as a rock.

At 12 hours, it was still resistant to being scraped, and at the 24- to 36-hour point, the uncovered paint stripper had gone rock hard and barrier coat removal was nearly as arduous as it was on the untreated surface. The good news was that the covered strippers fared much better, and at the 24- to 36-hour point, the epoxy paint had begun to soften, allowing a scraper or sharpened chisel to peel the coating from the surface.
Bottom line: Peel Away Marine Safety Strip nudged ahead of Soy Strip and Smart Strip to take line honors as the chemistry of choice when it comes to heavy-duty epoxy paint removal. Its creamy consistency was least likely to splatter when layed on with a thick-nap roller. Its color showed up clearly on the surface, and the Peel Away paper covering was easy to use. The paper costs about $20 for 110 square feet. Less expensive covering options are clear plastic sheeting or butcher paper, shiny side up. We do not recommend using the strippers without a covering when trying to strip an epoxy barrier coat. If you have plenty of time to wait it out, the Franmar Soy Strip will eventually soften the epoxy paint to a point where it is easily scrapable, but the Marine Safety Strip was a bit more fast-acting.
Sanding vs. Scraping
On nonblistered portions of the hull, the barrier coat was more immune to the strippers, even after 36 hours of treatment. The solution in these areas was abrasive removal rather than chemically expedited scraping.
Recognizing that less is more when it comes to how vigorously one cuts away at the surface of a fiberglass hull, I started with modest-grit sanding disks (50 and 80 grit), and in the most stubborn areas, I resorted to the 36- to 16-grit disks, aka gravel glued to paper. The final sanding just prior to barrier coating was done with 36-grit discs and followed up with a 50-grit second pass.
I also used a variety of sanders to find the right combination of user friendliness and aggressive action. There has been a revolution in sanders, and boatyard pros have flocked to the Fein (www.feinus.com) vacuum-assist electric sanders. The soft-pad Fein orbital we field tested was a DIYers dream come true. Its combination action and powerful high-RPM motor moved the 150-millimeter soft pad enough to get the final sanding job done in a hurry. The “hook it” type disc attachment system made disc changes easy and eliminated the danger of “thrown” discs.
In stubborn areas, where the barrier coat just didnt want to let go, I tackled the challenge with a conventional medium-duty 9-inch Hitachi (www.hitachi.com) disc sander and 36-grit 3M “stick it” sanding discs. The soft pad helped to prevent gouging. Before resorting to such heavy-duty sanding equipment, be sure youre familiar with it. Little things like moving the disc across the surface before pulling the trigger, and keeping the pad as flat as possible can add up to a more even surface.
In one spot just below the turn of the bilge, I turned to the “big gun” in my sanding arsenal: a powerful, high-RPM Bosch grinder (www.boschtools.com). Armed with a stiff center-hole, hard-rubber flex pad and a 16-grit disc, I had a tool that could reshape granite, and-if I wasnt very careful-could take much more than barrier coat off the bottom of the boat. On one hand, it made the ultra-adhered barrier coat fly off the surface. However, there was no room for a mistake-a slight twist of the wrist could result in a hull divot or the exposure of raw FRP laminate. It was like whittling with a chainsaw, and despite a deep desire to have at it and clean off the surface with my “big dog” grinder, I let restraint prevail and later was glad to have kept the mega-grinding to a minimum. For more on the tools and materials used to strip Wind Shadows barrier coat, check out “Weapons of Choice” later in the issue.
Recoating
Having many times applied barrier coat and bottom paint to other boats using an airless spray system, I was disappointed to discover that the yard where I had hauled had stipulations prohibiting outside paint spraying. However, once I had rolled on four back-to-back coats of epoxy barrier coat and three coats of bottom paint, I changed my opinion. By using foam-roller sleeves and a vertical pattern of paint application, I found that the material spread smoothly and evenly.
By following the manufacturers guidelines on over-coating times, all four barrier coat passes and a layer of bottom paint were applied in one day. Two more coats and a jack-stand shuffle to access the bare spots filled the schedule on the second painting day. Extra antifouling was applied in a band just below the boot top, zincs were replaced, and what took over two weeks to remove was reapplied in two days.
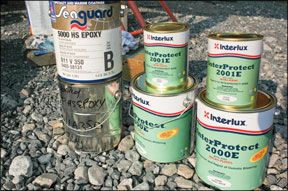
Not being able to resist the opportunity to do some additional testing, I applied Interluxs InterProtect 2000E ($82 per five-quart kit) to half of the hull and Sherwin Williams Seaguard Epoxy 5000HS ($57 per two-gallon kit), an industrial epoxy coating system and a prime candidate for underwater use as a barrier coat, on the other half. The long-term evaluation will see how well each holds up and if there are any adhesion problems between the coatings and the Interlux Micron CSC bottom paint that was applied.
Bottom line: High marks have to be given to Interlux InterProtect for keeping Wind Shadows solid FRP hull free from interlaminate blistering for over two decades. The difficulty in removing the barrier coat is a testimony to its adhesive quality.
Sherwin Williams Sea Guard was easy to apply and formed a smooth surface, but the InterProtect was even more user friendly. Time will tell which barrier coat holds up better in the long run.
The Practical Sailor Vault
For its last comparison of barrier coatings (June 15, 1991), Practical Sailor commissioned fiberglass-analysis lab Comtex Development (Bridgewater, Mass.) to test a variety of products. Eleven coatings underwent the water transmission of materials (similar to the ASTM E 96-80 standards test) and overcoat exposure tests. The test products were Ashland 7241 isophthalic polyester, Aristech 12262 general purpose polyester, Pettit Polypoxy, Awlgrip 545, Courtaulds Coatings VC Tar, Devoe Coal Tar, CopperClad, System Three epoxy, WEST System epoxy, Interplastic VE8117 vinylester, and Interluxs InterProtect 2000/2001.
Although this lab test did not consider ease of application or adhesion, testers came up with two top picks: WEST System and InterProtect.
For more on this test, “The Blistering Truth,” and other free blister-related articles, visit www.practical-sailor.com and click on Tools and Techniques. The Aug. 1, 2004 issue offers a former boatyard professionals adventures with a DIY blister fix, and the July 15, 2001 issue, in “Hull Blisters: Know the Enemy,” gives an update to the 1991 tests as well as a crash course on the anatomy of a laminate.


I was interested in learning more about Seaguard Epoxy 5000HS as a barrier coat. I am researching this question while currently stripping the hull of our FRP sailboat and looking for the product providing best balance of performance and cost. What I have read thus far in spec sheets about 5000HS seem to suggest it is for steel, aluminum and galvanized (or for previously painted surfaces that are prepped). I have some experience with the products used by the industrial marine industry. If this is a successful barrier coat for FRP that has been stripped to gel coat, I am interested. What has been the results of this test application?