

Whether by choice or force of circumstance, increasing numbers of us are sailing out of marina slips rather than off moorings. For anyone using a slip or dock as home base, a dock box is a handy receptacle for spare lines, fenders, paint, varnish, tools, and miscellaneous gear. Also, a solid dock box can make a useful, if low, work bench, and sometimes serves as a step for a boat with high topsides.
288
The smallest, lowest priced, commercially available dock boxes sell at discount for nearly $200, and the cost can go up to over $300. Hence, making a box yourself can save you a good deal of money.
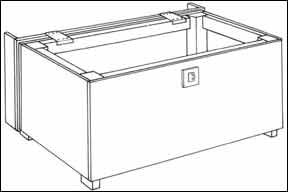
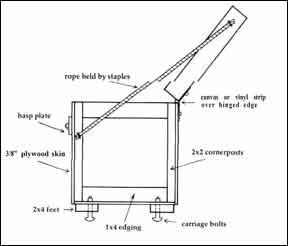
The illustration shows the construction of a basic, plywood-skinned box with notes on material sizes or scan’t- flings. As you can see, construction is simple enough so that even a beginner can make a good job of it.
The size of the box should, at a minimum, be 4′ by 2′ by 2′. If space and regulations permit (check your local conditions and regulations) a box up to 8′ long can be useful. Lengthening the box much above 5′ will require the addition of another pair of blocks or feet to support the center of the box. The box is bolted to the dock by carriage bolts driven up through the dock, the support blocks, and the box itself with the nuts inside the box. Since carriage bolts have no edges or slots on which a wrench or screwdriver can get hold, only someone with access to the interior of the box and, hence, the nuts, can easily remove the box. Use 3/8″ diameter galvanized bolts.
When measuring and cutting the top, allow extra length at either end so that 1″ x 3″ side pieces may be attached, and allow an additional extra inch at the front so that after the top is hinged, the 1″ x 3″ front piece will clear the front edge of the box body when swinging closed. Although the exact front to rear depth can be worked out on paper, it’s easier to allow a bit extra, mount the top temporarily, and then work out the exact dimensions with trial fittings.
While several different types of hinges could be used, two or three simple, stout, bronze or galvanized steel hinges will rust away in a salt atmosphere. The hinges should be set in mortises cut deep enough into the upper, rear edge of the skin and 1″ x framing so that the top of the box, when fastened to the hinges, lies flat, level, and flush on the top of the lower part of the box when closed.
If deep-leaved hinges are used, the 1″ x 4″ framing may require additional layers of wood in the way of the hinges so as to supply adequate landing places for the hinges. Fasten the hinges to the box body with long screws or bolt through the framing. Once again, use galvanized screws or bolts with galvanized hinges, bronze fastenings with bronze hinges.
288
While no dock box is proof against a really determined thief, casual vandals can be discouraged by bolting the hinges to the top. Use round head bolts with the heads outside. The bolts should pass through the top and hinges, and, after the nuts are drawn tight, the exposed, excess threaded shank should be cut short, then peened over. If this is done, and a stout hasp and lock are used at the front, the box will have to be torn apart before a vandal or thief can get to its contents.
As already mentioned, 1″ x 3″ side and front pieces on the edges of the top should come down outside the perimeter of the box body, and these will prevent most water from entering those sides. The plywood that forms the top should overlap its 1″ x 3″ framing. The rear edge must be weatherproofed by a canvas or vinyl cloth strip running the length of the joint between the top and back of the box body. The edges of the strip should be held down with lengths of metal half round: brass, galvanized, or stainless steel.
Despite these efforts, some water will always find its way into a dock box, so a few drainage holes should be drilled in the bottom. Be sure, however, to fasten screens over them to discourage rodent residents. Half inch square “hardware cloth” (which is heavy wire mesh and not cloth at all) works well.
Because the front lip of the top extends beyond the face of the lower part of the box, there must be a pad mounted on the face of the box on which to bolt the hasp.
If used, the rope stopper shown on the construction section should be installed on the outside of the box. If installed inside, the part attached to the top must be clear of the sides and, inevitably, will get in the way.
Each individual will have his or her own ideas about shelves, hooks, and removable bins for the inside of the box. Happily, wood construction allows for easy customizing or later modification.
As already mentioned, construction is simple and easy, a matter of straight cuts and butt joints. But let’s think a bit here on materials.
Ideally, the box should be made of the best materials: oak or mahogany for the framing, marine grade plywood for the skin, bronze screws or nails, epoxy glue for all the joints, bronze or stainless steel hardware, and a complete coating of epoxy to seal the wood before painting. Such a box would be fine, but is it necessary?
Dock boxes have rather finite lives. Sooner or later some damned fool is going to drive a boat or a golf cart into the box, or winter weather will destroy the dock and the box.
Adequate materials may make more sense than ideal ones. Lumber yard pine; exterior grade plywood; galvanized nails, bolts, and hardware; and “plastic resin” glue will make a good job . . . plastic resin glue, by the way, is available in hardware stores under a variety of brand names. It’s not the same as liquid white or yellow carpenter’s glue; rather, it’s a urea based powder which comes in cans. You mix it with water to form a syrupy Iiquid. Because it can’t stand boiling, it can’t be called waterproof, only water resistant. For practical purposes on our dock box it’s fine except if you’ve used oak. with which it sets up a chemical reaction.
The plywood should be primed with one of the reasonably priced, special products (like Firzite) intended for the purpose, then coated with exterior enamel. Plywood so treated will check, but a yearly coat of paint will keep it looking decent if not beautiful.
Best materials or adequate one, make your own choice.
-J. Pazereskis


