
")
In Part I of this series, I described the steps we took to set our rebuild up for success. Part II describes our gutting the interior, painting the topsides and designing and installing the interior.
As described in Part I, we chose a Cape Dory 36. The effort expended in rebuilding a substandard boat is going to be the same as a boat with a great heritage. There are lots of boat designs and genres to choose from. But, it’s important to pick a boat that will result in an outcome worth your investment in time, effort, and money.
GUTTING
With the Stimpson Bow Roof Shed built it was time to gut The Far Reach. I removed the Perkins 4-108 and sold it through Craigslist for $2,000. I unbolted, removed, and sold the wheel steering system, the sea frost refrigeration, jib furler, sails, and sail covers. I removed all the plumbing, interior systems, and through-hulls and seacocks. I removed as much wiring as I could get to before I removed the interior furniture. Next, I attacked the deck, removing all the hardware, ports, hatches, cleats, coamings, bowsprit, and toe-rail. I set aside the parts I could sell with what would go to the dumpster.
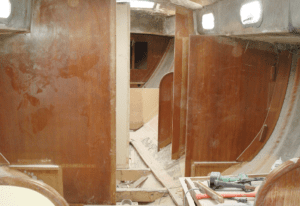
In the beginning I thought I would be able to reuse some of the interior so I was careful in removing it. In retrospect my thinking was a flight of fancy. The most effective use of my time would have been to remove all the components and hardware and sand the interior and exterior as quickly as possible.
I wasted time by doing this in phases and in retrospect I should have done it all at once in a ruthless manner and been done with it. The tools I used were a sawzall, wrecking bar, a few chisels, a 5-inch DA right angle sander with 40 grit abrasive disks. Later, I discovered the value of a 4.5-inch high-speed right angle grinder with aggressive 36-grit flap wheels. This grinder can be dangerous if not handled carefully. It can do a lot of damage if you are inattentive but nothing will get the job done as quickly.
I left the major structural bulkheads in place because they were in good shape. The rest I removed. I cut the cabin sole out and used the sawzall to remove the “floors.” I cut out and removed the 50 gallon fuel tank from the bilge as well as the integral fiberglass holding tank.
The underside of the deck/cabin had a ¼” thick full length fiberglass liner. Removing it was a big step as the top of the bulkheads were recessed into the liner. I did not like the liner or the way it looked. It was now or never. It was a horrible job but I cut it out in sections. I was surprised by how heavy the liner was.
With the interior removed, it was time to grind and sand the inside of the hull. I ground off old fiberglass tabbing, adhesive, fiberglass fillers, and paint, and smoothed out excess layers of fiberglass supporting the old bulkheads and floor timbers. Then, I sanded the insides of the hull, the bilge, engine compartment, cockpit lockers, chain locker, cabin sides, and under the deck and the overhead.
I went through a half dozen hooded Tyvek paper suits. I wore a 3M 6000 series full face respirator with particle filters, gauntlet gloves (Harbor Freight) and a shop vac with extended hose. The mess was indescribable.
A Dust Deputy mini cyclone attached to my shop vac saved a lot of time by trapping the particulates before they reached the filter. With the grinding complete I went back and sanded the entire interior with the double action sander and 40 grit abrasive paper. I wanted a completely clean interior sanded sufficiently to start the rebuild without having to sand again.
With the interior gutting complete I then sanded the outside of the boat. My boat did not have molded in non-skid which made the job easier. I sanded the entire deck with a right angle DA sander and 40 grit. It took two days to sand the deck. Then, I misted the topsides with black lacquer spray paint so I could see what I was doing and sanded the topsides with 120 grit.
STRENGTHENING
I wanted to eliminate as many through-hulls as possible to limit holes in the boat. Seacocks are also expensive and reducing the number saves money and maintenance. The Far Reach had ten when I bought her. I filled and patched all but three holes with multiple layers of biaxial and epoxy (see Gougeon Brothers Fiberglass repair manual). I retained only the two cockpit scupper drains and the galley sink drain.
I added multiple 1708 biaxial strips to all the bulkheads with radiused foam edges and tabbed the tops of the bulkheads to the cabin top as they had previously been fitted into slots in the overhead liner that I removed. I also installed a series of 5/16” stainless-steel bolts with aircraft lock nuts through the tabbing all the way around each bulkhead to ensure they remained in place should the epoxy tabbing ever separate from the plywood bulkheads. I added biaxial tape under the bridge deck and all the way around the underside of the cockpit sole to stiffen the deck.
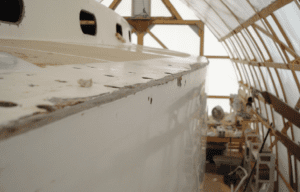
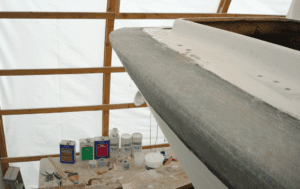
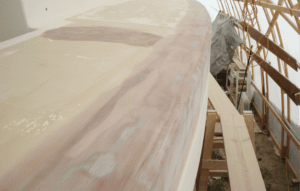
With regards to strengthening the hull, the most important project was glassing over the entire hull-deck joint with three layers of 1708 biaxial and epoxy. Almost all sailboat hull deck joints leak. The Far Reach was no exception. Bedding compound dries out. Hard sailing induces significant stress on the hull-deck joint. Water eventually gets under the toerail and works its way into the boat through the fastener holes ruining gear, clothing, and electronics. I wanted my voyaging boat to be strong but also watertight. I discussed my plan with the West Systems tech team. There were 140 holes through the hull-deck joint—no wonder sailboats leak! I left about half the fasteners and ensured they were countersunk and then covered the tops with thickened epoxy (I should have removed all of them).
Then I radiused the deck edge and ground off the gelcoat. I applied 4-inch, 6-inch, and then 8-inch wide strips of 1708 biaxial all the way around the deck joint—240 linear feet of biaxial fiberglass cloth—in one day. Then I spent about two weeks applying multiple coats of fairing compound and sanding with a long board till I was satisfied with the results. It was hard work.
I removed the teak eyebrow trim (wood strip attached to the cabin top above the portlights). There were 28 holes per side. They leaked too. I chamfered the holes and filled them with thickened epoxy and fairing compound before I sanded the deck and cabin top. I went on to fill a shocking number of holes in the deck with thickened epoxy. I filled all the instrument holes in the back of the cabin top and in the cockpit well with biaxial and faired them smooth.
Next it was time to remove the bottom paint. The paint was old. Unbelievably, it only took eight hours. Wearing a Tyvek suit and a full-face 3M 6000 respirator and heavy gloves, I sanded it off with a combination of sanders and 24- and 36-grit paper. I left much of the previously applied barrier coat.
I did not have the budget for a new inboard engine so I filled in the aperture in the back of the keel (I sailed without an inboard engine for five years) and sanded and barrier coated the hull with five coats of Interlux E2000 Barrier Coat. I applied bottom paint to protect the non UV-stabilized barrier coat.
Even when I was not asking my two mentors for advice I made it a habit, as I still do, to keep them appraised of progress so they had good situational awareness throughout the project.
EXTERIOR PRIMING AND PAINTING
Some experts recommend painting the exterior of the boat last. But, I was sick of seeing the boat sanded and covered with fairing compound. By April 2010 I was satisfied with my epoxy work and fairing of the hundreds of deck holes and the fairing of the hull/deck joint. I degreased the deck and topsides, sanded them one more time with 120-grit abrasives. Then, over a couple days I rolled on four coats of Awl-Quick, high-build primer and spent a week sanding it smooth. It was monotonous boring work.
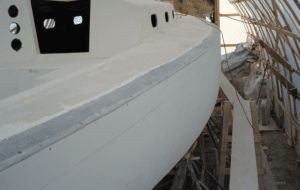
Next, I applied Interlux primer. Then Gayle and I rolled and tipped Interlux Perfection. It did not go well, there were bubbles in the paint. So, I sanded it all off—grrrr—and moved on to other projects. In October of 2011 (better temperature for painting), after I prepped the boat and primed it with Awlgrip 545 primer, I taped it off.
Then, I paid $600 to an Awlgrip certified painter to spray the deck and topsides with Snow White. The boat looked fabulous and it was a joy to walk into the shed and see that beautiful hull looking shiny and new. Though my determination was never in doubt, the change in the boat’s appearance was like a massive shot of energy. I waited till April 2013, after completing numerous deck projects, to paint the non-skid portions of the deck with Kiwigrip.
If we briefly fast-forward to the end of my first voyage to the West Indies in 2016, I can reveal the Awlgrip bubbled all the way around the boat from the waterline to a foot above it. When I returned home we hauled the boat out of the water. Awlgrip sent two tech reps to investigate the bubbling. They determined it was a bad lot of paint on their end.
They sent me a pallet of supplies gratis and in the spring of 2017 Gayle and I rolled and tipped the topsides with four coats of Awlgrip Snow White. It turned out great. The paint looked like it had been sprayed and it has held up well over five years and 8,000 nm of offshore sailing. Rolling and tipping is now my recommended method of painting to others because more paint goes on the boat, it’s an order of magnitude safer to use, and you can do it yourself and save a lot of money.
INTERIOR PROJECTS
The early phase of the interior work actually began while I was working on the exterior, so projects and progress are not perfectly linear and chronological though it’s easier to describe it that way. Nonetheless, with exterior painting complete, I could fully focus on the interior.
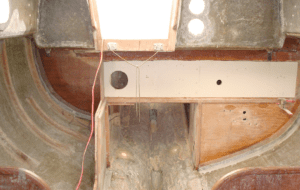
With the gutting behind me, I built a water-tight compartment in the aft end of the bilge should it ever be compromised in a hard grounding. I installed a new forward bulkhead about 12-inches aft of the old one moving the anchor-chain locker a little more aft and a little deeper. This allowed me to create a space forward of chain locker for an all-rope, second bower
I fabricated and installed wood floors and used douglas-fir for floor beams. Then I installed a temporary plywood cabin sole which allowed me to work on a flat surface.
INSULATING
We planned on four-season sailing, so insulating the hull was essential. For the overhead we installed ½-inch Armaflex AP fire-retardant, closed-cell foam. It came with a self-adhesive backing. We cut it with a box cutter and scissors and applied it from the chain locker to the end of the quarterberth and under the side decks as well. Later in the rebuild I installed removable insulated panels I made by sandwiching ¼” blue board between two layers of Reflectix foil bubble wrap insulation I purchased from Lowes Hardware. I sealed the panels with a combination of foil tape and duct tape. We insulated the hull from the gunwale to just below the waterline.

WATER TANKS
The boat originally had water tanks below every berth and a 50-gallon fuel tank in the bilge. There was no place to store supplies and equipment essential to voyaging. Because I removed the fuel tank I decided to install three water tanks there. This would put the weight down low and free up the rest of the boat for storage.
I made mock-ups with cardboard, drew diagrams, and had the tanks built from 3/8-inch polypropylene with baffles by Dura-Weld in south Florida. I installed the tanks on fiberglass trays fabricated with a thin layer of rubber liner between the tanks and the tray. I did not want deck fills to avoid potential leaks. We run a hose below deck to fill the tanks directly.
FUNCTIONAL DESIGN
It seems to me most boat interiors are designed to impress buyers that don’t have much offshore experience. Spacious interiors waste valuable storage space and create widen open areas with nothing nearby to hold or lean on. Instead of pushing the furniture outboard I wanted to pull it inboard to create more space behind and under it and to provide better handholds moving through the boat in big waves. I thought it was more important to have a safe comfortable seagoing interior rather than a comfortable dockside interior.
I sketched several interiors. Gayle and I sat in the boat measuring and talking through various layouts. We decided on 5-foot long inboard settees, with the cushions attached to the locker lids built in three sections. Outboard of the settees were two 6’4” pilot berths with removable light-weight juniper bunk-boards, for max storage under all four berths. The shorter settees allowed space for a cabinet on the forward end on the port side and a Refleks heater down low to the sole on the starboard side.
We chose a stand-up chart table with 3.9 cf icebox underneath and relocated it to the starboard side where previously it had been between the engine and stove. It makes no sense to put the thing you want to keep coldest between the two hottest components on a boat. We put toe-kicks under the sink and chart table cabinets to make standing there more comfortable.
BERTHS
I didn’t want a quarter berth but needed one for the kids, so we compromised. I gave it sea-going dimensions of 74”x24” and raised it about 14 inches gaining more space under and carving out some room for a watch seat. We decided to relocate the stove athwartship. It eliminated the gimbals but also eliminated the risk of burns from being thrown onto the stove or having a hot pot dumped on the cook. We also gained more under counter storage room by this arrangement. Not surprisingly we gained substantial storage space (8’x3’x2’) in the old engine compartment which we trimmed in teak and walnut.
We chose to build a fold-over ash saloon table opening up space for our feet and legs underneath which is lost with a drop leaf table, though I did not complete it till after the boat was launched. The saloon stanchions serve double duty to hold a brackets for oil lamps and as secure handholds offshore.
I designed a sitz tub in the head with gravity-fed 3 gallon pump up spray bottle filled from a 20 gallon water tank located in the port cockpit locker. While the toilet is a bucket and chuck it affair (we use wag bags inshore) the bare teak seat/lid is comfortable (the most comfortable you ever sat upon!) and secure in any sea. Gayle wanted a sink in the head so I cut the closet down and incorporated a small SS basin.
I designed an offset double-bunk in the forward cabin with two layers of massive storage under. We opened up the chain locker for ventilation, to make the boat feel bigger. Our final design eliminated the cabin doors that are hard to use on a small boat and only serve to create small claustrophobic compartments that cut off airflow and foster mildew. We chose pull curtains for privacy.
All this took time to design and a lot of thinking and measuring. Fans of sailing icons Lin and Larry Pardey will see the resemblance between our interior and that of their boat Taleisin. That is no accident. I got aboard Taleisin when she was in Annapolis in the late 1990s and it made a big impression on me. Throughout the build I corresponded regularly with Lin and Larry. They could not have been more helpful. Lin provided detailed measurement of their layout which I confidently incorporated knowing they were proven.
TOOLS AND MATERIALS
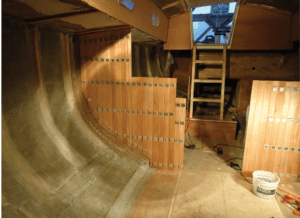
Once the interior arrangement was decided, I began the long task of milling hundreds of board feet of African Mahogany. Kaj Jacobson wrote me a detailed email on how to mill the half-lap V groove staving I wanted. It was not hard but it took time.
The V groove design breaks up large expanses of varnished wood, but also encourages micro ventilation around cabinetry and the cabin sole. I made a couple hundred screw clamps assembled with screws, washer, and small blocks of wood covered in packing tape to clamp the staving to the bulkheads while the epoxy cured. I then drilled out the screw holes and filled them with hundreds, if not thousands, of wood plugs.
I cut the plugs with a Fuller plug cutter on the old hand-me-down drill press. Gayle and I varnished the interior with six coats of Epiphanes high gloss varnish. Gobs of time can be saved by eliminating the paneled interior but it was an important part of my vision.
Cabinet doors I made my first inset-raised panel cabinet doors using Bird’s Eye Maple panels and mahogany for rails and stiles. I purchased quality interior brass hardware from White Chapel Hardware in Jackson Hole, WY. They gave me a significant builder’s discount.
Overhead. I wanted a traditional white V-groove overhead. Kaj Jakobson explained how. I built templates from doorskin ply and a hot glue gun. I traced the patterns over ¼” BS 1088 okume ply. Then, I use a guide bar and a router with a V bit to cut the grooves. I filled the grooved edge grain with epoxy as well as the back side of each panel. We painted the overhead with white Interlux Brightside. All the panels are removable.
Ports. With most of the interior installed and varnished it was time to install the ports. Before we painted the boat I had filled all the holes with thickened epoxy. I wanted them watertight. Tim Lackey wisely advised me not to use bedding compound under the interior flange—”Water should not get that far and if it does you want to know.” I made sure there was a substantial gap around the spigot.
With the ports installed, but trim ring off, I forced butyl rubber into the gaps from outside. Then I filled the trim ring with bedding compound and tightened them down for good squeeze out. Seven years later we have never had a drop of water get though.
Cabin Sole. I wanted to make the cabin sole bare teak and completely removable but the cost was out of this world. So, I chose black walnut instead. It is hard, stable, durable, and locally harvested. I used the same black walnut for bulkhead trim and left it bare too which is more durable than varnished trim.
The planks are secured by barrel bolts but can be removed in five minutes and all the water tanks can be sitting on the dock in 45 minutes. Then, the bilge can be washed out keeping the boat interior smelling fresh.
Next month I’ll describe the building of the spars, splicing wire rigging, converting from wheel to tiller, and the deck projects, etc.
CONTACTS
STIMSON BOWROOF SHED, www.bow-roof-shed.com Stimson Bowroof shed
MCMASTER CARR, www.mcmaster.carr SS fasteners, abrasives, rubber liner
JAMESTOWN DISTRIBUTORS , jamestowndistributors.com Assorted supplies, biaxial cloth
DEFENDER, www.defender.com Assorted supplies
WEST SYSTEMS, www.westsystem.com Epoxy and technical support
AWLGRIP, www.awlgrip.com Awlgrip topside and primers
INTERLUX, www.interlux.com Brightside paint
PYC INC., www.pycinc.com Kiwigrip Nonskid
WORLD TIMBER , www.worldtimbercorp.com Mahogany, iroko, ash, exotic woods
IMPULSE TRADING, www.impulsetrading.com BS1099 ply, Coosa, teak, hardwoods
DURAWELD, www.dura-weld.com Custom water tanks
WHITECHAPEL-LTD, www.whitechapel-ltd.com Brass interior hardware
ARMACELL, www.armacell.us Arma-flex AP closed-cell foam
GROCO, www.groco.net IBVF seacocks
DURAWELD, www.dura-weld.com Custom watertanks
WWW.SPARTANMARINE.COM, www.spartanmarine.com Bronze hardware
PORT TOWNSEND FOUNDRY, www.porttownsendfoundry.com Custom bronze casting
MYSTICRIVERFOUNDRY, www.whitechapehl-ltd.com Custom bronze castings


