Our test involved a cross-section of the myriad products that are on the market for making underwater repairs.
In our recent test of waterproof epoxies for making underwater repairs, we also looked into making underwater patches. Obviously, your success in this effort depends a lot on the situation and the size of the repair. And luck.
A common scenario is that only part of the damaged area is underwater. A boat that has been holed just below the waterline can sometimes be heeled on the opposite side of the hole, so that only part of it is submerged. Another common situation is that you are making repair in a flooded bilge inside the boat. With fortune on your side and the right tricks, you can make a pretty serviceable patch in either of these scenarios.
Here are some of the things we learned during our recent test of underwater epoxies.
Laminating resin. It must be relatively thin and capable of both bonding and curing underwater. West Systems G-Flex will do that.
Cloth. You want to do this in one layer, so you need something that both conforms well and builds some strength. Two layers of 1708 biaxial fiberglass is a good choice.
Prepare the surface. Bottom paint needs to be sanded off to bare fiberglass. Use course wet/dry sandpaper.
Pre-wet the cloth on dry land. This is the key. Pour the resin onto the cloth, spread, and work through the cloth using a laminating roller. Ideally, this is done on top of peel ply, but a plastic trash bag will work perfectly well in a bind.
Apply. With the peel ply still in place, dive under the boat and press firmly over the desired area. Working from the center, slowly work your way outwards to make a good bond. Leave the peel ply in place.
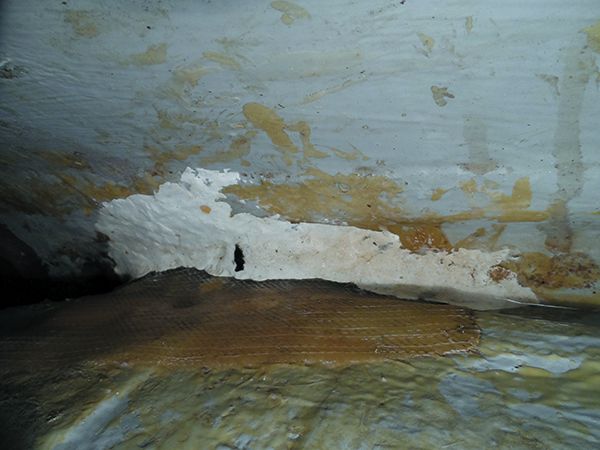
WaterWeld plugged an active leak next to this centerboard trunk. Stronger, more substantial laminated repairs would be possible once the leak was stopped.
There are two reasons for using peel ply. One is for ease of handling in the water. Although we usually work pre-laminated cloth without peel ply on dry land, it makes handling it in the water much easier. Because the cloth will initially stick to your hands more than the boat, the peel ply makes the patch much easier to apply. Finally, if there is still some inward leakage, the peel ply prevents the water flow from blowing the resin through the cloth and creating leaks.
Once resin is cured, you can remove the peel ply if you want to, but there’s really no need to for an emergency repair, other than to inspect your work. Just leave it.
You can buy a kit for this (compositepatch.com). It comes prepackaged, with resin and fabric in a bag. At over $250 for a few square feet it’s rather expensive, but it makes for neat work in awful conditions.
In the late 80’s and 90’s there was a material nicknamed the “Green Death” by commercial fisherman on the West Coast. it was put out by 3M a 2 part thick epoxy that could be applied underwater using presure to exclude the water between epoxy and hull. I fortunately had some with me when I hit an object in the water that left a deep hole in the bow just below the water line. Was able to get bow partially out of water and applied the epoxy to hull. It held for the remainder of my voyage in Baja and out to the South Pacific and on to a new owner.
I highly reccomend it but do not remmeber the exact name of product.
It is probably “Splash Zone” epoxy, now made by several companies. I patched a 2″ puncture a foot below the water line that has lasted 4 years on a concrete hull.
It very well could have been Splash Zone. However, many of the underwater epoxy products are green, including StarBrite and Total Boat. JB WaterWeld is white.
The key is to clean the surface the best you can, and then continue to kneed the epoxy onto the surface until there is a good bond. This will take a few minutes; it won’t stick right away or without this effort.
I used a green underwater epoxy in the 90s called Navtex. It was a putty that you let start to set up a little before shoving it into the hole/crack to form a plug. Timing was key to prevent it from sagging or being too firm to squeeze in, but it would cure underwater just fine once in place. This followed with the wetted cloth on pealply would work well I bet.
Another crude, but perhaps effective material is toilet sealing rings. A local guy who recovers boats after hurricanes always leaves for the Gulf Coast with a case of these rings. They are used to seal a residential toilet to the floor fixture, and are a waxy, gooey material. The goo gets in to the fiberglass fracture, and the wax doesn’t dissolve. Of course, it leaves a mess, but the crack is sealed and any repair will grind off the entire area. Toilet rings would appear to be a cheap, low tech solution to have aboard for hull cracks.
Stay Afloat is a softer version of toilet bowl wax that has gotten a few positive reviews, but PS has not tested it. I have used it to plug an undergound steel vault leak (water was shooting up two feet!) long enough to weld a patch over it, so it certainly rates “plausible” in an emergency.
In 1984 I used “Spash Zone Compound” to repair a damaged area on the bottom of the encapsulated keel. I had hit and pounded on an uncharted pinnacle rock off the coast of Turkey. That evening I dove on the keel, and outlined how much damage. I mixed up about a pint of the Splash Zone Coumpound, put it on wax paper, backed by cardboard and then wooden batons. I pressed this under the damaged area. Then I wrapped several lines all around the boat and tightened them using a “Spanish Windlass” technique. Seven months later I hauled the boat, and ground out this area to do a proper glass repair. I was amazed at how far into the cracks the Splash Zone Compound epoxy had penetrated. It was an excellent repair technique.
Although it conforms to CE ratings for ocean sailing, this boat is better suited for coastal cruising in comfort and short offshore passages. It's got a great set of layout options for living aboard.
This website uses cookies and other tracking technologies to offer you a better experience, personalize content and ads, and analyze our site traffic. Before proceeding, you agree to our Terms and that you’ve read our Privacy Policy. Update Settings
Functional
Always active
The technical storage or access is strictly necessary for the legitimate purpose of enabling the use of a specific service explicitly requested by the subscriber or user, or for the sole purpose of carrying out the transmission of a communication over an electronic communications network.
Preferences
The technical storage or access is necessary for the legitimate purpose of storing preferences that are not requested by the subscriber or user.
Statistics
The technical storage or access that is used exclusively for statistical purposes.The technical storage or access that is used exclusively for anonymous statistical purposes. Without a subpoena, voluntary compliance on the part of your Internet Service Provider, or additional records from a third party, information stored or retrieved for this purpose alone cannot usually be used to identify you.
Marketing
The technical storage or access is required to create user profiles to send advertising, or to track the user on a website or across several websites for similar marketing purposes.
To provide the best experiences, we use technologies like cookies to store and/or access device information. Consenting to these technologies will allow us to process data such as browsing behavior or unique IDs on this site. Not consenting or withdrawing consent, may adversely affect certain features and functions.
Functional
Always active
The technical storage or access is strictly necessary for the legitimate purpose of enabling the use of a specific service explicitly requested by the subscriber or user, or for the sole purpose of carrying out the transmission of a communication over an electronic communications network.
Preferences
The technical storage or access is necessary for the legitimate purpose of storing preferences that are not requested by the subscriber or user.
Statistics
The technical storage or access that is used exclusively for statistical purposes.The technical storage or access that is used exclusively for anonymous statistical purposes. Without a subpoena, voluntary compliance on the part of your Internet Service Provider, or additional records from a third party, information stored or retrieved for this purpose alone cannot usually be used to identify you.
Marketing
The technical storage or access is required to create user profiles to send advertising, or to track the user on a website or across several websites for similar marketing purposes.


In the late 80’s and 90’s there was a material nicknamed the “Green Death” by commercial fisherman on the West Coast. it was put out by 3M a 2 part thick epoxy that could be applied underwater using presure to exclude the water between epoxy and hull. I fortunately had some with me when I hit an object in the water that left a deep hole in the bow just below the water line. Was able to get bow partially out of water and applied the epoxy to hull. It held for the remainder of my voyage in Baja and out to the South Pacific and on to a new owner.
I highly reccomend it but do not remmeber the exact name of product.
It is probably “Splash Zone” epoxy, now made by several companies. I patched a 2″ puncture a foot below the water line that has lasted 4 years on a concrete hull.
It very well could have been Splash Zone. However, many of the underwater epoxy products are green, including StarBrite and Total Boat. JB WaterWeld is white.
The key is to clean the surface the best you can, and then continue to kneed the epoxy onto the surface until there is a good bond. This will take a few minutes; it won’t stick right away or without this effort.
I used a green underwater epoxy in the 90s called Navtex. It was a putty that you let start to set up a little before shoving it into the hole/crack to form a plug. Timing was key to prevent it from sagging or being too firm to squeeze in, but it would cure underwater just fine once in place. This followed with the wetted cloth on pealply would work well I bet.
Another crude, but perhaps effective material is toilet sealing rings. A local guy who recovers boats after hurricanes always leaves for the Gulf Coast with a case of these rings. They are used to seal a residential toilet to the floor fixture, and are a waxy, gooey material. The goo gets in to the fiberglass fracture, and the wax doesn’t dissolve. Of course, it leaves a mess, but the crack is sealed and any repair will grind off the entire area. Toilet rings would appear to be a cheap, low tech solution to have aboard for hull cracks.
Stay Afloat is a softer version of toilet bowl wax that has gotten a few positive reviews, but PS has not tested it. I have used it to plug an undergound steel vault leak (water was shooting up two feet!) long enough to weld a patch over it, so it certainly rates “plausible” in an emergency.
In 1984 I used “Spash Zone Compound” to repair a damaged area on the bottom of the encapsulated keel. I had hit and pounded on an uncharted pinnacle rock off the coast of Turkey. That evening I dove on the keel, and outlined how much damage. I mixed up about a pint of the Splash Zone Coumpound, put it on wax paper, backed by cardboard and then wooden batons. I pressed this under the damaged area. Then I wrapped several lines all around the boat and tightened them using a “Spanish Windlass” technique. Seven months later I hauled the boat, and ground out this area to do a proper glass repair. I was amazed at how far into the cracks the Splash Zone Compound epoxy had penetrated. It was an excellent repair technique.