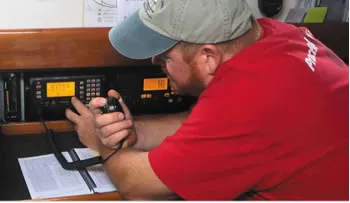
Photos by Frank Lanier
In our first article on marine single sideband, or SSB, radios, we discussed the relevancy of SSB and the benefits of having one onboard (particularly as compared with satellite communications), and we offered a market scan of the more popular radios available (see PS November 2014). The goal of this report is to delve into the SSB installation process, to introduce some popular accessories, and to present an initial report of our field testing; a more in-depth field test report will follow in an upcoming issue.
A typical SSB system comprises four main components: a radio (including any remote displays); an antenna tuner; the antenna itself; and the ground plane (also called the counterpoise). Worries about how to operate an SSB are often the first concern when buying an SSB, and a close second would have to be the expense and complexity of the installation itself. Do-it-yourselfers will typically find that installing the radio, remote display, and antenna tuner is no more difficult than installing any other onboard electronics, such as a VHF radio or a chartplotter. The challenge comes with the antenna and the ground plane.
Although Icom, the maker of our test radio (an Icom M802) does not make antennas or recommend specific brands, its general instructions call for a backstay antenna-which involves cutting your backstay and installing insulators-or a whip antenna (rarely used on sailboats). The Icom M802 manual also expresses a preference for a conventional ground plane such as a bronze ground plate (Dynaplate), copper mesh, and/or copper tape, the latter two often combined with existing bronze through-hulls to complete a path to the water (not necessary, but usually beneficial).
Our goal was to evaluate some of the more novel (and in some cases, controversial) products into a single system and conduct some long-term testing to see whether they provide acceptable performance-both lab testing and real-world use. In the past, weve found that these shortcut SSB installations fall under the no pain, no gain heading (we had to work to get that pun in), but given the reports weve gotten from other users, we were optimistic.
What We Tested
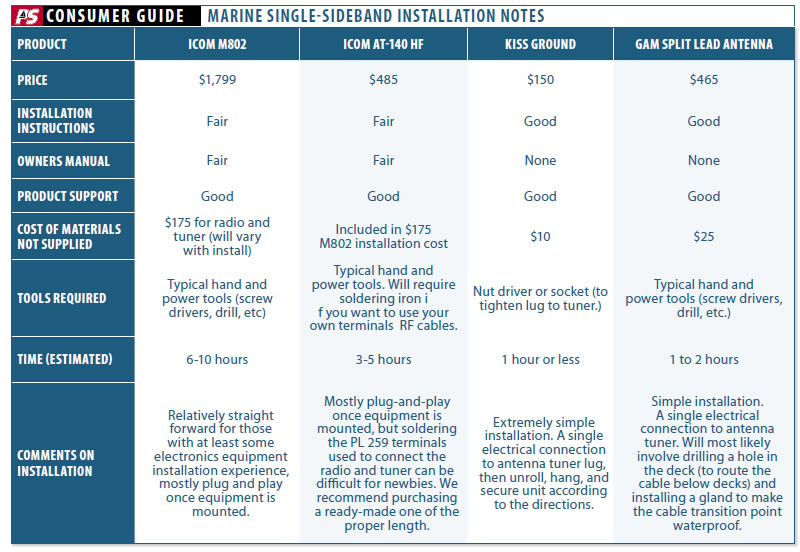
In our search for an easy SSB installation, we tested three products. Icom, a global company whose product line includes communications equipment and products based in the marine, avionics, land mobile, and wide-band receiver industries, provided us with its popular M802 SSB radio. GAM Electronics-a producer of high-quality, high-gain antennas for commercial fishing and consumer recreational vessels since 1958-provided its GAM/McKim split-lead SSB antenna. And Seattle-based Radio-Teck/KISS-SSB sent us its popular KISS-SSB ground plane/counterpoise.
How We Tested
Armed with a stopwatch and infinite patience, we installed each of the units according to the manufacturers instructions aboard our test boat, a 1978 Union 36 cutter. Testers evaluated them over a seven-month period while cruising along the Atlantic East Coast and northern Bahamas. This article describes our test installation, the components we chose (and why), and installation basics. Although our experience using the installed components in the field will be summarized in the conclusion, findings regarding performance are only preliminary. A full bench-test evaluation of the systems functionality will be covered in our next SSB report.
Installation comments
Confirming manufacturers easy-installation claims, testers were able to install the Icom M802, AT-140 tuner, KISS-SSB, and a GAM over a two-day period, although thorough planning and preparation made a big difference in efficiency. Nothing kills installation momentum like having to make multiple trips to the store for connectors, wire ties, tools, and other necessary parts that youd forgotten during the planning stage.
For do-it-yourselfers, a number of excellent books show how to install an SSB system. Three good manuals to have on hand are the Marine SSB Radio for Idi-Yachts, The Icom M802 Radio Manual for Idi-Yachts (both by Capt. Marti Brown), and Volume V Icom M802 Starting from Scratch by Commander T.L. Sparks. No license is required to install an SSB system, and the books from Brown and Sparks will be a big help when planning your installation.
Savvy dealers have also helped alleviate the grounding and antenna challenges by adding self-install kits to their product line. Some companies like Dockside DSR (www.docksideradio.com) have built a business around selling DIY antenna/counterpoise kits, and walking cruisers through installation process.
That being said, if you have zero electronics installation experience, this is probably not the best project to cut your teeth on. Having access to someone with SSB installation experience (whether a professional electronics technician or a knowledgeable fellow boater) will be a welcome avenue of assistance to the novice installer.
Including a conventional ground plane and antenna to the system will likely add another full day of work to the project, and depending on what your groundplane is, it may involve a haulout. This can quickly hike up the cost of an installation.
Icom M802
We selected the Icom M802 for our SSB system test based on features, functionality, ease of operation, and its overall popularity within the cruising community. We liked many of the features that have made the M802 so popular, particularly the fact that it can be used on both the marine HF and amateur radio HF frequencies (with the appropriate licensing). Testers also liked that the M802 included a large, easy-to-read LCD display as well as the quick, easy channel selection provided by the two large dials.
The system that we tested included the M802 transceiver, RC-25 remote control head, external speaker, and Icoms most popular antenna tuner, the AT-140. Since the transceiver for the M802 is separate from the control head, you have more options for installation. On our test vessel, we installed the control head at the navigation station while mounting the transceiver itself in an out-of-the-way, unused space beneath the chart table. This space was only 4 feet away from the batteries, reducing the length of wire runs. We mounted the AT-140 approximately 10 feet aft of the transceiver in the lazarette and as high as possible on the bulkhead. This brought it closer to the antenna, and above any possible accumulated bilge water.
Photos courtesy of John MacDougall
GAM Split-Lead SSB Antenna
Although the manufacturers description of the GAM split-lead antenna notes a number of benefits, the biggest draw for most sailors is undoubtedly ease of installation.
You can install an SSB antenna a couple of ways. On sailboats, the normal practice is to insert insulators in the backstay to create whats correctly referred to as a random-length end-fed wire antenna (as opposed to a long-wire antenna, which would be a wire antenna that is multiple wavelengths long).
Insulated backstays are fairly complex to install, and many boat owners cringe at the thought of cutting their backstay to install the needed insulators. In this type of installation, a measured length of the backstay is cut at the bottom and the top, and the cut section is re-connected with insulators. The jury is still out on the risks of having an insulator fail. Some riggers regard them as no less vulnerable than other components, so long as you follow inspection and replacement guidelines. Others avoid them. It is safe to say that it is preferable not to cut the backstay, but it is a convenient option that has generally stood the test of time.
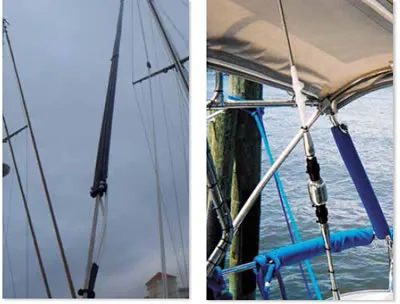
The GAM is a split-lead SSB antenna (which simply means that it has twin radiating elements) that eliminates the need for backstay removal and cutting. The center tube of the antenna housing is split, which allows users to put it on the backstay and slide it up to the desired height for the bottom of the antenna housing (15 feet or less from the connection to the tuner).
In addition to ease of installation, the manufacturer touts greater electrical conductivity and no shock hazard, etc., although the risk of shock from a backstay is minimal, and most backstays are large enough to compensate for the lack of conductivity compared to copper.
The GAM antenna housing is constructed of tough, ultraviolet-resistant, low-density polyethylene (LDPE) and is 1 5/16 by half-inch thick and fits backstays from quarter-inch and 7/16-inch in diameter. Overall, the GAM antenna is 34 feet long-so youll need a backstay that is at least that long to install it-and weighs 6 pounds.
We found the GAM split-lead antenna to be robust, well made, and extremely easy to install. From open box to mission complete, the entire process took our one-man installation team less than an hour. No muss, no fuss, and no special tools needed.
Once we slid it into place, we secured it at the base with the simple plastic clamp provided. For extra security, you can also add nylon wire ties (provided) every 4 feet during installation.
The GAM is also easy to uninstall, so its no problem to remove it for inspection, stowage, or in order to transfer it to another boat.
As to possible downsides to the GAM, it will provide a bit more windage aloft than a wire backstay, but this should be negligible. According to some experts we spoke with, the split-lead design is more temperamental, less efficient than a traditional backstay antenna, and can interfere with the operation of other onboard electronics due to coupling (i.e. closeness of GAM to the backstay).
We saw no noticeable interference problems with the GAM during our field trials, but we intend to explore this in more depth for our next article. GAM recently announced a new grounding product called the Pensum, which is their version of the KISS SSB.
KISS SSB
If you thought the GAM was controversial, the KISS-SSB is an even hotter topic in cruising circles. This product, which eliminates the need for a traditional ground plane, generates more fist-shaking and SSB tech-nerd name calling than arguments over exactly how many jigowatts it takes to energize a flux-capacitor.
The KISS-SSB is described as a self-contained, tuned counterpoise radial ground system-a fancy way of saying that instead of actually being connected to ground, it contains radials (wires) cut to specific lengths designed to resonate throughout the marine and ham frequencies.
The perfectly measured lengths of copper and marine sealed coils act as an exact mirror image of your radiating backstay, whip, or GAM antenna, the maker explained. This is what bounces your radiated signal wave off your antenna.
These radials are housed in a 1-inch, sealed tube roughly 10 feet in length, with a 4-foot lead at one end that attaches to the ground/counterpoise lug on your tuner.
As with the GAM antenna, the big attraction for the KISS-SSB is ease of installation. Many traditional installations utilize a capacitive ground system comprising copper-foil strips (often 100 square feet or more) routed throughout the vessel and attached to every major metal onboard component along the way (fuel tanks, water, etc.). Spreading copper mesh on the inside of the boat is another approach.
A seawater ground (a direct connection to sea water using a through-the-hull ground plate, etc.) is considered by many to be the gold standard for a ground-plane, but this will involve putting an additional hole in the boat (although an unbonded bronze through-hull may also be another option). In either case, the installation headaches are there. As such, its easy to see the allure of the KISS-SSB: no holes below the waterline for installation of a bronze plate and no copper foil or copper mesh to install.
We found the KISS-SSB to be robust and extremely easy to install. Installation consists of connecting the lead to your tuner and stretching out the tube containing the radials. According to the instructions, you can run the radials pretty much anywhere-along the hull-to-deck joint, behind cabinets, underneath bunks or cushions, in the lazarette, etc. Running the tube in a straight line appears ideal, however the instructions note that a sweeping turn or even a sweeping U-turn are also acceptable.
It appears that the only installation rules that you can’t bend are that the 4-foot lead can’t be trimmed, and if the radials are coiled, the coils can’t be less than 3 feet in diameter.
Installation of the KISS-SSB aboard our test boat took about 30 minutes, including the time needed to wiggle into the lazarette to route and connect it.
Some experienced HAM operators will say that they can build their own version of the KISS-SSB for less money. While thats likely true, most sailors can’t-and even if they could, the time spent would probably exceed the purchase price, and it likely wouldnt look anywhere near as good.
Conclusion
Of the three products we installed for this evaluation, the Icom M802 is pretty much the best-known entity with regards to performance and reliability. It also brings the least amount of controversy to the table. In other words, while someone may prefer a different radio, theres no ruckus as to whether the M802 actually works as designed.
The same can’t be said with regard to the GAM or KISS-SSB. Despite hundreds of reportedly satisfied customers, there is no solid consensus among amateurs or professionals as to how well either of these work. The KISS-SSB bears the brunt of the criticism as many techies argue that it is technically not a tuned or resonate radial, as advertised. In their view, two random pieces of wire crimped into the bilge or lazarette would do just as well, and indeed such an arrangement would also work to some degree. Well explore this further in Part 3.
In our view, the answer to the question, Do these products work? is not easily answered with a simple yes or no. They worked well during our test cruise, but we werent trying to reach Madagascar, nor have we completed bench testing their performance. A more reasonable question to ask is whether they meet your needs. Theres no doubt that an ardent SSB or HAM enthusiast can install a better system and tweak it to connect with similar enthusiasts half-way around the world. But, if a less tech-savvy user can more-easily enter the world of SSB by installing a system with minimal fuss that meets all their needs to check email or speak with other cruisers in their corner of the world, is it a bad system?
During our preliminary tests, weve used the system for both voice communications and email (see product update on top right ). It has worked perfectly so far during our initial email checks, which are pretty easy to assess.
The voice checks have been harder to evaluate due to a number of variables, including weather, time of day (which determines which frequencies to use), location, and the quality of equipment on the vessels we conversed with. We hope that more testing with these products will provide a more definitive answer in Part 3.