

Even the most dedicated sun worshipper craves shade after a bright, hot day on the water. For those of us whose goals include keeping our skin intact over time, a way to get out of the sun is imperative if we are to enjoy being in the cockpit at anchororinaslip. The problem is that few sailboats come equipped with usable shade, at least when the sails are down. The solution to the shade problem is a sun awning.
288
A sun awning also solves another problem, particularly in tropical climates. By keeping the deck shaded, and by preventing the sun from streaming through deadlights and open hatches, an awning is a big help in keeping the temperature of the cabin interior at a habitable level.
An awning can take a variety of different forms depending on your skills, the amount of money you want to spend, and just how much cover you really need. Happily, most awnings are easy to make for anyone with even the most basic sewing skills.
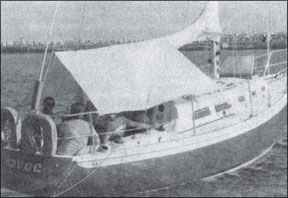
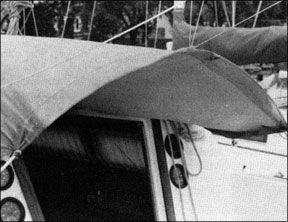
The first illustration shows the most common form of awning, basically a large rectangle of cloth draped tent-like over the boom and secured by cords to the backstay and lifelines. The awning shown is aboard Havoc, and was made by owners Norm and Gloria Drummond in about two hours.
To get the width of the awning, you need to measure from one lifeline over the boom and down to the lifeline on the other side. It’s a good idea to measure this width at the forward end of the awning, in the middle, and at the after end, so that you can taper the awning to fit the changing beam of the boat. Otherwise, you could use a single, average width. Make a sketch, more or less to scale, with the proper dimensions shown to help you visualize the finished product.
To determine the length of the awning, measure along the boom, from wherever you want the awning to begin, all the way aft to the backstay. If they were doing it again, the Drummonds would extend the awning forward almost to the mast to shade as much of the cabin top as possible.
288
You will also need to measure the distance from the topping lift to the backstay. When putting the awning together, you’ll have to make a cut along the centerline of the awning so it can straddle the topping lift. This cut can be joined with snaps, or with loop-and-eye tape (Velcro).
Figure out how many yards of 36inch-wide fabric you’ll need, then add 10 to 15 percent more for seams. Be prepared to refigure the amount of fabric you need when you discover that the fabric you want comes in another width.
You can use almost any cloth for an awning. Many commercially-made awnings use a very light fabric such as ripstop nylon spinnaker cloth. This has the advantage of stowing compactly, but it has the disadvantage of being semitransparent and subject to deterioration from ultraviolet light. If this is the route you want to go, ask your sailmaker if he has any flawed cloth he’ll sell you cheap. You can also buy sailcloth and other fabrics from some mail order discount firms, notably Defender Industries, 255 Main Street, Box 820, Rochelle, NY 10802.
I prefer heavier, more opaque fabrics, such as light- weight denim or oxford cloth, which you can get at a local fabric shop. These natural fabrics or blends can mildew, however. You can reduce the chances of mildew with a commercial mildew-proofer.
Acrilan is a synthetic canvas, available in several colors, and commonly used for sailcovers. At about 9.5 ounces per yard, it is much heavier than spinnaker cloth, but it is easy to sew on a home machine, is mildew-proof, and seems to have good ultraviolet resistance. It is highly recommended for awnings, even though it costs about twice as much as nylon sailcloth.
350
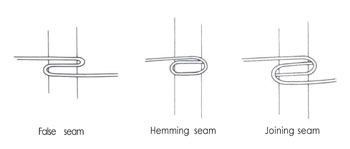
While almost any fabric can be used for awnings, choose a relatively soft material. Avoid anything resembling Dacron sailcloth, which snaps, crackles, and pops in any sort of breeze. Use either white or a light pastel color. Darker colors transmit less light, but they are also hotter. Light colors will tend to show stains, however. For sewing, there are three basic seams you will need to know: the hemming seam, the joining seam, and the false seam. The false seam is used in wide fabrics to keep the material from stretching. False seams were widely used when sails were made of cotton, but are rarely needed with today’s stable synthetic sailcloth. With a soft material, use a false seam in the middle of each full width panel.
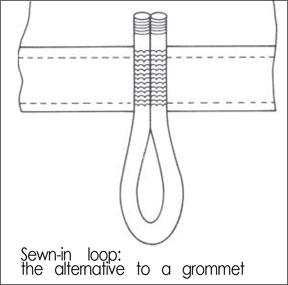
Take care to make the seam widths even. A seam width of about 3/4-inch looks good. If grommets are used in the seams, the seams will have to be slightly wider. Check the size of the grommets before making the seam.
288
An alternative to grommets is a simple loop of light line (l/4-inch or 3/S-inch) whipped at the ends and hand-sewn to the cloth with waxed nylon sail twine. It’s a good solution if you don’t have a tool for setting grommets. Be sure to sew through the line as well as around it when attaching it.
When you’re ready to cut and sew your awning together, install the Velcro or other closure at the cut for the topping lift, and attach the grommets or loops at the appropriate places. Along the side of the awning, every three feet should be about right.
That’s it for the basic awning, but there are other variations you might think about.
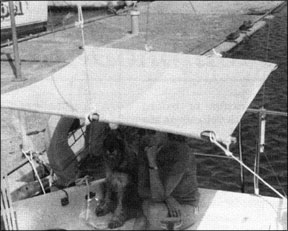
The major problem with the basic tent awning is that headroom is limited, except in the very middle. For this reason, awnings with spreaders, allowing almost full height out to the edge of the awning, are popular. The illustration shows such an awning, based on the one aboard the big yawl Win&go in her salad days in pre-Castro Cuba. The battens slide into pockets to stretch the awning across the boat. The ends of the battens are tied under slight tension to the lifelines or toerails. By adjusting the length of these lines, the awning can be tilted to one side or the other to suit the angle of the sun. As with the simpler design, a longitudinal slit, closed with Velcro, may be necessary to clear the topping lift.
I’ve used aluminum tubing, solid wood, and bamboo for battens, and have found bamboo the most satisfactory. It is light, tough, springy, and can stand a lot of abuse. Because it checks and splits badly, tape it at about 6-inch intervals between the nodes. For awning battens on anything but a really big boat, bamboo of 3/4-inch to l-inch in diameter will do the trick.
288
The only complication in making a battened awning is that the batten pockets must be designed in. It’s difficult to give any absolute figures, but pockets 2 to 3 inches wide, with about 3 to 4 feet between battens, is a good starting point. Usually, ties of medium weight cord are sewn into the ends of the pockets to retain the battens. A small grommet installed on one side of the batten pocket, and a tie sewn on the other side of the pocket works best.
Another type of awning is the low, curved awning. It consists of nothing more than a tapered length of cloth running from the mast to a foot or so aft of the companionway. It is given shape by two curved lengths of aluminum rod which fit into pockets at either end of the awning. The awning is hung from the boom and tied down to the grab rails on top of the cabin.
What this does is create an air space above the cabin top. Though this air space is only a few inches high, it helps wonderfully in keeping the cabin cool. Any awning which covers the cabin will achieve the same effect. The advantages of this particular type of awning are that it’s unobtrusive, has little windage, and does not hinder movement on deck. You therefore tend to use it more often, and for longer periods than other types of awnings which get in the way, and which begin to get out of hand when the wind pipes up.
In common with most other types of awnings, this one allows the companionway slide to be left open under conditions of heavy dew, mist, or light rain.
The design and construction are simple. The only complications are deciding on the curvature of the supporting rods, and adjusting the width to accommodate the fact that most cabins narrow as they run forward. In the awning shown, the forward rod is only 4 inches above the top of the cabin.
288
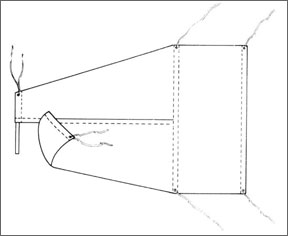
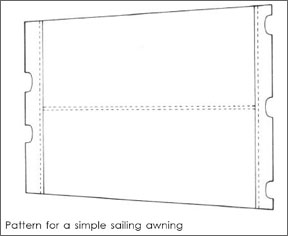
So far we’ve talked about awnings which can only be used when a boat is stationary or under power. But what about a sailing awning? The thought of an awning that could be left up while sailing never entered my mind until we began taking our dog sailing regularly. Dogs can’t stand as much sun as humans can, and I began to think about putting a Bimini top on the boat. But Windhover’s cockpit is so short that a Bimini seemed absurd, and fitting the struts to the boat, and the canvas to the struts, seemed like a lot of work for three feet of shade.
The idea I hit onis a simple, slightly tapered, battened awning tied to the backstay bridle aft, and held forward by lines running to lifeline stanchions on either side. The forward end is held up by a line permanently fixed about ten feet up the backstay. This line has a halyard clip at its lower end, and when not in use, clips out of the way to the backstay turnbuckle.
This awning is about an unobtrusive as an awning can be, and can be rigged in about two minutes. When approaching a harbor or encountering a situation in which the crew must have maximum maneuverability, letting go the forward lines (but not the upper lines) causes the whole thing to drift back out of the way against the backstay.
The awning was designed to be narrow enough so that the crew could still sit on the cockpit coamings when the awning was rigged. If that’s not important to you, a wider awning would give more shade. Even in its narrow form, however, the awning can be cocked toward the sun by readjusting the lengths of the forward lines.
288
To avoid grommets and loops, the awning is designed with scallops cut out of the batten pockets. These cutouts allow the lines to be tied directly to the bamboo battens so that the lines can serve both to keep the battens in their pockets and to hold the awning in place.
My wife made the awning in about an hour out of lightweight, smudged oxford cloth that we found in a discount store. If I were making a “Mark II version,” I’d spring for a mildew-proof synthetic fabric. As made, the whole thing cost less than four dollars.
The cutouts are finished with binding tape. A false seam is used down the middle to reduce stretch. If you don’t have a split backstay, you can lash the awning to the single backstay and tie the ends down to the stern rail.
The varieties of awnings are almost endless, and you’ll have to decide which works best for your boat, and your sailing. On hot sunny days, with our sailing awning rigged, we may look a little like the African Queen, but the dog is happy and cool, and so we are.


