

Connecting two wires is simple; use a properly sized crimp butt connector with a ratchet crimper, and finish with adhesive-lined heat shrink in damp, high-vibration locations, or anywhere strain relief is less than perfect. Terminal connections, whether screw, pressure plate, or spring tensioned (such as Wago connectors) are also straightforward. Things become less obvious when there is a third wire to be joined, or when two or more wires must land on the same terminal location. And sometimes, what seems obvious is wrong.
Start with good craftsmanship. The fundamental rule is that good connections are clean and tight. Strip the correct length without damaging strands. Pull wires from under the pressure plate of terminal blocks (aka choc blocks) and solenoid terminals to get a feel for just how tight that screw needs to be. Practice crimping, making test pieces and pulling them apart to confirm they meet UL or American Boat and Yacht Council (ABYC) guidelines. A fish scale and a pair of vise grips is all you need. If you think you will be soldering, watch some videos. Wrap or mesh the wires neatly, heat the wire, and apply only as much solder as needed; blobs and sharp spots can poke through the insulation, creating a short.
In summary, every connection should be solid. Wires must be supported so that they don’t chafe or break, nothing should come loose as a result of temperature cycling under load. Remember, tight connections are generally unaffected by corrosion since water and oxygen can’t seep in if they are tight.
Insulate all energized surfaces, and guard equipment terminals and barrier strips against accidental contact with anything conductive. Note: Don’t store an umbrella next to the windlass solenoid as the previous owner of one of our boats did. Always cover battery positives; a wrench dropped across the terminals can be welded in place. Piggyback spade quick connects and three-way butt connectors must be used judiciously, because they have exposed energized surfaces.
Don’t Over Bundle
An orderly appearance is nice, but cable ties every two inches mean that nothing can be traced or repaired without cutting everything loose. Don’t pull cables tight to eliminate unsightly slack; it will be impossible for the next person to work on it.
Although troubleshooting can be kept to a minimum if the connections are good, eventually equipment is replaced and new gizmos are added. Nothing is permanent, so design for the next person, who may be you. Label everything, secure against movement to a practical extent, but leave it user friendly.
With the rise of LEDs and instruments, it’s common to connect small 22 AWG and even smaller leads to 16-14 AWG main lines. We discussed several methods that work, see “How to Connect Small Wires.” Whatever method you chose, focus on strain relief and support.
Connecting Multiple Wires
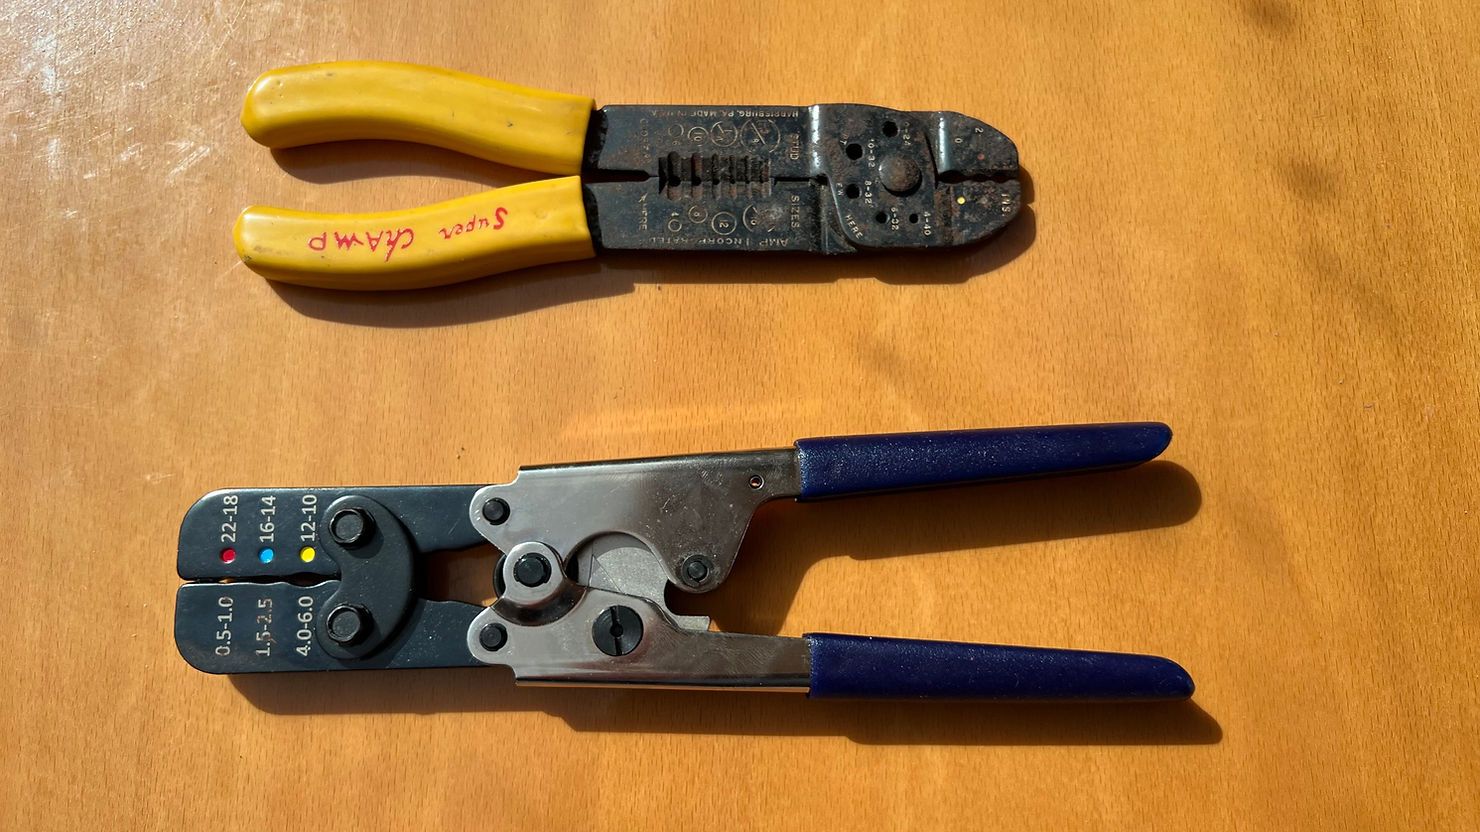
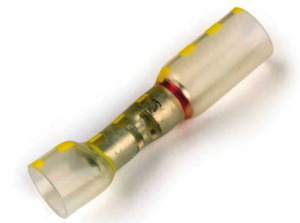
Crimped connectors are the standard for most applications. Your electrical tool bag should have a good selection of crimp fittings and a ratchet crimper. Always pull test a sampling and confirm that your results meet UL and ABYC requirements.
A common concern is that a crimp might be compromised if you placed two wires in one fitting, even if they fit properly. We did some testing with a small sample of 14-16 AWG ring-eye connectors and our pull tests met the UL requirement and far exceeded the ABYC requirement.
Assuming the crimper is properly adjusted, it seems there is no reduction in security versus two separate crimps. There is no prohibition, I have seen this practice countless times in industry, and when adhesive lined heat shrink is used, the adhesive will run and fill the gaps between the wires. We are not recommending this for connecting more than two wires because of fitting and sealing problems. It should equally apply to all crimp connectors—ring fittings, captive spades, and butt connectors.
The same pull-out results should hold for closed end (aka pigtail) crimp connectors. They are a little trickier to seal, but some contractors prefer them for joining multiple wires. To pull through tight spaces, tape them down flat.
Some details to keep in mind:
• The combined wires must be a proper fit in the crimp fitting.
• The ratchet crimper must be adjusted to the actual wire size (eg. 16 vs. 18) and for the brand of fittings, because thickness varies.
• Do not solder wire ends first; if solder softens due to heating the crimp will loosen. If you want to solder after crimping, that is permissible.
• Use adhesive-lined heat shrink for additional support, even in dry location. But remember the support will fail if the wire gets hot.
• Step-down butt connectors may be required, depending on wire size.
Three-way Butt Connectors
These look like the obvious solution, but I avoid them. The problem is that the center rivet is an exposed energized surface. If another is installed in close proximity, or if the connector touches another energized component, you have a short.
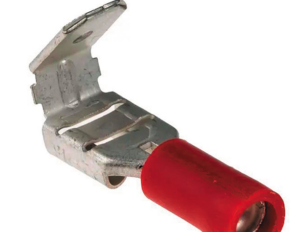
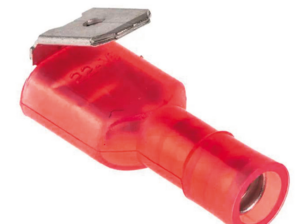
Piggy-back Spade Quick Connects (aka Multi-stack Disconnect)
Also called multi-stack disconnects, this union is the simplest solution. Use them only when the device or panel connection is a spade. They can corrode and become high resistance in damp locations. (This has happened to me many times on boats and in industry, primarily on pump motors.) Anti-corrosion grease helps ensure reliable connections (see“Conductive Greases vs. Corrosion”). They can pull loose.
Most critically, they often expose electrically hot surfaces, so only use only the fully insulated type. Finally, remember to install them in reversed pairs to insure correct polarity. If they will be disconnected with any frequency, use adhesive lined heat shrink and pull on the fitting, not the wire.
Bullet Connectors
Also known as snap plugs, these are similar in use to spade connectors. They are common on outboards and are fully insulated. Like spade quick connectors, they require grease for long life. To connect three wires, crimp two wires into one fitting. If they will be disconnected with any frequency, use adhesive lined heat shrink and when disconnecting pull on the fitting, not the wire. Crimps should only be used on stranded wire.
Spring Pressure Connectors
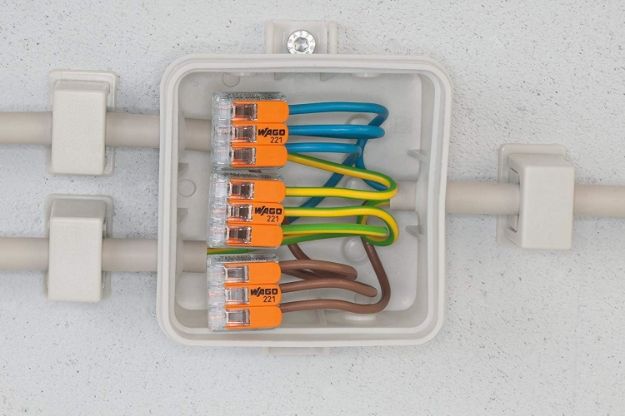
Specifically, we have used and tested Wago 221 and 222 series connectors. There are lots of knock-offs on Amazon, so beware. Some sailors love them, perhaps because of their resemblance to a mini-jammer, but I use them almost exclusively for dry-runs to test connections before crimping. As an experiment three years ago, I used a pair for connections in a sealed box just below the anchor light three years ago. The light is still working and they were lightning fast to attach. I like to think of them as improved wire nuts.
The pullout strength of Wago connectors is only about six pounds. This is less than a wire nut and considerably less than that of other recommended connectors, but it still meets ABYC and UL requirements if used in a box with strain relief. They cannot be waterproofed and thus should only be used in dry locations.
Only one wire should be inserted into each port of any spring pressure connector. The pressure will not distribute between both wires and the pull out strength can be nearly zero. To connect more wires, use a wider connector with more ports (3 and 4 ports are common).
Twin Ferrules
If you must insert two wires into a single spring-pressure port, you can crimp two low-amp wires into one ferrule. Alternatively, you can splice the two wires into a single wire a few inches away from the spring-pressure port and attach the single wire to the spring-pressure port.
Terminal Block
If multiple wires must to be connected, it’s hard to beat a terminal block. Located in a relatively dry location near breaker and instrument panels, they allow orderly and reliable connections, and easier trouble-shooting. Jumper strips between ports are preferred for joining multiple wires, but jumper wires are acceptable.
You can connect up to three wires on any screw (four on a stud). Rings fittings are more secure than spades, and only captive spades (with the prong ends bent up) are permitted by ABYC. Never just wrap wires around the screw.
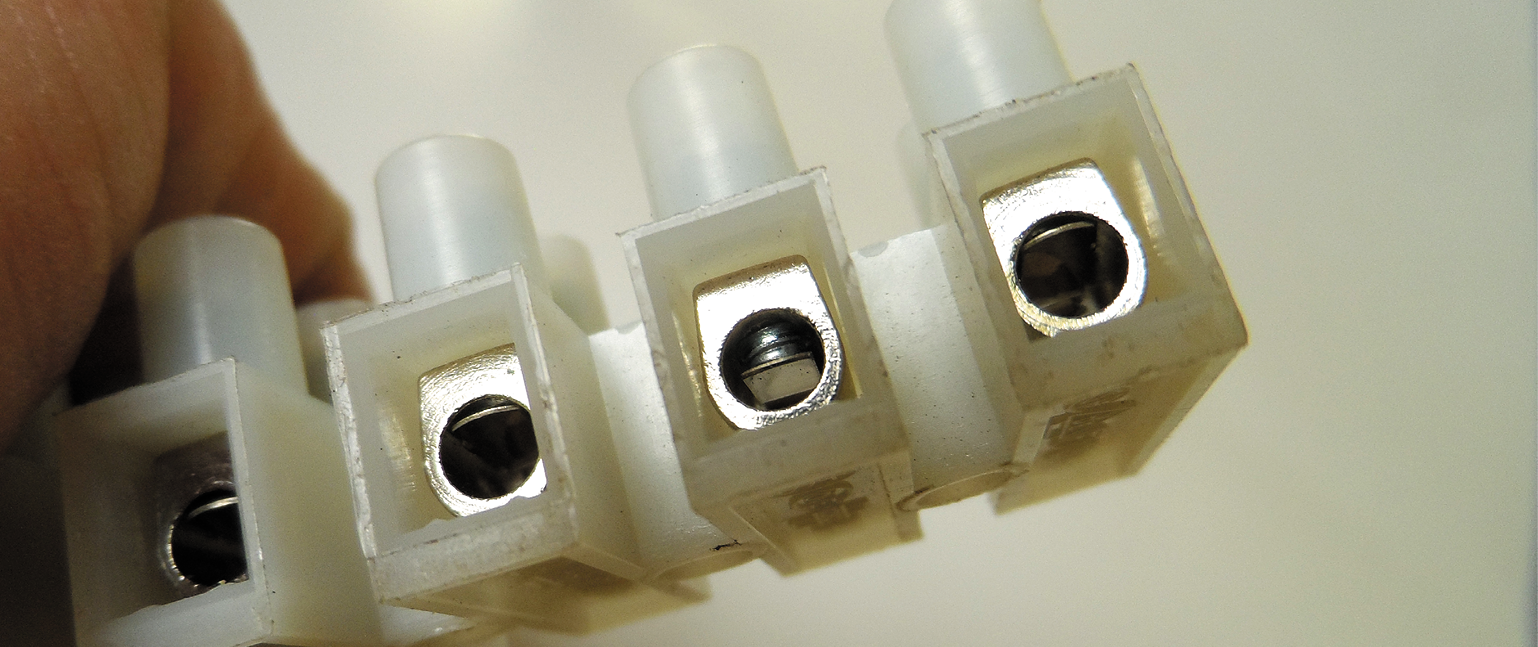
Barrier Strip
Barrier strips are like terminal blocks, except smaller. These are often called Euro-strips, or choc blocks, because like a bar of Hershey’s chocolate, you can snap off just as much as you want. Instead of crimping on a ring, you insert a stripped wire and tighten a screw. Pressure is applied either directly by the screw or through a pressure plate.
Use only the pressure plate type, as the screw will tear up stranded wire. Two wires are permitted per port, allowing the use of jumpers to connect multiple wires. Do not insert more than two wires, even if they fit; the pressure will not be evenly distributed and one or more of the wires will pull out. These are handy for mock ups and dry runs. Every bag should have a few. A single port pair can be used as a butt connector, and two pairs can join 3-4 wires.
Soldering
ABYC says solder cannot be used as a sole means of connection because the solder can soften if the circuit overheats. There is also some increase in wire fatigue and corrosion at the edge of the solder. However, ABYC is voluntary and soldering can be done well. The overheating risk can be managed by proper fusing, and the breakage/fatigue risk through good wire support and strain relief. Fire risk is very low in instrument circuits with dedicated fuses (less than 3 amps) and greater in higher power circuits (>10 amps).
If none of the other methods work, this can be the best way, particularly with small wires. Solder alone should only be used on low power circuits (less than 3 amps) and always provided with good strain relief, remembering that heat shrink does not provide strain relief once the wire heats up.
Scotchlock Tap
Please escort these wire butchers to the waste bin. Common on trailer wires, I’ve replaced too many of these. Typically, the wires break off inside, the result of flexing or corrosion.
Conclusion
Given the choice, my connections are crimp and heat shrink or terminal blocks. But I’ve used all of these methods within the last two weeks (except Scotchlocks), and I can’t remember the failure of a physically undamaged and properly made connection in over 35 years of doing this kind of work. Clean, tight, insulated, and well supported, you can’t go far wrong.
TECH GUIDE: STANDARDS FOR WIRE CONNECTIONS
| WIRE GAUGE (AWG) | ABYC E-11 | UL 486A (CRIMP) | UL 486A (PRESSURE PLATE) | WIRE BREAKING STRENGTH** |
|---|---|---|---|---|
| 24 AWG | N/A | 5 lbs. | 5 lbs. | 11 lbs. |
| 22 AWG | N/A | 8 lbs. | 8 lbs. | 17 lbs. |
| 20 AWG | N/A | 13 lbs. | 10 lbs. | 28 lbs. |
| 18 AWG | 10 lbs. | 20 lbs. | 10 lbs. | 44 lbs. |
| 16 AWG | 15 lbs. | 30 lbs. | 15 lbs. | 72 lbs. |
| 14 AWG | 30 lbs. | 50 lbs. | 25 lbs. | 100 lbs. |
| 12 AWG | 35 lbs. | 70 lbs. | 35 lbs. | 174 lbs. |
| 10 AWG | 40 lbs. | 80 lbs. | 40 lbs. | 287 lbs. |
| 8 AWG | 45 lbs. | 90 lbs. | 45 lbs. | 411 lbs. |
| 6 AWG | 50 lbs. | 100 lbs. | 50 lbs. | 725 lbs. |
| *PS pull tests for butt connectors in the only two tested sizes (AWG 24 and AWG 16) exceeded wire strength (see PS March 2019, “How to Connect Small Wires”). |
As important as the product you choose is the method used to connect wires. Making a proper connection with a high-quality heat-shrink butt connector requires careful stripping of the wire insulation and a good quality ratchet crimper. Practical Sailor has covered the nitty-gritty details of making good connection many times over the years. See Inside PS blog post “Fighting off Marine System Corrosion,” for links to some of these reports.
1. Non-insulated piggy-back spade connectors are not recommended for most applications, although they may be used in a panel or on equipment terminals where insulated connectors won’t fit.
2. Fully insulated piggy-back spade connectors are far preferable to non-insulated versions. Be sure to match the wire size to terminal and use a high-quality crimper to make the wire-to-terminal connection.
3. The Hydralink butt connector features an oversized connector on one side to accommodate two smaller wires. Be sure follow the AWG size recommendations for each side of the connector. The heat-shrink insulations provides a positive seal against moisture.
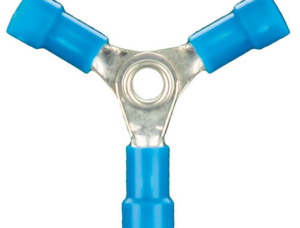
4. The three-way butt connector’s Achilles heel is the exposed and energized central rivet, which is more susceptible to short circuits.
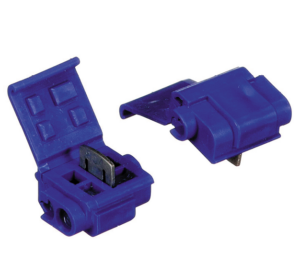
5. Scotch blocks make poor connections and will destroy your wire. Never use these connectors.

This article was published on 20 April 2022 and has been updated.


Is there a ratcheting crimper that you would recoment? Maybe with adjustable pressures for different applications? Also I am about to re-wire a 76 islander from scratch and was hoping to get some pointers, tips, tricks, and if it’s not too much to ask, a certified union electrician to do it for me so that it’s done right?! 😮💨 thanks in advance PS
I use these.
https://smile.amazon.com/Klein-Tools-Ratcheting-Crimper-10-22/dp/B07WMB61J5/ref=sr_1_2?crid=3PFCRZOGCTQCZ&keywords=wire%2Bcrimping%2Btool&qid=1660832219&refinements=p_89%3AKlein%2BTools&rnid=2528832011&s=hi&sprefix=Wire%2Bc%2Caps%2C92&sr=1-2&th=1
And these for smaller wires that don’t really need a ratcheting crimper.
https://smile.amazon.com/Crimping-Stripping-Klein-Tools-1009/dp/B079T9Q9X8/ref=sr_1_9?crid=3PFCRZOGCTQCZ&keywords=wire+crimping+tool&qid=1660832219&refinements=p_89%3AKlein+Tools&rnid=2528832011&s=hi&sprefix=Wire+c%2Caps%2C92&sr=1-9