

While many potential failures are easy to spot, some flaws are hidden under paint or within the structure, or are so small that a routine visual inspection wont pick them up.
Standing rigging, hulls, decks and hardware fittings are the most common places where hidden structural weaknesses can lead to big repair bills, or even loss of life.
Fortunately, some of the most common inspection methods are available to the sailor willing to learn and practice. One of the biggest challenges to carrying out your own thorough inspection is knowing what to look for.
A basic inspection involves close visual examination (often with the aid of a bright light and magnifying glass), dye penetrant testing, and hammer testing. As any surveyor or industrial inspector knows, the most valuable tools are a sharp eye and a keen ear.
For closer scrutiny of suspicious sites, there are professional methods, requiring specialized equipment, training, and experience beyond what is practical for the DIY sailor. In the right hands, these tools can look beneath the surface to find faults. In the hands of the inexperienced they can miss serious problems, or find a flaw that doesn’t exist. In this report, well look at professional inspection techniques, and what to expect from a certified inspector.
What We Tested
We crawled all over our test boat and a neighboring deteriorated boat (1972 Cal 25), testing chain plates, masts, and soft decks. We examined our test boat to see if we could locate known metal reinforcement plates and if the laminate profile seemed to match that seen in core samples. We also tested known laminate samples from prior PS articles, locating delamination and cracks. Our observations, combined with 30 years of experience (PStechnical editor Drew Frye is a certified non-destructive testing technician) are summarized in what follows.
DIY Inspection
The main objective with regards to any inspection is to actually do it. Refinery equipment and jet liners have mandatory inspection programs for a reason. Some intervals are based on usage (as when checking wear), others are based on time (as when looking for corrosion).
Not every inspection is detailed; daily inspections are often a simple review of the most critical components (rigging for example) for obvious damage. More comprehensive inspections occur less frequently. The important point is to set a schedule, write it down, and keep to it.
Drew Frye
Preliminary Inspection
Put your inspector hat on, prepare the worksite, and allow the time required to look closely at every part, without rushing to the next task. Look in the right places, which is not always convenient.
Clean the inspection site. If you are looking for cracks, even the slightest covering of growth, grease, or corrosion will obscure your view. In the case of pitting from corrosion, the worst pits are often concealed.
Adjust the lighting. Most inspections require lots of light, but in other cases, a dim, or angled light will reveal more flaws. For example, a flashlight beam played across a metal surface at a low angle will highlight cracks and pits better than a bright overhead light. Examine critical areas with lighting from multiple angles.
Use magnification. A magnifying glass or loupe can reveal cracks and detail that even high tech methods miss. Fortunately, stress cracks in steel parts (excluding weld inclusions and certain casting flaws) start on the surface where the stress is the greatest.
Dye Penetrant
While penetrating dye won’t reveal cracks you can’t see, it often helps discriminate between scratches and real cracks. For the most part, equipment has to come apart for examination, since cracks often originate inside fastener holes. T-ball slots can usually be checked without disassembly.
Drew Frye
Most kits include cleaner, dye, developer, and instructions. Be sure to follow the instructions closely. Practice on a part with a known minor crack if possible. Bend a bolt back and forth until a crack is just starting and use it for practice.
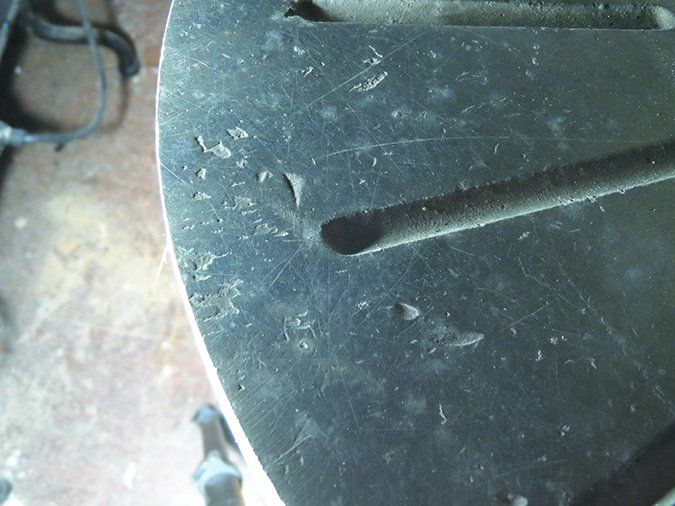
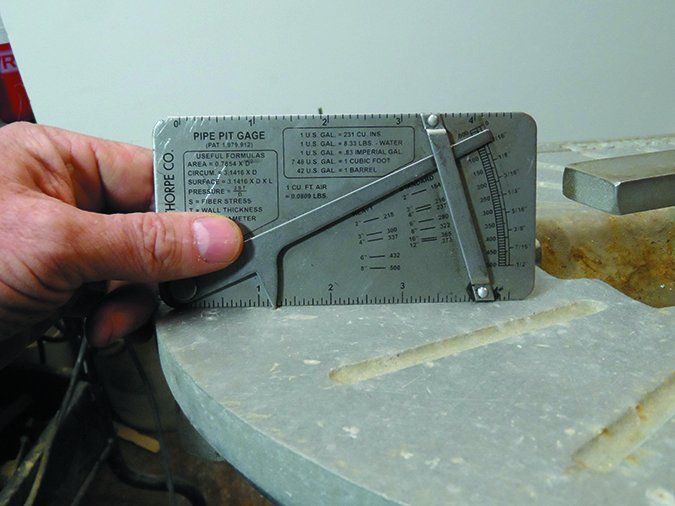
Often corrosion is limited to small spots you can cover with your fingertip. In tanks, these pits can lead to leaks, and in chain plates they can lead to cracks. You can estimate the depth of pits using ultrasound, but because the pits are often smaller than the ultrasound transducer, this can be inaccurate. A pit gauge (see photo) gives you an idea of how serious the pitting is. Any owner of a steel boat should own a pit gauge. In some cases, long-term exposure to high-sulfur fuels causes a mild steel fuel tanks to become porous and weep with no visible pits; the area may be black or freckled.
Phenolic Hammer
In the hands of an experienced person, sounding a hull with a phenolic hammer can find flaws ultrasound might overlook.
Drew Frye
A firm phenolic hammer is the workhorse for fiberglass. A large plastic-handle screwdriver can be a substitute for tight corners. With either tool you can tap away on most surfaces with little risk of harm, listening for large flaws, like deck delamination and loose bulkheads.
When inspecting near fasteners (keel bolts, cleats, winches, cleats), switch to a small, smooth metal hammer-we like a tack hammer-and tap very lightly. Often critical delamination lies just below the surface and very, very light tapping with a harder hammer yields a higher frequency that reveals flaws. Make certain the face is smooth and don’t tap hard enough to do any surface damage.
Start by tapping areas you know are good and areas you know have failed and compare the sound and feel of each tap. Observe the effect of changes in thickness, a nearby bulkhead, cored vs. solid fiberglass, and inserts. Be patient.
Certain areas-keel attachments, chainplates, winches, and cleats-deserve special attention. These are generally anchored in solid glass, and failure is seldom in the center of the laminate, but more often only one or two layers below the surface. To uncover hidden damage, you must tap on both sides of the laminate. Unfortunately, the inside (assuming the pull is outwards) is the more common failure point, and this is generally the more difficult to get to.
Ultrasound
Perhaps you found a fault but can’t tell how serious it is. Perhaps the part is inaccessible or critical. Time to call in the big guns for a high-tech inspection, but what method? Can we trust it?
Similar to your boats depth sounder, ultrasound determines thickness (depth) and finds flaws by bouncing sound waves through the structure. Delays and changes in the intensity of reflections (scatter pattern) indicate aberrations. Accuracy is strongly dependent on the material (metal vs. fiberglass), geometry (flat surfaces are best), and operator experience.
There are two common types of testers: general thickness testers and ultrasound testers that can generate A-scan (plotted wave forms) and C-scan (two dimensional planar view ) presentations.
Surveyors will sometimes use a general thickness meter on a steel hull. These units give only a single number-the largest echo as determined by a crude algorithm-and, like a digital sounder, offer nothing more than a depth readout. These are only acceptable for new steel or gross estimates of corrosion.
Like a bottom-mapping fish finder, an A-scan/C-scan unit displays all of the echo data, revealing flaws in the invisible opposite bottom surface of a component.
If the opposite surface is corroded, sound waves scatter and the echo becomes weak and broad. A good A-scan meter can identify hidden corrosion and delamination before it has measurably weakened the structure. A thickness tester won’t do this.
If an inspector shows up with a simple thickness tester that lacks A-scan/C-scan capabilities, ask her how she detects flaws on the opposite side or inside of the material she is testing. To provide quality control, the technician should scan reference blocks to calibrate the unit. When testing bolts or laminate, the inspector should first scan good bolts and laminate for reference.
Interpreting Ultrasound
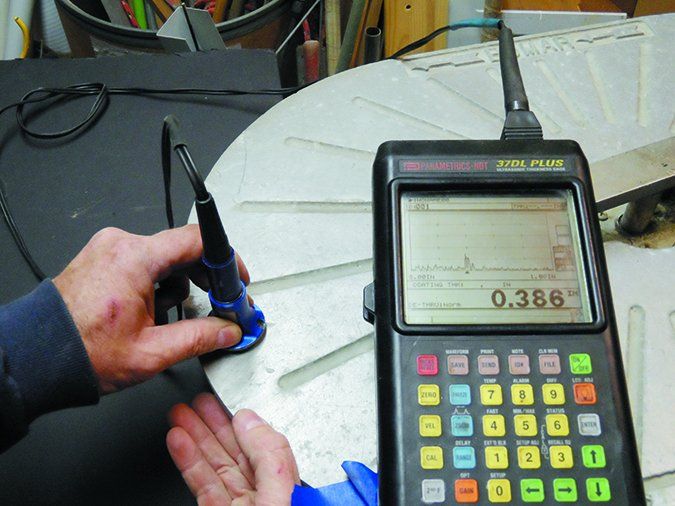
We used a Panametrics 37DL PLUS from Olympus. Now superceded by the 38DL, the 37DL is representative of the new generation of devices that combine digital signaling technology and powerful microprocessors. Both models include features that simplify measuring true metal thickness even when the exposed surface is coated or painted.

Drew Frye
Checking Metals
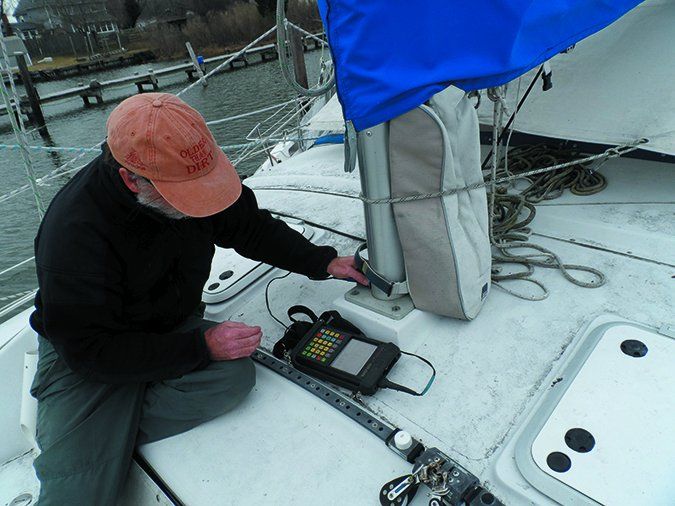
Ultrasound is a very effective and accurate method for measuring the general thickness of metal structures, including masts, spreaders, chainplates, metal hulls and tanks, and bolts. It is also effective for finding cracks, including cracked keel bolts. However, there are many caveats and limitations.
Even though most of the scanning work will take place on the outside of the hull, tank, chainplate, etc., a good inspector will always start inside when possible. It may only be a glance with a flashlight though access holes, but it will help to identify internal structures such as tank baffles and likely areas of corrosion that can alter echoes. Ultrasound is spot inspection of a small area, so it is vital to know where to look.
Drew Frye
You can scan through tight, thin coatings, but scanning through bottom paint, loose coatings, or corrosion won’t work. In these places the inspector will use a couplant fluid-usually a gel-to ensure the transfer of sound energy. But even with a couplant, a smooth surface is vital, so don’t be surprised if the inspector takes out a scraper, file, or grinder as needed.
Ultrasound is effective for determining average thickness, but it cannot accurately detect anything much smaller than the transducer head (~ 5/8- to 1-inch), often registering only as a fuzzy echo. Although fine pitting (the sort that can be missed) is seldom structurally important, it can create leaks and cracks that can lead to corrosion.
The best way to seek out small pits is by internal inspection and a pit gauge. Failing that, a painstaking inch-by-inch ultrasound scan will reveal these smaller flaws.
Cracks are easier to detect if they run perpendicular to the sound pulses and this can be tricky around welds and complex shapes. Often, an X-ray inspection is more practical for most fittings and weld repairs.
You can inspect keel bolts by placing the transducer on the top. Any echoes at distances shorter than the length of the bolt are suspicious. A broken bolt will create a very sharp peak, but a small crack can only be confirmed by comparing the image/data to that of a good bolt.
Chain plates often suffer from pitting on the backside. Any areas indicating sharply less thickness or generating a less distinct echo deserve a closer look.
Composites
Sounding a solid laminate with a hammer provides a quick overview of its general condition and will detect many of the same faults found using an ultrasound tester. If there are any core samples available they can be valuable for calibrating meters (or ears).
Gelcoat and barrier coats do not interfere with readings, but bottom paints usually must be removed. Youll either have to sand or grind smooth any rough surfaces or level them with clear epoxy or gelcoat. Use only clear fillers and coatings in critical areas so that defects are not hidden from future inspections.
Typical laminate composition is usually too irregular to accurately scan deeper than 3/8-inch-even less if there is considerable mat and filler. Obvious flaws are generally in the first 1/8-inch, which the hammer can probably detect.
Ultrasonic scanning can’t detect core delamination. Because of the great difference in material compositions, it is generally impossible to see past the boundary between the core and skin. A hammer is better.
Ultrasonic scanning also can’t see past any metal plates embedded in the laminate (commonly used for securing deck fasteners). The echo is too strong. On the other hand, ultrasound is an excellent tool for confirming the extent and thickness of these embedded plates, so long as there is no more than 5/16-inch overlying laminate.
X-Ray Inspection
An x-ray inspection of a boat is like a medical x-ray. It is the workhorse for weld and fastener inspection. To provide quality control, a small exposure control sample is positioned in a corner of the frame (typically a small bit of wire) of the scanner. This provides a basis for determining of penetrating power. A good fastener or plate can be scanned to establish a baseline for comparison as well.
Cracks that are parallel to or at an angle to the x-ray beam are visible with x-ray, but those perpendicular to the beam might not be rendered. Ultrasound is more effective for cracks that are parallel to the surface being sounded (perpendicular to the sound waves).
X-rays are effective at locating welding flaws on new constructions, but are less useful for monitoring corrosion. For bigger jobs, it is usual to X-ray square sections at each welded plate intersection and every 4-6 feet of running weld. The inspector is looking for complete fusion, slag inclusions, and cracks.
X-rays can also be used to inspect new fasteners and fittings. Multiple pictures from multiple angles, will reveal any significant cracks. Any information about ongoing corrosion, however, is very limited.
Other drawbacks to an x-ray scan are that it won’t pick up softer substrate, making it unhelpful for inspecting fiberglass. They can’t be used to measure metal thickness and measurements of complex structures can be impossible to interpret. You also have to take measures to shield people nearby from exposure to x-rays.
Magnetic Particle Inspection
Often called a Magnaflux inspection, named after the most common brand of test meters, a magnetic particle inspection uses a powerful electromagnet to pass a field through the metal part.
Any crack, no matter how small, creates a break in parts magnetic field. When conducting a magnetic particle inspection, the subject component is dusted with fine iron powder. The powder is drawn to the most minute crack making these cracks visible.
Magnetic particle inspection works nicely on cast iron cylinder heads, but it is useless on most marine metals (aluminum, most stainless steel, and copper alloys) because they are non-magnetic. A magnetic particle inspection is potentially useful on some exhaust risers, but any exhaust flaws are usually revealed during a visual inspection.
Conclusions
Proper inspection is all about matching the method to the situation. Start with the basics; sharp eyes, a light hammer, and a critical eye. The eyeball and the ear are highly evolved for detecting light and sound, and more importantly, separating distractions from important information. If your visual inspection suggests a need for closer scrutiny, move on to dye penetrant, ultrasound, and X-ray, as the circumstances demand.
Many inspections are best performed by taking things apart. Chainplates and keel bolts, for example, can hide corrosion that isn’t readily apparent in an ultrasound test.
Inspectors can only investigate existing cracks and delaminations. They cannot predict fatigue, corrosion, or see into the future. In some cases, it is better to take preventative measures and replace the suspect part(s) and others like it of the same age. Thus the old axiom for ocean voyagers: If one shroud needs replacing due to load cycling (wear), then replacing all shrouds of the same age is a prudent course of action.
The more time you spend with your boat, the more easily you’ll recognize the subtle changes that might signal a nascent problem. More than a few times the harmless squeak of a cabin door has been traced back to a bad section of deck compressing under the force of a deck-stepped mast.


