We have the minimum required lights, including running lights for sailing and motoring, and an anchor light. We might even have an electronic distress signal (“Distress Flares Go Electric,” June 2021). But do we have lights for rare navigation lighting situations, such as restricted ability to maneuver (RAM) or not under command (NUC)?
Ships, fishing boats, tugs, and dive boats are just some of the vessels that have masts dedicated for lights to alert nearby ships of their status, and to signal situations that might prevent them from maneuvering to avoid collision. Relatively few sailors have a means of showing all the specialized lights that might apply to sailboats. Should we?

An anchor light is not for drifting, using a sea anchor, or any situation where you are not made fast to the ground. Flashing lights are only for distress. Thus, lighting and day shapes for a few additional navigation situations deserve discussion.
RESTRICTED ABILITY TO MANEUVER (RAM)
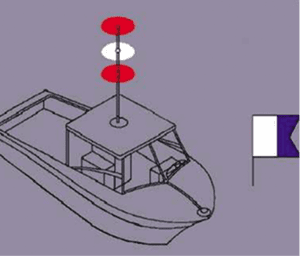
The lights for this situation are a vertical row of three lights, red/white/red, spaced 1 meter apart. The day signal is a ball/diamond/ball. RAM suggests that the motion of the boat will be predictable. A boat with divers in the water, hove to, or towing a drogue would be considered a RAM.
NOT UNDER COMMAND (NUC) DAY SHAPES AND LIGHTS
A vertical row of two red lights indicates the skipper has no control over motion, perhaps because of a broken rudder. Any motion, including drifting, qualifies as NUC. The day signal is two balls.

DIVING
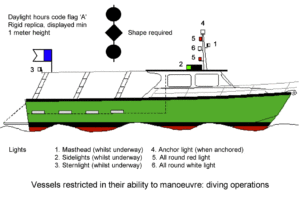
A day flag (either the blue and white “alpha” flag, or red with white diagonal stripe in the US) is required by law or regulation in the US and many countries. The divers are to stay within 25 yards (varies by state) when near the surface and boaters are to stay 300 yards from the flag (100 yards in a marked channel). No divers? Take the flag down. (Some states permit a flag painted on the side of dive boats).
At night a dive boat is considered restricted in its ability to maneuver (RAM), and the required lights are red/white/red, one meter apart in a vertical line. If the boat is drifting, running lights are also required, and if anchored, an anchor light is still required.
SEA ANCHOR OR DROGUE
Just like a dive boat that is drifting, a boat dragging a sea anchor or drogue needs to show running lights and RAM lights. Running with a drogue in heavy weather can be a matter of speed control and easing the motion, or survival. In the first case your ability to change course is limited, and you have very little control over the vessel’s speed. In the latter case you have no control over speed or course, but the motion of your vessel will be predictable.
PROPER USE OF NUC INDICATORS
A boat with steering failure, dismasting, or some other situation that makes it impossible to control is considered not under command (NUC). A rudderless boat may randomly tack, circle, or speed up and slow down. Its motion is unpredictable. The day shapes and lights for this situation are not for sleeping or leaving watch, only for a boat that cannot be controlled.
COLREGS AND LIGHTS
A discussion of the Collision Regulations (COLREGs) regarding the above situations is best carried out with the rules at hand. The Coast Guard version, which includes U.S. inland rules as well as international rules, is available online (www.navcen.uscg.gov/pdf/navrules/navrules.pdf). Here are just a few excerpts relevant to lights and shapes for sailboats.
WHAT IS RESTRICTED ABILITY TO MANEUVER?
Definitions for a boat that is restricted in its ability to maneuver are in Rule 3 of the COLREGs.
(g)The term vessel restricted in her ability to maneuver means a vessel which from the nature of her work is restricted in her ability to maneuver as required by these Rules and is therefore unable to keep out of the way of another vessel. The term vessels restricted in their ability to maneuver shall include but not be limited to: (i)a vessel engaged in laying, servicing or picking up a navigation mark, submarine cable or pipeline; (ii)a vessel engaged in dredging, surveying or underwater operations; (iii)a vessel engaged in replenishment or transferring persons, provisions or cargo while underway; (iv)a vessel engaged in the launching or recovery of aircraft; (v)a vessel engaged in mine clearance operations; (vi)a vessel engaged in a towing operation such as severely restricts the towing vessel and her tow in their ability to deviate from their course.
SLEEPING UNDER SAIL OR UNDER BARE POLES
An unattended helm is not allowed under COLREGs. This is spelled out in Rule 5.
Every vessel shall at all times maintain a proper look-out by sight and hearing as well as by all available means appropriate in the prevailing circumstances and conditions.
DISTRESS
Rule 37 covers distress signals.
When a vessel is in distress and requires assistance it shall use or exhibit the signals described in Annex IV of these Rules (33 CFR part 8) to illuminate her decks.
The accepted signal is a strobe flashing 50-70 times per minute. Sailors should also review Rule 36, which states that any light used to attract the attention of another vessel cannot be mistaken for any aid to navigation. The rule also advises that the use of high intensity intermittent or revolving lights shall be avoided.
VERTICAL SPACING
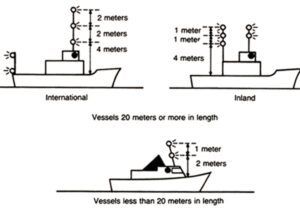
Vertical spacing of lights is covered in Annex I. For boats less than 20 meters in length, the vertical row of lights must be greater than 2 meters above the uppermost continuous deck, spaced one meter apart, and be visible in all directions (no more than 6 degrees may be blocked by mast). For boats greater than 20 meters, the lights must be 4 meters above the deck and the spacing must be 2 meters (see illustration 2, page 18).
EXTRA LIGHTS
Rule 30 deals with extra lights in subsection (c):
A vessel at anchor may, and a vessel of 100 meters and more in length shall, also use the available working or equivalent lights to illuminate decks.”
FLORIDA DIVER LAW
Florida gets specific regarding divers. Not only are lights required at night, but a flag must be displayed. Interestingly, the specified flag differs from the international flag, which is the blue and white “Alpha” signal flag. According to Section 327.331 of Florida code:
(c) “Divers-down flag” means a flag that meets the following specifications:
1. The flag must be square or rectangular. If rectangular, the length must not be less than the height, or more than 25 percent longer than the height. The flag must have a wire or other stiffener to hold it fully unfurled and extended in the absence of a wind or breeze.
2. The flag must be red with a white diagonal stripe that begins at the top staff-side of the flag and extends diagonally to the lower opposite corner. The width of the stripe must be 25 percent of the height of the flag.
3. The minimum size for any divers-down flag displayed on a buoy or float towed by the diver is 12 inches by 12 inches. The minimum size for any divers-down flag displayed from a vessel or structure is 20 inches by 24 inches.
4. Any divers-down flag displayed from a vessel must be displayed from the highest point of the vessel or such other location which provides that the visibility of the divers-down flag is not obstructed in any direction.
(2) All divers must prominently display a divers-down flag in the area in which the diving occurs, other than when diving in an area customarily used for swimming only.
BLACK BALL
A black ball displayed where it is visible during they day indicates that a boat is at anchor. Use of this day shape for anchoring varies with the region, but in most of the U.S. no one uses them, few look for them, and most wouldn’t recognize it for what it is. Rules for smaller boats vary. In the U.S., boats less than 7 meters are exempt. Nevertheless, displaying a black ball makes sense near channels, so ships to determine your navigation status (anchored vs. underway) at a great distance. COLREGS specifies a ball with a minimum diameter of 2 feet, with exceptions.
For vessels of less than 20 meters in length, shapes of lesser dimensions but commensurate with the size of the vessel may be used, and the distance apart may be correspondingly reduced.
CONCLUSIONS
If you carry a sea anchor or drogue, have ever considered diving at night, or embark on single-handed voyages, making yourself both more visible and communicating your navigation status is smart. We don’t understand why hoistable light systems for recreational boaters is not available, so we’ve offered some do-it-yourself ideas in this report.
When it comes to lights for special situations like night diving or when the boat is disabled, recreational boats need temporary options that cost less and require little power. We found nothing practical that met our basic criteria for contingency use on sailboats. If you know of one, you can email us at [email protected]. These are all the lights that we found:
AQUASIGNAL HOISTABLE LIGHT
Aquasignal Series 40 hoistable lights. Similar to standard series 40 lights, these are 8 inches tall, 3 inches in diameter, and fit 25W incandescent bulbs (no LED option). Rigged as a red/white/red RAM light, they use 75 Ah of power each night, an unacceptable amount for many cruising boats. The cost is also steep, at $120 each ($360 total).
PERKO HALYARD MOUNT
The Perko halyard mount navigation lights are similar to the Aqua Signal lights, but they are discontinued, and we found no replacement. They cost about $85 ten years ago.
PRACTICAL SAILOR DIY LIGHT
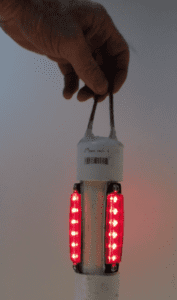
Our DIY RAM light is based on the DIY anchor light modules but substituting red LEDs for white. They are weather proof, vibration resistant, meet the Coast Guard requirement for 3 mile visibility, and because the lights have a 120-degree vertical arc of visibility, full visibility is maintained even as a boat rolls heavily. The red version is slightly less bright than the white version, though it still meets the standard. You could, of course, mount four LED strips to make the red version brighter; there is enough room.
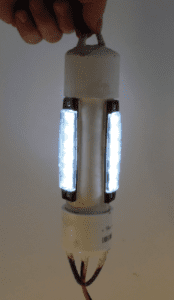
We considered adding switches, allowing a single unit to show a single white (anchor), red/white/red (restricted ability to maneuver) or two red (not under command), but decided that introduced additional failure points for options that would very seldom be used. Instead, we made the system modular, and you hoist only the components you need. They are chained together with cord/line extensions as needed. The cord/line extension is a 30-inch Dyneema strop with an eye in each end (one-meter spacing is required, and the light units are 10 inches long). Cable ties firmly attach a 24-inch 2-pin extension cord. One end of the strop is secured with a luggage tag hitch and the other with a screw link or shackle.

Our design for a DIY anchor light/RAM light is based on three white LED road trailer clearance marker lights, available for less than $1.50 per unit when purchased in packs. They meet the visibility requirements for boats of all sizes because they are designed to meet EU and US truck clearance light brightness requirements, which are significantly greater than those required for navigation lights. They are low-profile, weatherproof, and resistant to impact and vibration.
We mounted the lights around an 8-inch length of 1 ¼-inch PVC pipe; a single 5/16-inch hole passes the wires, two screws attach it in place, and it is sealed in place with a generous application of polyurethane caulk (we used Sika 291). The leads are coupled to a common 12V SAE 2-pin extension cord. Remember, LEDs are sensitive to polarity, so keep the positive and negative straight and used polarized plug connectors. The current draw is low enough (0.09 amps or 2.2 Ah per 24 hours) that we skipped the photo-electric cell that would turn it on and off automatically.
STEP BY STEP
1. Cut 6 ½-inch length of 1 ¼-inch schedule 40 PVC pipe.

2. Drill three x 5/16-inch holes in the side for the light’s wires (Photo 1). Fit should not be too tight—you don’t want to pinch the wires. The holes are centered between the ends and spaced around the pipe 120 degrees apart. An easy way to mark for drilling is to wrap a sheet of paper around the pipe and cut at exactly one circumference length. Fold the paper into thirds, mark the folds, and wrap again. The folds will be 120 degrees apart and in line vertically, ready for marking
3. Drill holes for the mounting screws. Machine screws about ½-inch long are preferred; they won’t stick in far and they won’t cut the wire insulation. No need for nuts. Just drill holes 1/64-inch smaller than your screws, and they will self tap in the soft plastic.
4. Insert the wires through the center holes, apply sealant around each hole and down the center of the light strip, and screw them down. It is tempting to apply the sealant first, but then inserting the wires is a mess.
5. Wipe up the excess sealant. It’s a mess. You could mask around the holes for a neater finish.
6. Prepare the top cap (white anchor light-only). Drill two 3/16-inch holes in the cap, insert 10 inches of 3/16-inch Dyneema to form a loop, securing the ends with stopper knots. Apply sealant inside and out.
7. Prepare bottom cap and top cap of RAM modules. Same as Step 6, but add about 5/16-inch to center hole, to accommodate the plug pigtail.

8. Thread the plug pigtails through the bottom cap hole and knot inside (Photo 2).
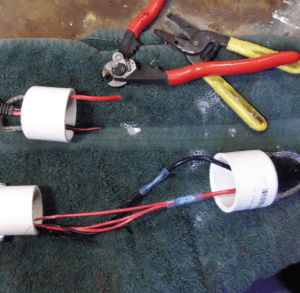
9. Twist the leads together and crimp to the pigtails (Photo 3). Be sure to strip enough insulation to allow for several twists. LEDs are polarity sensitive, so connect black-to-black (Photo 4). Seal the union with adhesive-lined heat shrink. Good fittings will have enough adhesive to fill the gaps between the three leads. The three leads, twisted together, should be about 14-16 AWG. RAM modules should have double-plug leads, one through the top and one through the bottom, so that they can be chained together.

10. Note that although all 2-pin plugs appear identical, there is a distinct male and female. The male plug has the ground (black) exposed, so that accidental contact with a grounded surface, like a mast or engine, does not cause a short. Each light module must contain either a female plug (anchor light only) or one of each (RAM modules), so they can be chained together. Mark each module with an up arrow, or you will be frustrated when you plug in the wrong end and it doesn’t light.
11. Seal the Dyneema line and the pigtail into the bottom cap, inside and out.
12. Glue on both end caps on with PVC cement. The tensile strength of each unit exceeds 1,000 pounds (we tested them), so a string can safely be hauled as tight as hand tension allows.

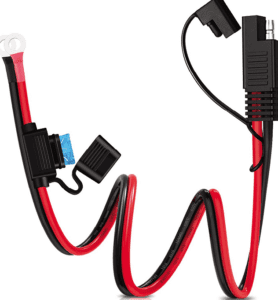
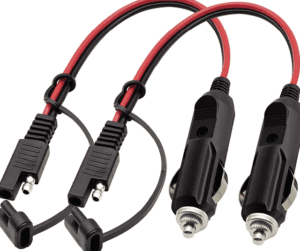
13. Prepare the supply cord. For the emergency anchor light we chose an 8-foot extension cord with SAE 2-pin connectors. We have three convenient outlets for this connector. We can plug it in just in front of the mast, in the cockpit, or in the cabin. In a pinch, you can rig a fused lighter plug directly to a battery (Photo 5), but lighter plugs are notoriously unreliable on boats, so this is temporary. As a supplemental harbor anchor light, we hoist the light 6 feet above the deck; at this level it is visible to nighttime dinghy operators and also lights up the deck. We can also extend with standard 2-pin extension cords. If the light is to be used as part of a RAM light system, the cord is shortened to 6 inches, so that it can be used as a module. Red light modules are the same as the anchor light module, except red LED marker lights are used.
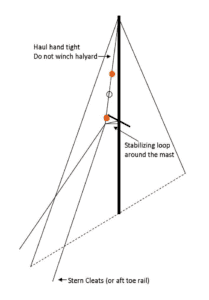
14. Rig using non-stretch line (a halyard is good for the top) to reduce swinging. In wild weather, reduce swing by rigging the bottom line as a bridle that secures to the port and starboard toe rails (see Image 4). To prevent fore-aft swinging, add a loop (about 30 inches long) attached to the bottom light and around the mast, and raised to a point just below the spreaders. The bridles should be led aft and outboard. The lights must be pulled several feet away from the mast to keep the blind spot less than 6 degrees. The lights will hang at a slight angle, but this is not a big deal. In our case, the mast is raked sufficiently to serve this purpose. There is no need to pull the lights to the masthead, although they should be high enough to be visible above the swell.
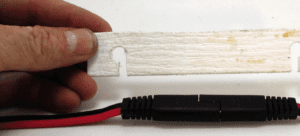
15. Prepare cord locks, if desired (Photo 6). The SAE plugs were designed for trailer wiring and the high friction fit is very unlikely to pull apart. But you can add locks for more security, and they take only a few minutes to make. The holes in the locks are 1/16-inch larger than the widest cord diameter. The slot is just wide enough to pass the narrowest dimension. The spacing is about 3/8-inch longer than the length of the closed plug pair. The strip can be either 3/16-inch HDPE or 1/8-inch aluminum, or fiberglass. It’s width is about 1 inch (aluminum or fiberglass) or 1 1/4-inches (high density polyethylene). Smooth the edges to avoid damaging the wire insulation.
The white light makes a useful cockpit and bilge work light. It’s waterproof. The red lights can be hung in the cabin or cockpit for vision-safe night lighting, although you still don’t want to look directly at the light (see “Are Chart Lights Steering Us Wrong,” PS October 2020).
Caps. $ 2 x 1.57 = $3.14
6.5” pipe = $0.70
LEDs = Three white side marker lights (6 LEDs each), 3 x $2.12 = $6.36
Assorted wire and sealant = $4
Cord = $4.20
Rope = $0.40
Total = $18.80

Since our August 2021 review of deck connectors (“Watertight Connector Test”), we’ve converted our F-24 test boat to SAE 2-pin connectors for many applications, including tiller pilot, mast lights, and utility cockpit connections. We like the price and widespread availability of the components, but the big selling point is easy interchangeability and ruggedness. For example, we can plug the emergency anchor lights and RAM lights into the mast base plug, the tiller pilot plug, a cabin plug, the cockpit plug, or straight to the battery with clips. Same with our utility washdown/emergency sump pump; we can plug it in wherever needed, just like appliances at home.
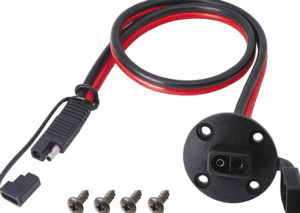
All of this applies equally to 4-pin connectors. They can be the better answer if you need more power to control more things. We’ve used 4-pin connectors for connections at the mast base for trailer boats.
The exposed pin should be ground phase to reduce the risk of shorts. As long as the exposed pin is ground and the adjacent pin is power, 2-pin plugs can also be inserted into 4-pin sockets. Grease exposed ends with Tefgel or Green Grease twice per year (every few years inside the cabin). Keep the caps on when not in use so they don’t attract dirt and to cover the ground pin.
You will have to splice the wire tails. Crimping and heat shrink is preferred below deck. Soldering and adhesive lined heat shrink yields a more streamlined result and is acceptable for above-deck cords.
We like the broad deck mounting flange. We like the molded seal. Between these two factors, they absolutely cannot leak through the deck. Most have tinned wire, and because they are used for motorbike charging, the wire is typically at least 14 AWG.
Maintain polarity. If you are careful with your wiring you’ll ensure correct polarity.
We have used these SAE connectors on a Stilleto 27 for 8-10 years with no problems, while multiple brands of “marine-grade” connectors failed.

The COLREGs allows two lighting schemes for sailboats; either red and green side lights plus a stern light, or a single tricolor mounted at the top of the mast. The advantage of the tricolor is that it can be seen above waves. However, like a masthead anchor light, it is hard to see at close range. Also you can’t use a tricolor when motoring, since your white steaming light indicating a power-driven vessel must be above the side lights.
A less commonly seen combination is for sailing boats is red over green, one meter apart, at or near the top of the mast. This is in addition to the usual side lights farther down and the white stern light. Advantages of this setup are increased visibility in waves, visibility in close quarters, and unlike the other options, a means of estimating distance, since more than one light is visible at a time.
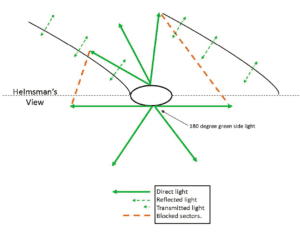
It is widely believed that the red-over-green light is for sailboats longer than 20 meters, but in fact there is no size restriction. A tricolor cannot be used by boats over 20 meters, and so red-over–green makes sense for them at sea. Ideally, the lights are above the mast and unobstructed in all directions. A one meter mast light could also be attached to the top of the mast; it won’t increase the air draft by one meter, since the VHF aerial is probably more than half that.
However, the USCG COLREGS manual clearly shows the green light some distance down the mast, where it will be blocked in some directions by the mast and sails. Green light will also reflect off the sails, which can be annoying. Commonly, instead of a single green light, 180-degree green side lights are mounted on each side of the mast, 1-meter down, with a red light at the masthead.
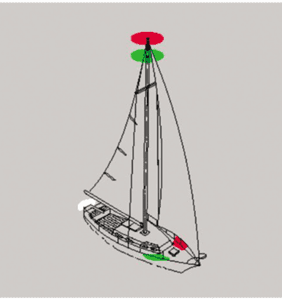
This requires one more pair of lights, but no more cabling than a tricolor. However, a hoistable red-over-green modular light like the one described in the adjacent articles could be used when more visibility is desired.
A paper recently submitted to World Sailing lays out the problems sailboats face trying to comply with the COLREGs (http://honeynav.com/wp-content/uploads/2020/04/OC4biNavigationLightReportVerFinal-25596.pdf).

This article was first published on May 18, 2022 and has been slightly modified for clarity.






Sailboats under no circumstance are under the category of ram. They are not restricted of maneuver. No need for this
Where did you get this idea? Sailing vessels had in the past performed many of the tasks in Colregs Rule 3(g) and most are also auxillary power driven vessels. They can, for instance, engage in emergency towing and are then very much in a RAM condition. Bering Sea Gold had a sailboat involved in dredging (and diving!). The same lights are used for diving. People don’t dive off sailboats? That’s news. Sailboats can be aground, and then should display two red all around lights. Just omit the white in between.
Which case do you disagree with and why? Diving at night (COLREGS rule 27ei and state law)? Lying to a drogue (steering is greatly restricted and in survival conditions releasing the drogue is not an option)?
Sail or power is not a factor in these determinations. Very likely the sailboat has no sail up and is a power driven boat for the purposes of COLREGS.