

Conventional commercially available anchor chocks, though convenient, can be nasty metal toe stubbers and not particularly attractive. In contrast, wooden chocks are easy to make, handsome, and relatively snag- and toe-proof.
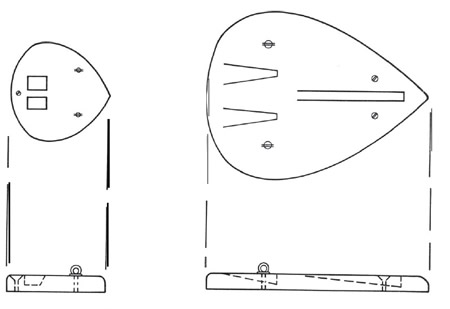
The drawing and photograph show the basics of a design suitable for forth and Danforth ripoffs; no great imagination is necessary to adapt the concept to plough type, yachtsman or fisherman type, or Northill anchors. You could even devise one for a Bruce, but you would, of course, be stuck with Bruce’s uncompromising high profile rigidity… Sorry, but we think Bruces are best left to their original purpose of anchoring oil rigs.
The example shown was made about 30 years ago of Honduras mahogany. For reasons of maintenance, oiled teak is preferable. Varnished wood simply wasn’t made for cradling heavy chunks of metal.
It holds a vintage 20 pound Dan-forth. The fluke and shank rest is of 1″ stock with largest dimensions of 15″ x 8 1/9″. The crown rest, 8″ x 6 1/8″, is of 7/8″ stock. One-inch stock should be adequate for any anchor up to about 30 pounds.
Design the larger piece so that about 3″ of the flukes and all of the shank are contained in a resting posi-tion. Design the crown rest with at least an inch of width outside either edge of the crown.
The chock may be of any shape which accommodates the anchor parts and suits your taste. Once you decide on a shape, make a template by running a straight centerline on a piece of card stock or heavy paper. Lay the centerline of the anchor on the line you’ve drawn. Sketch half of the chock so that it encloses the necessary parts. If you’ve got some Copenhagen sweeps (ship’s curves), use them to fair up the curves. If not, try drawing with a dashed rather than solid line; most people can draw smoother freehand shapes with dash-ed lines.
When you’re satisfied as to the shape, cut it out of the card stock. Tell the kids you’re regressing to paper dolls, if they ask.
Draw a centerline on the piece of wood and transfer the whole shape by stationing your cutout or template on the centerline. Then draw around the template, and flip the template over to get the other, exactly match-ing side.
Cut out the wood; then lay the an-chor on the two pieces and, lining up on the centerline, mark the positions of the crown, fluke, and shank recesses.
Now you’re ready to chisel out the !recesses. If you’re an experienced ‘wood butcher, you’ll have your own procedures. If not, here are some suggestions:
First of all, you’ll need a high quality chisel with a 1/2″ blade. The “secret” of good woodworking is to make sure your edged tools are really sharp. Take the time to dress your new or old tool on a good Arkansas stone using light oil as a lubricant. Take great care to keep the angle con-stant as you stroke the stone; other-wise you’ll be rounding the edge rather than sharpening it. When you can shave a hair from your arm, you’ve got the edge sharp enough.
Estimate the depth necessary for the tips of the flukes and place a piece of tape on a 1/2″ drill bit at the ap-propriate depth, Drill down to this depth at the position of the tips. This hole will be your depth control. Clamp the wood firmly; and, using the drawn shape of the flukes as a guide for your sharp chisel, begin slowly to chisel out the shape and slope. Be patient; chisels are essential-ly slivering tools, not gouging tools. Resharpen whenever the edge becomes even faintly dull. When you approach the final form, use the chisel as a straightedge to check smoothness of the slope. Your final dressing strokes should be done with the chisel held at a very low angle to the work.
The shank slot is easier insofar as its edges are parallel, more difficult in-sofar as there’s a longer slope to cut and smooth, But the procedure is the same as with the fluke recess. Drill a control hole; a 5/8″ bit produces a 5/8″ slot (which is good for anchors up to about 20 pounds.) Then proceed as before, carefully and patiently shaving down the sloped slot.
For the crown rest, use your chisel to create the vertical control depth.
This is one of the few times when US ing a hammer on a chisel is ap-propriate. Hold the chisel along the forward vertical edge of the recess you are making, then tap it with a leather or wood mallet (not a metal hammer). Because you are cutting across the grain, the chisel will not penetrate very deeply.
Use the guide lines to chisel up to the guide cut, estimating the location of the sloped, aft edge. Repeat until you approach the required depth, checking your progress with a ruler. Smoth up all the edges and surfaces, keeping the chisel sharp for this work. Try the anchor in the chocks and modify recesses as necessary. When it all fits, round the edges with a rasp or surform and smooth with sandpaper.
Drill for fastenings and finish the wood. An oil finish is most suitable for teak chocks, given the wear and tear they’ll be getting.
The chocks should be fastened through the deck with 1/4″ bolts. Use both flat head and eye bolts, the latter for lashing the anchor with small diameter nylon or dacron braid. The eye bolts shown are standing proud, for the sake of a clear drawing; you might prefer to countersink the heads so that only enough of the eye pro-trudes above the surface to allow threading the line.
Alternately, you can use all flat head bolts and attach eye straps for the tie downs.
The cabin top is the traditional loca-tion for anchor chocks on sailboats. In this position it is readily available, less prone to snagging sails and sheets, and contributes least to pitching. The drawback is that the relatively high location has a slight effect on the boat’s stability.
When mounting chocks, use old-fashioned bedding compound, such as Dolfinite; it is easy to clean up with turpentine, in contrast to the more difficult mess made by silicon or polysulfide.


