


The best way to treat an iron keel that’s rusting is to sandblast the whole thing and apply a complete, new, epoxy-based coating system. But that’s not always feasible or desirable. Because of the mess involved, many boat yards do not allow sandblasting. Even when this is permissable, a complete recoating job also means a complete re-fairing job, and that in turn means lots and lots and lots of slow, boring, dirty work if anything approaching a proper, smooth foil is to be achieved.
288
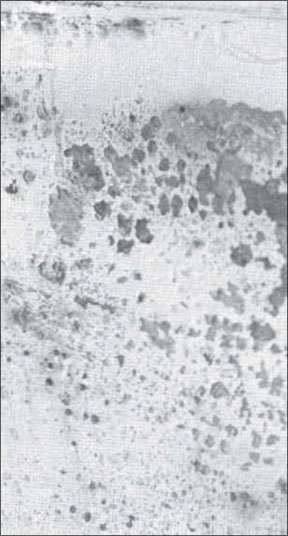
Because of the problems involved in complete refinishing of an iron keel, patch painting of rusted spots is often the only practical way to go.
Begin by cleaning the rusted spots as thoroughly as possible. Take your time here as this is the most important step. Chip off any scale with a cold chisel or welder’s chipping hammer, then wire brush-use a drill-powered brush where possible – and sand with coarse paper until you’re down to clean, bright iron. Use fine sandpaper (#150) to feather in surrounding, sound paint, and you’re ready for your new coating. Get paint on the bare, prepared iron as soon as possible. Iron will begin to oxidize almost immediately, and leaving it bare overnight will make much of your preparation go for naught.
Unfortunately, the best possible anti-rust coatings – those with epoxy bases which are true vapor barriers – are not compatible with other paints. Epoxies just won’t stick to other coatings; and, thus, because patch painting must lap over onto other paint, epoxies can’t be used in this application.
Our own experience backs up the recommendations of the paint manufacturers. The best coating to use in patch painting iron is zinc chromate paint. All the major manufacturers of marine coatings make a good zinc chromate. Take your choice and follow the directions. The most important rule to follow is three coats must be used. The object is to form as nearly an impenetrable barrier to water as possible, and three coats give a far better chance than one or two.
Patch painting isn’t the ultimate answer. Actually the ultimate solution isn’t even the sandblast – epoxy route. It’s replacing the damned iron with lead. But that’s even less economically feasible than sandblasting! Careful preparation and three coats of zinc chromate paint, however, make for a good, economically and manpower effective, finite solution.
-John Pazereskis
As a rule, lead keels require far less care than iron. Nevertheless, they are not maintenance free. While you don’t normally think of your lead keel as corroding away, lead keels can develop significant problems that both degrade performance and reduce the value of your boat.
The main culprit is bottom paints with a high copper content. Copper paint on a lead keel creates a galvanic couple, just as copper paint does on an iron keel. Fortunately, the difference in potential between lead and copper is far less than the difference between iron and copper, so that corrosion problems are commensurately smaller.
288
However, it is common to see lead keels with crumbly, whitish surface deposits, which when scraped away reveal a porous surface where the lead has corroded. Fortunately, the surface of a lead keel does not corrode and pit in the same manner as an iron keel, and reasonable repairs can be made without expensive equipment.
A drill-powered wire brush will usually grind away surface deposits and do an adequate job of cleaning out shallow corroded areas. It is important to remove as much of the crumbly oxidized lead as possible, to create a good surface for filler bonding.
With the lead clean and bright, fill corroded areas immediately with an epoxy filler. The best epoxy fillers for this purpose are the ones you make yourself from epoxy resin, such as the Gougeon Brothers West System epoxy, and a filler such as phenolic microballoons or microspheres. Remember that lead is pretty soft, and you don’t want your filler to be significantly harder than the surrounding material.
When filling, give the area to be faired a prime coat of unfilled epoxy before applying the thickened epoxy mixture. This will allow a better bond between the filler and the surface. You can allow the clear epoxy to partially kick off before over-coating with filler, but don’t let it cure completely or you’ll get a poor bond.
When the filler has cured, sand or plane it level and smooth. A belt sander or conventional hand bench plane can be used, since lead planes almost as easily as wood.
With all corroded areas and damaged areas cleaned and filled, sand or wire brush the rest of the keel to bright metal. A belt sander or disc sander works fine here, although proper use of either tool to avoid gouging the surface takes a little practice. A lead keel is far easier to bring to bright metal than an iron keel. The fin keel of a 30-footer can be done in an hour or so.
To make sure your keel doesn’t begin to corrode again, you must completely isolate the surface of the keel from the bottom paint with an epoxy barrier.
This is a two-stage process. First, the keel must be primed with a vinyl primer, such as Regatta Vinyltex 50/51 or Interlux Viny-Lux Primewash 353. The primed keel can then be over-coated with an epoxy mastic such as Regatta Epoxydur Mastic 3630-3631. Surface preparation and the timing of application of the coats of vinylepoxy systems are critical, so the manufacturer’s instructions must be followed to the letter.

288
The epoxy mastic coating does not sand well, so special care must be taken in application to get a smooth keel surface. This same epoxy system can be used on iron keels that have been blasted or ground to bright metal, but is only effective on a completely clean surface free of any rust or scale.
Several coats of the epoxy mastic can be used. The thicker the coating, the more effective the barrier between the keel.
The only drawback of epoxy sealing of an external keel is that it no longer functions as a good ground plane for Loran and single sideband, or as access to ground in a lightning protection system. To compensate, you should install an external grounding plate such as the Dynaplate.
Surface corrosion is not limited to the lead keels on older boats. Poorly alloyed keels on new boats can also corrode. Fortunately, the cure is not difficult – only labor intensive – and the prognosis is for complete recovery and a long life. Yearly checkups are recommended, with local retreatment as necessary.
Beauty of Internal Ballast Really Is Skin Deep
If you’re gloating because you think your encapsulated keel frees you from any worries, forget it. Encapsulated ballast frequently requires more complicated care than an external ballast keel.
The danger is damage to the fiberglass shell surrounding the keel.
Even if you haven’t run aground this year, there’s a good chance that some where along the way you have acquired at least some superficial gouges in the lower part of the keel shell. These should be treated before they become problems. Even superficial damage to the gelcoat can allow water penetration into the laminate.
Treatment of superficial gouges in gelcoat or the first layers of the laminate is straightforward. First, wash the damaged area thoroughly with high pressure fresh water. Dry the gouged area with a handheld hair dryer. Roughen the edges of the gouge with very course sandpaper – 50 grit or 36 grit.
Wash the area again thoroughly with acetone. Use a small, stiff bristle brush to clean the gouge completely. Dry again with the hair dryer, after most of the acetone has flashed off. Don’t breathe the stuff.
With the area thoroughly clean and dry, brush on a clear coat of epoxy resin, followed by resin thickened with microspheres or micro-balloons. Stick waxed paper over the epoxy patch to keep the epoxy from sagging out.
When it’s dry, sand smooth and touch up any voids or hollows with more filled epoxy.
When everything is filled, prime the patch and the surrounding area with a two part epoxy primer, such as Woolsey MFP. This is important, because the gelcoat that you have sanded is now pretty porous, and is more likely to develop blisters than polished gelcoat.
More extensive damage to encapsulated keels, requiring structural fiberglass repair, will be dealt with in another article. How do you tell if you’ve got structural damage? As a rule, any time the shell is ground away so that any of the ballast is exposed, or any time laminate is exposed over an area’ greater than a square foot, you probably need to do more than patch with putty.


