

Rock-solid deck hardware installation begins with a tightly sealed core.
Installing new hardware on a cored deck means sealing the core around every penetration. Skip this step and water will eventually seep between the skins. Balsa will rot, and repeated freezing and thaw cycles can turn foam core to mush and cause delamination.
The typical solution is to drill an oversized hole, fill the cavity with epoxy, and redrill as needed. But this method is not without drawbacks and shortcomings:
• Some people have become sensitized to epoxy, with symptoms ranging from skin irritation to full-on shock.
• Epoxy has limited tolerance for moisture; yes, you should dry the core first, but that doesn’t always happen.
• If you use fast-curing epoxy in warm weather, it can exotherm and boil out.
• If you use slow-curing epoxy, it might not cure overnight.
And then there are practical problems with the traditional method. Working from the top, you must over-drill the hole to get enough room for the epoxy to enter and to allow air to escape. This requires removing more of the top skin, creating a larger scar to disguise should you decide to relocate the gear. Completely filling a hole on a vertical surface requires a bit of magic. And then there’s the nature of the epoxy plug, which can become brittle and crack over time. Unless the plug is fully supported by a backing plate, it can be pushed out of position, again exposing the core to moisture.
TRADITIONAL METHOD
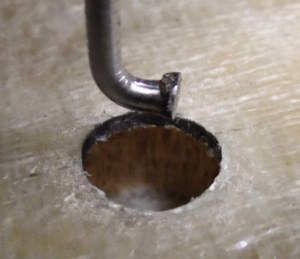
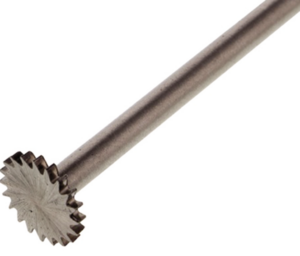
1. A bent nail (1) is often prescribed to carve out core, but it can leave an uneven surface for bonding, especially near the skins.
Although epoxy is our “go-to” material, and the traditional method is well proven, we believe there are better ways.
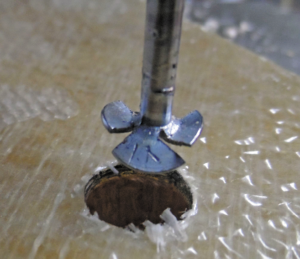
In the traditional method, a hole is drilled through the top skin only, at least as large as the fastener and large enough to admit the core removal tool of your choice. The core is removed by moving a cutter up and down between the core skins and around the circumference of the hole until the core is dust. You need to pay special attention to the insides of the top and bottom skins, because that top-to-bottom bond is what helps maintain strength in the laminated structure.
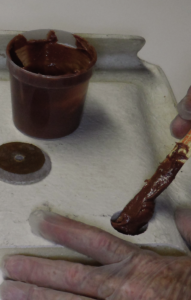
We like to use a bent roofing nail. It removes chips, produces a deep cavity, and cuts smoothly. After blowing out the chips, the hole is filled with slow cure epoxy (in warm temperatures, fast-cure will exotherm, creating bubbles and a poor seal).
The hole is then re-drilled through both skins to fit the fastener, and the hardware bedded and installed (see “Trouble Free Deck Hardware Installation”).
ADDING GLASS REINFORCEMENT
You can protect against cracking with reinforcing fiberglass. Adding glass fibers is particularly useful when installing or repairing screws or other self-tapping fasteners.
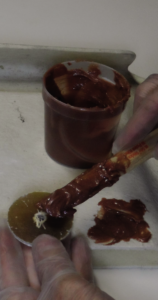
Inject about 50 percent of the epoxy first. This will help wet out the cloth. Using a large cable tie, stiff wire, or similar tool, push 3/4” x 2” strips of 6-ounce fiberglass cloth into the epoxy-saturated hole. You can fit 2-4 strips in the smallest holes and 3-6 strips into larger fastener holes. Only a few strips are needed for crack control, but for future screw holes, cram as many as you can. Don’t use fiberglass mat, roving, or biaxial cloth, these weaves don’t conform to the hole as easily as cloth, and they are harder to wet out. Follow up with more epoxy to fill the space, gently poking the glass to help the air release (see “A Stronger Screw Hole Repair”).
TECH GUIDE: CORE FILLER SPECIFICATIONS
| MANUFACTURER | PRODUCT* | TENSILE STRENGTH (PSI) | VISCOSITY AT 72°F IN CENTIPASCALS (CPA)* | COMMENTS |
|---|---|---|---|---|
| CORE SEALING | ||||
| SYSTEM 3 | General purpose 2-part epoxy | 7,500 psi | 950 cPA | Add high-density filler and/or cloth if needed. |
| WEST SYSTEMS | 105/205 2-part epoxy | 7,800 psi | 975 cPA | Add high-density filler and/or cloth if needed. |
| WEST SYSTEMS | G-Flex 2-part epoxy | 3,440 psi | 15000 cPA | Tougher, better with damp surfaces. |
| GENERIC PASTE EPOXY | Generic thickened epoxy | 1,500-2,500 psi | Paste cPA | Weakened by micro air bubbles. Tougher. |
| PETTIT | Splash Zone 2-part epoxy | 4,100 psi | Paste cPA | Will bond wet. Low exotherm. |
| CORE REPAIR BY INJECTION | ||||
| SYSTEM 3 | Clear 2-part epoxy | 7,800 psi | 380 cPA | Penetrates well, good bond. |
| SYSTEM 3 | Rot Fix 2-part epoxy | 7,800 psi | 325 cPA | Penetrates well, good bond. |
| WEST SYSTEMS | 105/205 +5% acetone 2-part epoxy | 2,800 psi | 310 cPA | Solvent must be able to evaporate. |
| GORILLA GLUE | Original 1-part polyurethane | 600-4,250 | 3000 (thins as foam) | Expands and foams in moisture. |
| *Epoxy adhesives thin with heat, but also gel faster. Slow hardeners delay exotherm in temperatures below 90°F, but slow hardeners are also more vulnerable to moisture. |
EXOTHERM
One wouldn’t naturally think that a fastener hole would be prone to exotherm. The volume seems so small. The trouble is that the core insulates the hole, preventing the epoxy from shedding heat. Below 70 F and out of the sun, a fast-cure epoxy like West Systems 105/205 will work for this job. In warmer temperatures, or in the sun, the epoxy will become boiling, and the plug will be more foam than epoxy. Slow hardener (such as West Systems 206) is the standard recommendation, but in cool weather it may not be fully cured until the next day, delaying work.
Toughened epoxies, such as G-Flex, and underwater epoxies do not have the same tendency to exotherm in small holes. They cure more slowly and give off less heat in the process. They also have a reduced tendency to crack. When using the traditional, “core-carve” method for filling screw holes, G-Flex performed well in our bench tests. Field tests are still ongoing. Underwater epoxies are too thick to work with the traditional method, but we have tested them using what we call the inside-core method.
SPECS: BOND STRENGTH
| ADHESIVE | SECONDARY BOND TENSILE STRENGTH |
|---|---|
| VINYLESTER | 500 psi |
| POLYESTER | 350 psi |
| EPOXY | 2,000 psi |
POLYESTER AND VINYLESTER RESINS
Polyester and vinylester shrink during cure, and the secondary bond—the bond an already cured skin—with the outer skins is about 4-6 times weaker for polyester, and 2-4 time weaker for vinylester. This bond is insufficient, especially when compared to the advantages of epoxy.
RIGID POLYURETHANES
(GORILLA GLUE, TITEBOND, ETC.)
The main advantage of rigid polyurethane glue is its moisture tolerance. Previously, we learned that a deteriorated deck can be stiffened by injecting adhesives or foam (see “Can Glue Injection Save a Rotten Core?”).
We continue to recommend complete core replacement as the best way to rebuild damaged decks (“Step-by-Step Deck Core Repair,” and “Deck Core Repair from Underneath”). However, while exploring the glue-injection method, we found the Original Gorilla Glue performed better than epoxy in some circumstances.
We’ve since become fans of the glue, using it for several small repairs and in situations where tearing the boat apart was either too complex or not warranted. We wondered if Gorilla Glue could do double duty when sealing new holes for fasteners. Could it seal the core against water intrusion and stiffen up a larger area of deck to resist compression loads?
The answer is yes—with limitations. Gorilla glue foams and expands when reacting with water, so you have to use it differently than you would epoxy. The foaming is inherent to this type of glue.
Assuming you’ve carved out the core using the traditional method, you pump or pour the glue slowly into the hole allowing air to bubble out. Within 5 to 10 minutes, the glue will begin to foam and expand.
Don’t let the foaming glue spill back out, force it back into the core by plugging the holes with wooden dowels. This will push the glue into voids. Leave the dowels in place until the glue has finished expanding, but pull them out with a set of pliers before the glue cures (2-4 hours). Later, use epoxy to fill the dowel’s impressions. This method works when stiffening soft spots in dry core.
However, the method did not fare as well during our test with damp core. For that test, we made a plug in a balsa core section that had been soaked in water for two weeks and then allowed to dry for 8 hours. In this case, the foaming was extensive and the resulting plug was porous and weak, much like the core material itself.
With dry balsa, however, the Gorilla Glue plugs had physical properties similar to epoxy plugs, with minimal foaming. As with epoxy, these plugs could also be reinforced with fiberglass.
There are other polyurethanes that foam less with moisture (Titebond III). However, foaming cannot be entirely avoided. For this reason, we’d avoid polyurethane glues for sealing fastener holes in core.
CONCLUSIONS
The traditional method remains our “go to” for routine fastener installations. If we’re going to be installing a large backing plate, the inside core method is faster, easier, and stronger, when the entire process is considered. It is perfect for winches and windlasses. If access is sufficient, we also like this method for repairing leaking fasteners (the old, failed plug is easily removed) and for installing new fasteners in deteriorated decks. We get a good look at the core, the reinforced plug is larger, and the backing plate can be oversized to firm things up.
If you have multiple deck holes to seal, have access to the inside of the holes, and will be installing backing plates, it may be best to tackle the whole job from inside. This method will also work from the outside if you are installing a mounting pad large enough to generously cover the hole you will make in the core. It is handy when placing fasteners through plywood core, since plywood core is difficult to remove with a bent nail.
We do not recommend this method for large through-hull fittings. Too much of the inside skin is removed.
• Drill a ¼-inch hole through from the top side to guide the hole saw. You will redrill to the fastener size later.
• Using a hole saw, drill a ¾-inch (or larger as needed) hole through the inside skin and core, using the initial hole as a guide. Use a depth stop to avoid damaging the top skin.
• Pop out the core and clean out the hole using a bent roofing nail or small chisel. You do not have to carve core from under the edge of the inside skin, just clean the edges of the hole and underside of the top skin.
• Make a backing plate with a ¼-inch center hole (the hole is optional but helpful). Round the corners at least 1-inch radius and taper. Center over the hole and mark the outline with a pencil.
• Fill the hole with thickened epoxy, leaving it slightly proud. Thinly butter the backing plate and the backing plate contact area, which should be marked in pencil.
• You can also reinforce the plug with glass fiber, but don’t try laying in glass cloth, roving, or mat; the thickened epoxy will never wet it out. Instead, just work in a small handful of chopped strands, adding them between layers. You don’t need much fiber to control cracks, so focus on even distribution.
• If the core is damp, let it dry. If this is impractical, consider using Pettit Splash Zone underwater epoxy. It bonds to damp surfaces, will cure underwater, and has suitable strength and hardness.
• Beware the exotherm. Thickened epoxies exotherm slower than straight epoxy, because of the mass added by the filler, but in warm conditions (over 80°F) use a slow hardener. Waterproof epoxies are already slow-cure formulas.
• Press the plate into place, securing with a waxed bolt (can be smaller than 1/4-inch) through the center. Remove this as soon as the epoxy gels. Using the epoxy that squeezes out, form a rounded fillet between the skin and the backing plate.
• After curing, redrill the center hole to fit the fastener.
The larger drilled hole is easier to clean out, the hole is easy to fill with epoxy putty, the plug is larger, better bonded and better supported, and the backing plate is now an integral part of the hull. Yes, you lose a small amount of skin on the inside, but that’s more than made up for by the increased efficiency of a well-bonded backing plate. We think this is a better method for sealing common through-bolts.

Core weakened or damaged by water intrusion—usually due to poor hardware installation practices—is a common problem in older boats. In recent years, we’ve conducted a series of related tests to determine effective repair and prevention methods.
• “Cored Hull Construction, Does High Tech Mean High Quality?” (PS October 2007)
• “Boat Clinic: Minor Repair to Cored Decks” (PS Online March 2011)
•“Through-bolting Fiberglass: An Inquiry into Failure Modes” (PS June 2013)
• “A Stronger Screw Hole Repair” (PS May 2018)
• “How Big Does a Backing Plate Need to Be?” (PS August 2016)
• ‘Step-by-Step Deck Core Repair” (PS July 2020)
• “Can Glue Injection Fix Rotten Core?” (PS July 2020)
•“Deck Core Repair, from Underneath” (PS February 2022)
Here we compare filler materials used to seal core from water intrusion.
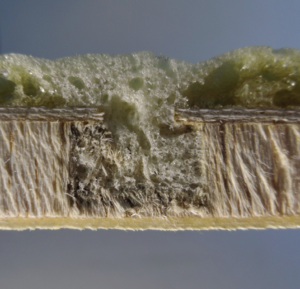
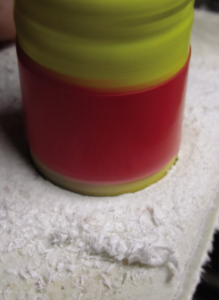
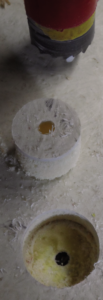
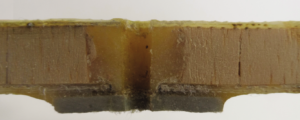
1.Gorilla glue fails to form a solid plug in damp core. The filler is porous and weak, similar to that of a foam core.

2.Dry balsa core sealed with 105/205 Epoxy is rock solid and well bonded.
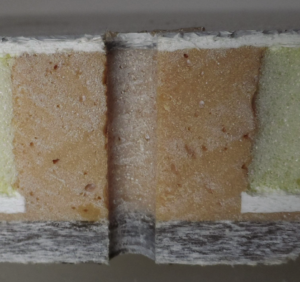
3.1:1 pre-thickened epoxy was used here with foam core. It is okay to have a few isolated bubbles. The important thing is a good bond at the top and bottom.
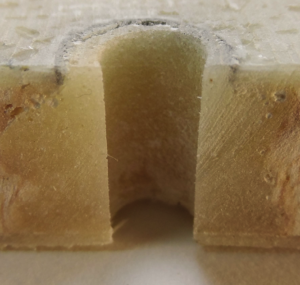
4.General purpose two-part epoxy forms a tight bond in this photo of an epoxy plug in balsa.
This post was originally published on 18 May 2022 and has been updated.


_An Allen Wrench to Remove Core_ When I installed my fittings on Prestissimo, a 42′ sloop, I drilled a hole sized for the bolt, down to, but not through, the interior skin. Then I used a Allen wrench, with the short end sharpened like a knife, and the long end in a drill, to chop up the foam core. I vacuumed out the foam pieces, and used a squeeze bottle with an aluminum tube sticking out of the nozzle to fill the void with epoxy from the bottom up. After drilling out the holes I installed the fittings, bedded the backing plates in epoxy, and tightened the bolts which were sprayed with mold release. Finally the fittings and bolts were removed, the holes were cleaned (if necessary), and everything was reinstalled with a generous coating of BoatLife under the fitting and all around the bolt. She has been sailing for 18 years and not a single fitting has leaked!
My preference for holes and fillets is milled glass fibers. In the jar/tub, it’s like lint. After it sets in epoxy you can beat on it with a 3# hammer for a long time before it starts to crack.
It stiffens the epoxy well enough that it can often be used vertically without sagging.
I thought we had put the ‘bent nail’ issue to bed decades ago. There are so many useful Dremel attachments out there, anything else is a crime against efficiency and pride in your work. Dremel 115, 196 or 199, Countersink, and bed with Butyl tape (isobutylene-isoprene, not mastic).