


For many boaters, damage control means a cell phone call to Sea Tow, Tow Boat US or another marine assistance provider. These are reliable support services akin to AAA afloat. But for those sailing offshore, or along less populated parts of the coastline, such options may not be available. This is one of the reasons why self-reliance and a clear understanding of damage control techniques are still well worth cultivating. This month we’ll explore damage control and how it relates to a sailboat’s three critical appendages—the rudder, rig, and keel.
Preventing problems is a lot easier than coping with a 0300 catastrophe, and regular inspections are the pathway to better reliability. When it comes rigs, rudders, and keels, there’s much to check, and each haulout is an opportunity to ward off potential problems. Steering cables and linkage, rigging components, from chain plates and mast step to the mast head, all deserve a close look during haulout. A tiny part can be a critical piece of hardware and it’s much easier to discover and remedy problems in the boatyard than while at sea.
Before every voyage is another chance to prevent potential trouble. The legendary offshore sailor Rod Stephens reminded sailors to, “never head offshore without first going aloft and checking each fitting on the way down.” This kind of scrutiny lessens surprises at sea.
Unfortunately, not all incidents stem from metal fatigue and corrosion. Collisions, groundings, and extreme weather events also play a role in damage control. It’s another good reason to develop the skills that will help you cope with the unexpected—a key facet of good seamanship.
An effective damage control response begins well before you reach for a tool bag. When something goes very wrong aboard a sailboat, the first step is to tame the chaos. As in the case of a chaotic spinnaker broach—there is a critical moment when effective leadership and crew competency can really pay off. The biggest dividends are derived by a well-trained crew, because there’s often only a small window of opportunity when quick action can change the outcome.
Fixing what fails at sea sounds a lot easier when an incident is analyzed ashore. As with most physical activities, the real challenge lies in putting theory into motion. Wind, waves, and weather set their own cadence and provide a crew with a full agenda. Add a major breakdown and the skipper faces a dual focus—navigation and damage control.
Bridge resource management is big ship talk for how jobs are allocated, progress monitored, and leadership decisions are made. The most simplified rendition of the concept is demonstrated by the singlehander and how they cope with a crisis. With one person, the chain of command is streamlined. Duties are prioritized, but not delegated.
As crew size expands in number so does the need for effective leadership. One of the skipper’s key responsibilities resides in tracking how things are trending, whether outside assistance is needed or if a MAYDAY call should be made. Things can go from an easy-to-fix scenario to an abandon ship crisis in a surprisingly short period of time.
UNCONTROLLABLE URGE INCIDENT
A tragic example of this kind of downhill cascade occurred aboard the 32-foot ultra-light-displacement boat (ULDB) Uncontrollable Urge. Her experienced five-person crew were sailing in a Southern California regatta known as The Islands Race. And during a windward leg near San Clemente Island the sloop’s rudder stock failed and the blade sheared off. The crew quickly responded with a sequence of recommended but unpracticed emergency steering techniques. Efforts to gain control by trimming sails, using a spinnaker pole rudder jury rig, intermittently engaging the engine and finally avoiding a lee shore by anchoring, all failed.
During this time, offers of assistance were not engaged, commercial towing was not available and the skipper’s delay in broadcasting a MAYDAY, set the stage for disaster. Two and a half hours after the rudder had broken and all attempts to affect emergency steering had failed, the 32-foot sloop grounded on a surf swept ledge and the crew was swept ashore. Tragically, one of the crew member, 36-year-old Craig Williams, drowned (see PS August 2020, “Making a Case for Inherent Buoyancy”).
A FOCUS ON STEERING SYSTEMS
Yacht designs emphasizing directional stability have been on the decrease for decades. The trend in modern sailboat design is toward deep fin keels and rudders that allow boats to turn on a dime and deliver better windward performance. However, these deep, knife-like, high-aspect-ratio rudders must be engineered to handle both sailing loads and other impacts (see “Steady at the Helm,” PS March 2020).
If the control of the foil is lost or the foil itself is broken off, directional control of the vessel goes away. Many traditional longer keel cruising boats are more sluggish to turn, but are more willing to hold a course, which makes them easier to steer using alternative methods should the rudder or helm be disabled.
In today’s boats, steering loss is a much bigger deal. Unanticipated failures vary in complexity. In many cases, such as when a clevis pin falls out, or when a cable between the steering wheel and the rudder stock breaks, it’s relatively easy to fix. Just attach the emergency tiller. Assuming this essential piece of gear is well engineered and easily accessible, you’re back in business.
But if your emergency tiller is an afterthought added to meet CE certification, the emergency steering it provides may be less than desirable. If you’re planning on ocean racing or lengthy offshore cruising, take a close look at how robust the emergency tiller and its connection to the rudder stock happens to be. Will it suffice for days and handle steering in gale force conditions? Based on our experience, it’s probably not up to the task (see “The Hunt is on for a Quality, Well-placed Emergency Tiller,” PS November 2008).
I recall losing wheel steering aboard our 1969 Ericson 41 sloop Wind Shadow just two days out of Cape Town, South Africa, with 3,500 miles until our next planned landfall. Within 15 minutes we had the tiller in place and lines from the servo-pendulum self-steering gear led to the tiller instead of the wheel.
In the early racer/cruiser era, many 40-footers were designed with the option of a tiller or wheel. Consequently, there was a massive cap on the head of the rudder stock situated at the aft end of our cockpit sole. It was ready for the tiller to be pinned in place.
Not many steering failures result in an improvement in performance, but this one did. With the steering wheel no longer imparting its “flywheel effect” on the serve-pendulum windvane system, the direct vane-to-tiller linkage made the self-steering even more responsive.
Things get more complicated when the steering failure stems from a broken rudder rather than a linkage problem. If the rudder stock has sheared inside the rudder blade, at least there’s no hole in the hull. Today’s short chord, high aspect ratio fin keel sailboats are less directionally stable, and without a rudder, they can become an unguided missile.
Trading directional stability for superior maneuvering near the starting line and in close-quarters is a fair compromise on a club racer. But a squirrely hull can become a big challenge when it comes to jury-rigging emergency steering. Options for improvised steering vary according to hull design, but one thing is certain. None of the alternatives will work as well as the original rudder.
For this reason, rudders should be designed and built with an extra-large safety margin. During every haul out, spend some time checking the rudder blade, skeg (if present), and support hardware. Climb into the locker or other access point and using a bright flashlight, check the laminate around the rudder post tube for signs of stress. Also check the cables or linkage that delivers the helm’s steering force to the rudder and note any signs of chafe, corrosion and other signs of wear.
RIG LOSS
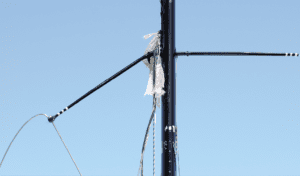
Standing rigging behaves like links in a chain. If any component lets go of everything else in the tensioned pathway also fails. A good starting point when it comes to rig awareness is to identify essential rig components. These tensioned wires or rods are critical to keeping the mast in place. For example, the loss of a forward or aft lower shroud on a conventional keel-stepped sloop, cutter or ketch rig usually leaves the mast in place. But, an upper shroud or V-1 on the windward side fails, the rig is likely to come down.
A fringe benefit of a Solent rig or a traditional cutter rig arises from the two stays situated forward of the mast (see “Adding a Solent Stay,” PS September 2015). This provides a second chance to keep the rig in place. Roller furling headsail foils hide the rigging wire they surround. An underway failure of a headstay is a nightmare but when the rig also comes down, it further escalates the catastrophe. Another good reason for offshore and ocean voyaging sailors to consider two stays forward of the mast and running backstays is to add further redundancy. Rig inspections are always a good idea. And it’s important not to leave out vital components such as chain plates, spreaders, and the mast step itself. These are critical pieces of hardware and it’s very difficult to remedy problems in these areas while at sea.
Rig problems often announce themselves with a loud bang and the first question to arise is whether or not the mast is still vertical. If you’re lucky, it is, and the headstay and backstay remain in place. This is the time to tack the boat. It puts the tensioned side of the standing rigging, where the failure occurred, on the opposite side and relieves the load.
This maneuver starts out like a conventional tack. But in this case, the jib sheet is not released, and the net result is a backwinded headsail and the start of a maneuver called heaving-to. Once the bow passes through the eye of the wind, the main sheet is eased, and rudder positioned to turn the boat back into wind. The force of the backwinded head sail is opposed by the rudder’s effort turn the vessel into the wind. The mainsail is spilling breeze—not flogging—and the net effect is that the boat is forereaching. The keel is stalling, and the vessel is slowly moving both forward and sideways. The forces in play act to stabilize motion onboard—minimizing pitch, roll and yaw. This maximizes a crew’s ability to fix or jury rig whatever failed.

ALL HANDS ON DECK
If the rig does fail, it’s all hands on deck. The skipper should have a clear picture of who should be assigned to boat handling, navigation/communications and who will comprise the damage control response. The first task on the to-do list involves the identification of what has broken and what immediate action can be done to keep the rig in place.
In many cases an unused spinnaker, genoa or staysail halyard can be clipped to the rail on the side of the boat where a shroud has broken. Tools are at the ready to pull cotter pins and remove the toggle and turnbuckle associated with a parted shroud. A bow shackle can be screwed into place and a spare halyard attached to the chain plate. This is a temporary fix that will buy you time as the broken shroud is repaired or replaced.
Another approach is to crimp or clamp in a new, identical diameter, section of wire using multiple Crosby Clips or Nicropress connections made on site. These temporary fixes can be expedited when a swaged or terminal type end fitting is pre-installed on one end for making a hardware connection—to the chainplate,turnbuckle or mast tang for example. Then all it takes is careful measurement and a clean cut with enough extra length to accommodate the wire-to-wire junction.
Stalok or Hayn terminals can eventually be used to put the original 1×19 wire back in action. An extra-long stud terminal can fix wire breaks at a common failure point, just above the bottom swage fitting. In other cases, you’ll need toggles, link plates, or a short wire pennant to make up for damaged wire cut away from the broken stay.
The compression-type Hayn or Stalok terminals, however, are impractical for most emergencies (see “Screw-on Rigging Terminals,” PS June 2015).Splaying the wire, shaping it around a cone insert and torquing the terminal together is tough enough in a shop. At sea, it’s a project for magicians only. That’s why many sailors prefer to jury rig wire using Crosby Clips.
During a dismasting at sea, the vessel’s motion surging against the broken mast can be a threat to the hull. This is why the right tools and the skill of the crew are of vital importance. The on-and-off rigging tension as the vessel rolls in a seaway can be dangerous to the crew attempting to cut away or unpin rigging. Some favor diagonal pliers to grab and pull-out cotter keys and then use of a drift pin and a ball peen hammer to drive out the clevis pins. Others, equip the boat with a hydraulic cutting tool, a costly but valuable tool on larger vessels. In our own testing, the Swiss-made Felco cutters earned high marks in testing as did a sharp hacksaw (see “Emergency Rigging Cutters“, PS October 2001).
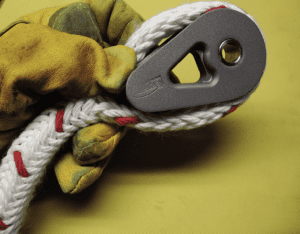
Low-stretch rope is a great asset when jury rigging spars to set a sideways storm jib or other sail remnant. The ideal cordage used for rigging is high-modulus 12 strand Amsteel or other Dyneema hollow braid that’s easy to splice and affords very little stretch. Yale’s Ph.D is another high modulus hollow-braid the allows for quick eye splicing. Its textured outer surface resists slipping, a valuable attribute when attaching a jury rigged spinnaker pole lashed to a mast stub. Adding a thimble to these eye splices is easy and will preserve the rope.
A key concern for the long-distance passagemaker is having enough line, fittings, wire, and terminals on board to be able to execute a functional jury rig. By pre-rigging a spare shroud, you’ll get a clearer idea of what you’ll need.
CONCLUSION
Naval architecture details how to create a stiff, strong and stable keel-to-hull connection. It needs to be a rigid junction where the lever-like influence of a deep, narrow-chord, fin-keel supporting a ballast bulb remains a stable, silent, structural component of the vessel. Creaks and groans emanating from interior joiner work during a rough water beat to weather can be tolerated. However, hull-skin flex, noise emanating from the garboard structure or signs of grid debonding or floor-frame failure spells trouble. These are inherent distress signals that forecast near-term structural problems. If left unattended, they will lead to critical failure. Vessels that show lateral keel flex each time the boat tacks are accelerating fatigue and shortening the structures life span.
Rigs, rudders and keels are appendages that endure cycle-loading and the resulting fatigue plays a key role in their lifespan. The lifespan can be extended by increasing strength and stiffness, but this comes with performance-robbing weight or a big jump in cost that comes with high-modulus materials and aircraft-molding techniques.
Another way to strengthen the keel attachment is to lessen the aspect ratio of the keel and lengthen its contact with the hull. (Most cruising boats already have modest aspect ratios and don’t dangle three tons of lead at the tip of long thin foil.) Lastly, be wary of damage caused by groundings, especially if it involves a swell and significant pounding. If you are buying a preowned sailboat, seek a surveyor with a good background in sailboat construction and make sure the three critical appendages get a clean bill of health.
The introduction of high-strength, low-stretch high molecular weight fibers (HMPE) in running rigging has been a game changer in sailing, with the technology trickling down into all aspects of running and standing rigging. We’ve documented the many uses of high-tech fiber ropes—everything from soft shackles to headstays—in previous reports, and the recurring lesson from all these reports is the ease of fabricating your own high strength, low stretch ropes.
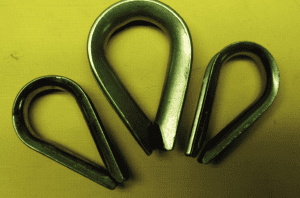
1. Stainless steel thimbles used for wire rope must resist tension-induced crimping.
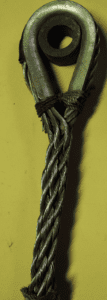
2. This 7″ x 19″ emergency headstay ends in a spliced eye around a pressed stainless steel thimble, reinforced with a hand-made bushing. The bushing was cut from an old Tobin bronze prop shaft and drilled to fit the clevis pin. Regardless of whether it’s a wire rope or HMPE cordage, it’s important to prevent tension-induced thimble elongation and flattening.
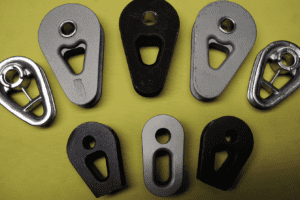
3. Purpose-designed thimbles made of anodized aluminum, machined billet aluminum, and stainless steel have holes sized to match the clevis pin diameters commonly used in rigging. Any of these would be a good choice for fashioning your own emergency rigging. At the other end, you could put a tensioning low-friction block like the one made by Colligo.
4. A single braid line such as Yale’s PhD (available in polyester and much stronger Dyneema) is easy to splice and fit around a thimble. This can be a handy asset when dealing with a rigging failure at sea. Another option would be to incorporate low-friction rings (see “Sizing Up Improvements in Low-friction Rings,” PS August 2021). The rings can be tensioned with HMWPE lashing (see “Lashing for Strength,” June 2019.) Ideally, your shroud should be pre-spliced, and ready to install and tension.

Another example of a critical failure is what happens when fatigue weakens the garboard region of a sailboat hull or the keel bolts that keep the ballast attached to the hull. The material fatigue, metal corrosion, and fiberglass (FRP) delamination caused by years of sailing, accidental groundings and, in some cases, poor design or manufacturing flaws, can severely weaken the laminate and hardware holding the ballast in place.
When the force exerted by the ballast exceeds the strength of the hull laminate keeping the lead or iron in place, failure can be cataclysmic. Unlike a rig or rudder failure, in which an able crew has a shot at jury-rigging something to save the boat, there is only one possible response to a catastrophic keel failure—it is spelled out in the Abandon Ship Bill.
The growing concerns about keel integrity have prompted a new stipulation in the International Special Regulations (ISRs), the guidelines for international yacht racing. The guidelines now include a stipulation that all offshore racing sailboats must show proof of a keel-and-rudder inspection done on a biennial basis. In our opinion, the same attention to keel attachment and rudder condition should be given to cruising boats heading off on lengthy voyages.


The 21st century tool for cutting away wire stays in an emergency is likely a battery operated grinder. Even a Dremel-like tool with an abrasive wheel can be very effective. Traditional tools (hacksaw, cutters) may require that the stay be under tension to be effective. Not so for a grinder.
Thankfully, I have never has to cut away a stay, but I have used my Dremel grinder many times.