

World Sailing (then ISAF) initially accepted Dyneema lifelines in 2012, but then banned it from all offshore racing in 2015. In 2018, World Sailing decided to allow Dyneema lifelines for offshore multihulls, realizing that the primary risk factor was stanchion chafe, and this resulted from hanging rail meat over the lifelines, something multihull sailors never do. Neither will most cruisers, though many will hang laundry, and in some smaller boats they use cockpit lifelines as a backrest.
In 2020 Australian Sailing produced a study of Dyneema lifeline chafe for World Sailing. They concluded that Dyneema was appropriate for lifelines in all categories, but that the installation was not simplistic [the word used in the report]. They further recommended that Dyneema lifelines be installed only by professional riggers because of the complexity of getting the design, chafe protection, and other installation details right.
Details on lifeline requirements, installation, chafe protection, and splicing methods can be found in the following Practical Sailor articles. We won’t repeat them here.
• “Fiber Lifeline Protection Plan,” PS September 2015
• “Long Term Test Evaluates Synthetic Lifelines,” PS September 2012 Other references include:
• Australian Dyneema lifeline study, https://cdn.revolutionise.com.au/cups/ sailing/files/bn1zle3qqnfxydut.pdf
• Rope inspection guide by Samson: https://samsonrope.com/docs/ default-source/technical-bulletins/tb_ inspection-retirement-pocket-guide_ aug2013_web.pdf?sfvrsn=c3d63bbd_2
• World Sailing Lifelines standards are found in the Off-Shore Special Regulations (which also includes in-shore racing as Category 4). https://www. sailing.org/documents/offshorespecialregs/ index.php
The most common cause of failure has always been chafe through the stanchion holes, accelerated by burrs. Some of these burrs are artifacts of manufacture, but most are the result of wires rubbing on the holes over time, often made much worse by rail meat hanging from bare steel lifelines. Smoothing these burrs and providing chafe protection are vital to a safe fiber lifeline installation. To smooth these burrs, use a Dremel tool, a rat-tail file, or an improvised cylindrical hand sanding device (sandpaper wrapped around a bolt will work). Sand down to 400 grit, and then polish.
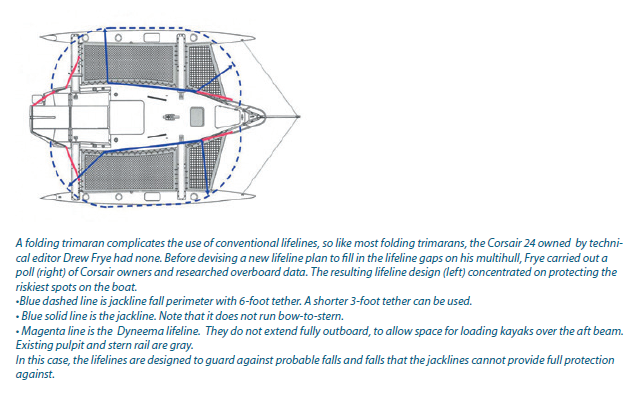
Man Overboard Survey For Corsair Owners
| PERCENTAGE OF SURVEYED MOB INCIDENTS ABOARD CORSAIRS | LOCATION AND ACTIVITY WHEN GOING OVERBOARD |
|---|---|
| 50 PERCENT | Working on the bow nets or center bow while launching or recovering a spinnaker. |
| 20 PERCENT | Steering from rear beam, outside the cockpit. |
| 10 PERCENT | Coming back in from the windward hull, across the tramp. |
| 10 PERCENT | UV damage caused forward safety net to fail (not main trampolines). |
| 10 PERCENT | Sitting out on tramp in severe conditions. |
| 0 PERCENT | Fall from cockpit. |
OBSERVATIONS
I like to start with what I know best. My first cruising multihull (Stiletto 27) didn’t have lifelines. The designer reasoned that the cockpit was well enough protected by high cockpit coamings (about 18 inches) and a tiller crossbar across the aft cockpit boundary. I never heard of anyone falling from those areas, so apparently he was right.
When working forward, we either wore a tether or learned to be careful, but there is little reason to be near the rail on the bow of a multihull, and they don’t heel more than 10 degrees. However, I did learn about hidden corrosion of coated stainless cable when a cable bridle securing the reacher tack let go with a startling “bang.”
The wire was badly corroded under the vinyl coating, with less than 1/3 of the original material remaining. Because the tack ran back and forth along the bridle, like a traveler, the wire was regularly flexed under load, not unlike a racing boat lifeline that endures bouncing rail meat for hours at a time. Thirty years ago, long before bare wire became the standard for World Sailing standard, we replaced the bridle with bare wire.
Our 34-foot PDQ cruising cat had plastic coated lifelines. When the lifelines were about 15 years old, we stripped some of the lines, looking for signs of corrosion. There was very little rust and no broken strands, no doubt because the lifelines rarely had any load on them. The boat had a center cockpit and we seldom touched the lifelines.
Our Corsair F-24 has no lifelines. Most folding trimarans don’t, because they are designed to fold onto a trailer,with the amas on their sides, resulting in the stanchions protruding awkwardly from both sides. Some were ordered with the factory lifeline option, and most of these were subsequently removed.
As a trimaran, there is also no need to go within six feet of the rail while underway. (Six feet is World Sailing’s specified length for safety tethers). Yes, racing crews sit out on the windward hull, but you don’t need to. You can also wear a tether when going forward, and there are often hiking straps on the tramps, which provide some security for crew sitting on the windward ama. Before adding additional lifelines, we took a poll of Corsair racers to determine where people actually fall overboard. This is big racing fleet, so we got plenty of input.
We made some changes to address these risks. Permanent jacklines were installed along each side of the main hull so that they would always be available (see “Rethinking MOB Prevention,” November 2018).
The bow has a sturdy stainless tube pulpit. We added two short, downward angled lifelines to protect this narrow area. There is a safety net to leeward, but you’d rather not fall there. The lower lifeline is fixed, and the upper is removable so that it to be used as a part of the anchoring system.
At the stern we added a pair of angled lifelines connecting the stern rail to the tramp, providing additional security for the helmsman when sitting on the coaming and for crew coming in off the tramp. We did not extend them clear to the outboard hull, because that is where we board from dinghies and kayaks, and where they are pulled on deck for transport. The stern rail was extended vertically to provide additional handholds when coming into the cockpit from the tramp.
Material. We used a 6,400-pound breaking strength Safeway Tow Rope (see “Dyneema Abrasion Test,” November 2018) to provide a safety factor against UV and wear. This inexpensive, non-marine product has been holding up well as an adjustable bobstay, which has a much higher load than any of our lifelines would require.
The Safeway Tow Rope is a generic Dyneema product, less than 1/3 the cost/unit strength than name brands, but with lower strength per diameter than Samson and New England Ropes single braid Dyneema products. We used a slightly larger diameter to compensate. A covered product, such as New England Ropes WR2 has superior chafe resistance in stanchion holes.
Safety experts and manufacturers generally recommend replacing Dyneema lifelines after 8 years, as opposed to 12-15 years for stainless steel.
Some data suggests these high molecular- weight polyethylene lines (HMPE) lose 50 percent of their strength in five years, after which the loss levels off. World sailing does not specify a replacement interval, only that they be monitored for chafe. We’re suggesting 5-7 years in the tropics and 8-10 years in temperate latitudes. This compares to 12-18 years for uncoated stainless steel lifelines—although well maintained stainless steel lifelines that aren’t exposed to acid rain or other contaminants that can invite corrosion, can retain full strength for decades. (The most frequent site of failure are the studs, hasps, and terminals, not the wire itself.)
Size. World Sailing specifies that the uppermost lifeline on boats greater than 28 feet must be 5 mm (3/16”). Using existing stanchions and machineformed swages for stainless steel, this is the largest diameter that will allow the fittings (3/8-inches) to pass. But since Dyneema lifelines are typically spliced in place, the line can be as large as 9 mm, which is rated for loads far beyond what is required and beyond what most stanchions will support. But there is no physical reason not to use 6 mm (1/4”), which would allow a considerable reserve thickness to protect against UV. We recommend going up to 6 mm, at least for the top line, and have used this diameter for most of our testing.
Lashings. In “Lashing for Strength,” June 2019, we learned that lashings distribute stress inefficiently between strands. Between this unequal load distribution and the increased vulnerability of small diameter line to UV, it is recommended that a lashing have twice the required calculated strength. In other words, a 4-pass (8 strands) 7/64-inch Dyneema lashing will “calculate” to be 8 x 1,600 = 12,800 pounds, but is really only rated to 6,400 pounds, making it a good match for our test material and for 3/16-inch Amsteel lifelines (5,400 pounds).
Keep in mind that lashings have less redundancy than rope. Cut one strand of a rope, and the rest will probably hold. Cut one part of a lashing and all is lost. This is prevented to some extent by a tight tie-off around the entire bundle with a long string of half hitches; do not cut the tie-off short. (Technically, a lashing is slightly more efficient if the bitter end is tied off only to the last pass, since stresses can better redistribute, but this is less redundant in case a strand is cut.) Lashings should also be renewed more often than the lifelines, generally every few years, depending on use and latitude.
We’d skip the specialized terminators and oversized low friction rings for lifelines and jacklines. They protect against hazards that don’t exist in these applications; low radius turns do not weaken 4mm lashing twine and chafe is nonexistent at the ends and against the line because they are smooth surfaces and there is no movement. In fact, we have never noticed or heard of chafe even on lifeline eyesplices that are unprotected by thimbles, since there is very little movement.
Instead, keep the hardware compact enough to fit a 1-inch or 2-inch nylon tubular webbing UV cover. This can be easily slid aside for inspection.
Do not use conventional cable thimbles. These were designed for steel cable and often have sharp corners at the cut ends that can cut lines. Use a sailmaker’s thimble, small low friction ring, a webbing chafe covering, or nothing at all.
Forming eyesplices. A brummel lock is not stronger than a simple bury splice reinforced with lock-stitching. The purpose of a Brummel lock in a hollow braid bury splice is to prevent slipping at very low load. In fact, nearly the entire load is carried by the Chinese finger lock in just the first few inches of the splice, near the tail, which is why a smooth taper is recommended.
Brummel locks look neat and make you one of the cool kids, but testing has revealed that rather than being stronger than lock stitching, a Brummel actually weakens the line 5-10 percent compared to lock stitching (see PS October 2014, “Stitching Instead of Splicing”).
Large industrial cables are never spliced that way. Instead, follow Samson’s instructions for lockstitching, using either whipping twine, cord, or a few strands pulled from the same rope. The needle should be dulled on the end so that it cannot cut a strand.
In practice, a lock-stitched bury splice is easier to adjust to length—just leave the tail hanging out with room for adjustment (see PS April 2021, “Slick Whoopie Slings for Sailors”).
Because the greatest strain on the splice occurs right at the tip of the tail bury, make sure to taper the strands over a few inches. Buries as long as 72 times the diameter have long been consider the gold standard, but repeated testing suggests that 50 diameters is plenty with an effective lockstitch. The important thing is the taper. See Samson’s instructions for a 12-strand Class 2 splice at the Samson website (www.samsonrope. com/resources/how-to-splice-rope.) Class 2 ropes includes high-molecular weight fiber ropes like Dyneema, Spectra, and Vectran.
Each splice will shorten the rope a few inches because the inserted tail bunches up the rope. There are rules of thumb to predict the length reduction, but the rules varies slightly with each brand of rope. A more accurate determination can be made by measuring the length reduction caused by your first splice after carefully smoothing the cover and giving it a good pull. All the remaining splices should take into account this predicted size reduction.
Chafe. Stanchion chafe is accelerated by burrs inside the cable holes in the stanchions, sometimes from manufacture, but often made worse by rail meat hanging over worn or bare steel lifelines. Smooth off these burs, polishing progressively to at least 400 grit sandpaper. Additional chafe protection, in the form of plastic or textile tubing, is a good idea. Our lifelines have not chafed, because there is little motion under load and the surfaces are smooth. On the other hand, our Dyneema anchor bridle and Dyneema topping lift quickly chafed where they bore against sharp edges, prompting us to install chafe guards.
Keep an eye on your lifelines and take pro-active measures to reduce chafe if any of the ropes appear fuzzy.
If stanchion chafe is still an issue, swapping your lifelines end-for-end might buy you a little more time. This isn’t difficult since the lashing securing the lifelines should be replaced at the mid-point in the life expectancy anyway (2-3 years for safety).
A best practice is to secure the lifeline around the entire stern rail or pulpit post, not just the welded-on loop (see photo above). The welded loops are always used with cable lifelines, and there have been a very few failures— but given our familiarity with stainless, these welded eyes are vulnerable (see PS February 2007, “Marine Metal Warning”). At the very least, inspect the welds closely for cracks or pitting corrosion.
Girth Hitch vs. Splicing In Place. It’s handier to make the bury splice on your lap (or have a pro do it) and then girth hitch the eye around an object, rather make the splice in place, although the latter is not difficult with a simple bury and lock stitch splice. A girth hitch weaken the join, but only about 10-15% (testing by Samson), or about the same as a Brummel lock, so it is acceptable.
Animated knots offers a good demonstration of girth hitch ( www.animatedknots. com/girth-hitch-knot).
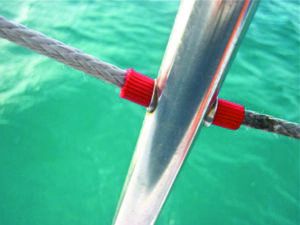
We’ve used a Prusik or clove hitch when we wanted to prevent a lifeline from sliding down a stay or rail (typically a high lifeline—see PS June 2016 “Raising the Bar on Lifelines“). The Prusik is used if that is where the lifeline terminates, and the clove hitch for intermediate tie-offs. In either case, a wrap of high-friction tape below the knot helps prevent it from sliding downwards. The Prusik weakens the line about as much as a girth hitch, and a clove hitch weakens the knot about 40 percent.
Covered lifelines excel in oscillating and pendulum chafe test.
We’ve been focused on Amsteel, because it is a popular choice and because most user experience is with Amsteel and close relatives (12-plait ultra-high molecular weight polyethylene, UHMWPE). But there are also specialty coreand- cover lifeline products, where the cover is woven specifically to resist chafe. The upside is that chafe resistance in covered rope is 5-10 times better than 12-plait.
The downside (beside the higher price) is that since the eye splices are core-only, a larger size is required for similar strength. An equal diameter of Amsteel or DUX will be 40-100 percent stronger and considerably cheaper, but will chafe more quickly. Which is best? The jury is still out, but we’re leaning towards using single braid, going up a size, and fitting chafe protection where needed. Another possibility is a Dyneema double braid, which can be stripped of its cover where needed, but these covers are less resistant to chafe than the lifeline products.
COVERED LIFELINES
Covered lifelines offer the strength of UHMW fibers with the additional chafe and weathering protection of a braided cover. For lifeline applications, the cover is typically made of Dyneema.
NEW ENGLAND ROPES WR2
We tested this for side-to-side abrasion over both cinder block and sharply cut stainless tubing, and were very impressed. The rugged cover is optimized for wear resistance.
Bottom line: Recommended.
LIFELINE BY MARLOW.
Similar to WR2, the cover is tight and should provide impressive wear.
Bottom line: Not tested.
12-STRAND LIFELINES
A 12-strand lifelines offer the strength of UHMWPE without the additional chafe protection of a braided cover. They are easier to splices and inspect, but are more exposed to UV, weathering, and chafe than covered lines.
AMSTEEL BY SAMSON
There probably more boats with this installed than any other product. As long as the stanchions are carefully polished and you don’t hang rail meat, it should last a long time.
Bottom line: Recommended and well proven.
STS BY NEW ENGLAND ROPES
Similar to Amsteel and used on a PS test boat (report to come).
Bottom line: Recommended.
DYNICE DUX SK-75
Because it is pre-stretched and made from the highest quality Dyneema, it packs an impressive 10, 500 pounds breaking strength in the just 5 mm. It will also stretch less as it settles in (there will still be some construction stretch resulting from your splices).
Bottom line: The Best Choice for Dyneema lifelines.
UHMPE BY SAFELINE
One of many generic high modulus ropes sold as winch cable. We started testing this one 5 years ago, first by strength testing (it met the claimed strength) and chafe, and then installing them on the boat in a variety of applications, including soft shackles used daily for mooring, bobstay, lifelines, and anchor bridle.
We removed one lifeline section after 3 years and retested the strength; it was 82 percent of new. Chafe seems similar. It is not as strong for a given diameter as Samson or NER 12-strand Dyneema rope, but the cost per unit strength is 3-5 times less. If you slightly exceed the strength requirement, we see a good value.
Bottom line: Dyneema winch cable can be a Budget Buy, but the diameter may need to be oversized. Because the Safelines on our test boat are not leaned on and because they do not pass through stanchions, we see no visible chafe. There is bleaching, and we know from experience that UV can penetrate to the inner fibers, so only future testing will reveal how much strength remains. For cruising sailors and offshore racers, uncoated 1 x 19 stainless steel lifelines will offer the most value—and peace of mind.
VALUE GUIDE: HIGH STRENGTH, LOW STRETCH ROPE LIFELINES
| MANUFACTURER | NEW ENGLAND ROPES | MARLOW | SAMSON ROPES | NEW ENGLAND ROPES | COLLIGO MARINE | SAFEWAY $ |
|---|---|---|---|---|---|---|
| TYPE | Dyneema cover over Dyneema core | Dyneema cover over Dyneema core | Dyneema single braid | Dyneema single braid | Dyneema single braid | Dyneema single braid |
| MODEL | WR2* | Lifeline | Amsteel Blue | STS | Dynice Dux SK-75 | Synthetic Winch Rope |
| SIZE | 7 mm, 5 mm core | 7 mm, 5 mm core | 5 mm | 5 mm | 5 mm | 6 mm |
| MINIMUM BREAKING STRENGTH (POUNDS) | 6,150 lbs. (core only) | 6,400 lbs. (core only) | 5,400 lbs. | 9,475 lbs. | 10,500 lbs. | 6,400 lbs. |
| OSCILLATING CHAFE | ||||||
| SMOOTH STANCHION | >2 hours* | > 2 hours | 20 minutes | 20 minutes | Not tested | 20 minutes |
| SAW-CUT STANCHION | > 2 hours | > 2 hours | 20 minutes | 20 minutes | Not tested | 14 minutes |
| SMOOTH STANCHION W/WIRE GROVE | 90 minutes | 90 minutes | 20 minutes | 20 minutes | Not tested | 16 minutes |
| PENDULUM CHAFE TEST | ||||||
| STRENGTH REMAINING AFTER 50 CYCLES | 6,150 lbs. | 6,400 lbs. | 3,100 lbs. | 6,100 lbs. | Not tested | 2,800 lbs. |
| PERCENT OF CORE REMAINING | 100% of core | 100% | 57% | 64% | Not tested | 44% |
| OVERALL CHAFE RESISTANCE | Excellent | Excellent | Fair | Good | Not tested | Poor |
| PRICE ($/FOOT) | $1.75 | $1.88 | $1.68 | $1.73 | $2.26 | $0.52 |

Although the modifications described in the adjacent report relate mostly to multihulls, many can be applied to monohull sailboats. Traditional boats with long bowsprits are often unprotected by lifelines, and removable fiber rope chest-high lifelines have been used since before the days of tall ships. It doesn’t take much imagination to see how these techniques can be used to fill gaps in your own lifeline system.
![]()
1. Our new mini-lifeline stretches outboard from the cockpit and out across the stern, offering some security when sitting on the coaming.
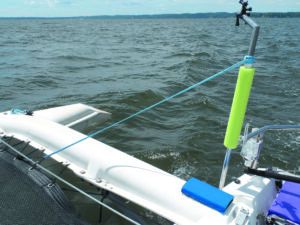
2. The new lifeline extension leads from the tramp to a welded extension on the pulpit stanchion, which also serves as a handhold when boarding from the stern or moving from the trampoline to the cockpit.
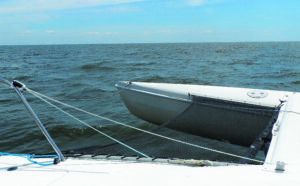
3. The new mini-lifeline at the bow stretches aft from the bow pulpit to the inboard lacing support for the tramp. The higher lifeline is temporary, since it also serves as a bridle for anchoring or mooring.
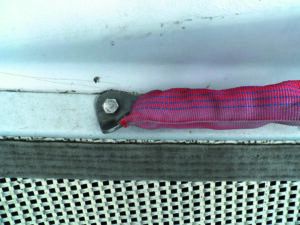
4. This stainless steel bolt hanger makes a strong, single hole anchor for lifeline on small boats. As with all lifeline attachments, it must be well backed (see PS August 2016, “How Big Does a Backing Block Have to Be?”).
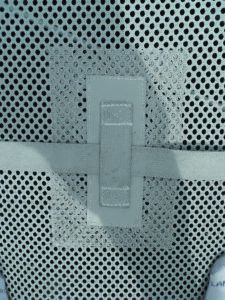
5. Heavy bar stitching and reinforcement patches provide extra securing for the hiking footstraps on the tramp. The UV-resistant stitching is checked regularly for wear.
6. A Dyneema chafe sleeve from New England Ropes is slipped into place. Later, the sleeve will be stitched to the Dyneema 12-strand lifeline to stay fixed in place.
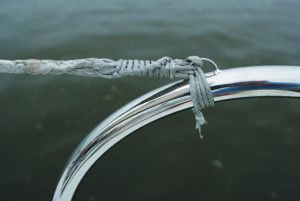
7. Secure the lifeline lashing to the entire pulpit, pushpit or stanchion— not just the welded-on loop. Girth hitching is easier than spllcing the rope in place.


