

In a few of our past reports on boat financing, Practical Sailor discussed how to pre-inspect your potential dreamboat before committing to the next step and how to bring in a surveyor. Although the articles are geared to the prospective buyer, it is just as relevant to the owner of an older boat. If the boat in question has more than 20 years behind her, one item that will likely come up on a survey is keel bolts – the heavy duty fasteners that keep your keel from going on a bottom tour while you reach for handholds on your suddenly tippy craft.
Despite advances in imaging technology, keel bolts are still very difficult to fully inspect without a bit of surgery. Fortunately, some hints of trouble are obvious, like large gaps in the keel- stub joint, weeping rust stains near the keel-stub joint or crumbling bolt-ends in the bilge.
A recent question on keel bolts from subscriber Ed Giles prompted me to plumb the archives of our files on keel bolts, and I came up with several articles going back to some of our earliest issues. (This is one of those fundamental repair jobs that hasn’t change much over the centuries.) Most of the articles were responses to inquiries to PS Advisor, like the one that Ive included below from George Alihof, written to us back in 1990.
For some of our more recent articles associated with keel bolts check out: Sistering Keel Bolts; When Keel and Stub Part Ways; and most recently, this months Bilge Oil and Keel Worries. There is also an interesting article from our archives in keel bolt inspection. (Im still looking for Part II to this article which first appeared sometime before 1998.)
Mr. Alihof described a typical problem that many owners face, an ever-widening gap between the keel and stub, often referred to as a smile, since it usually appears at the bow of the boat and assumes the sardonic curve of a slack tightrope. The course of action we recommended back then for Mr. Alihof is simpler than the more complete repair we recommended in When Keel and Stub Part Ways. Either approach is viable. Keel bolt repair is one of those mentally stimulating jobs, because no repair is ever the same, and a proper fix often require a bit of creative engineering. Mars Metal, the maker of most lead keels in North America offers a complete description of their comprehensive keel bolt repair process on its website.
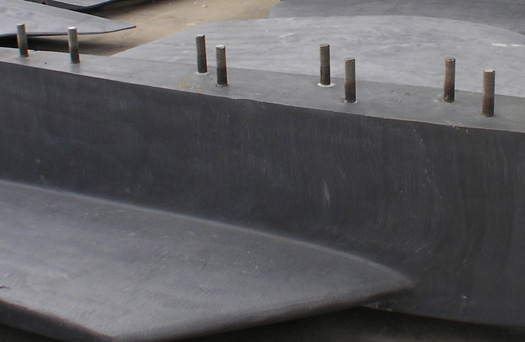
Keel bolt replacement is also an interesting project because you find yourself wielding some unlikely tools, like the pickaxe I used to dig a trench under Toscas iron keel, so we could punch out the keel bolts from above. Amazingly, all but two of the pre-World War II keel bolts were in serviceable shape. They don’t make them like they used to I suppose.
Here is Mr. Alihofs query, followed by our response:
Dear PS,
Our 37-foot boat has a bolted-on keel, and the joint between the keel and the hull keeps breaking open. Should I drop the keel and put bedding compound between the two, or should I try to fiberglass over the joint? The keelbolts are tight.
George Alih
Erie,PA
This is a fairly common problem with fin keel, flat bottom boats, and there are several possible causes, including cast-in bolts that are slowly pulling out of the keel, or inadequate structural support for the keel in the bottom of the hull. If you tighten the bolts every year, and more thread shows above the nuts inside the hull, the bolts are almost certainly pulling out of the keel, and you have a big job ahead of you, which would include cutting holes through the ballast near the top, drilling through vertically from the inside of the hull into the openings in the keel, and installing new bolts with nuts and big washers at both the top and the bottom.
We’d also look for signs of compression of the hull laminate in the bilge under the keelbolt nuts. If it’s a cored hull without solid glass up the middle of the hull, the core could be crushing under the nuts, allowing the keel to drop slightly more every year. We’d be tempted to back off the nuts in the bilge, and jack the boat up slightly off the keel. If the joint has indeed opened all the way through, you may be able to lift the hull using a series of screw jack hull poppets, but you must use a minimum of six, and place them only under strongly reinforced sections of the hull, such as under bulkheads.
The boat should be totally emptied of gear, and the tanks should be pumped out to reduce the weight as much as possible. This is potentially a very dangerous job. You must stop immediately if the keel starts to lift off the ground, if the hull begins to dimple under the poppets, or if the chain between the poppets becomes heavily loaded. Sometimes, you can separate the keel by driving a series of hardwood wedges into the joint as you jack up the hull. It ‘ s far safer to do this job with a Travelift or crane, and if you do it in the off-season, the cost should not be excessive.
With the keel free of the hull-but dropped no more than an inch or so, with the bolts still in their holes-thoroughly clean out the joint with a scraper or putty knife, finishing off by flushing thoroughly with fresh water. Allow both the top of the keel and the bottom of the hull to dry. Don’t stick your hand in the joint, ever! We’d put a thick washer of polysulfide compound around each bolt where it enters the hull. but we’d fill the rest of the joint with a stiff, reinforced epoxy putty mixed from resin and Gougeon Brothers 404 high-strength high-density filler.
The boat should immediately be lowered back down on the keel, the keelbolt nuts set up firmly, and the excess squeezed-out putty cleaned away. While you’re at it, replace the existing washers under the nuts in the bilge with large plate washers cut from stainless steel stock at least -inch thick. For a 1-inch diameter bolt, make these plate washers about 4-inch square, and bed them in polysulfide, too. Give the compound a couple of days to cure fully, then re-torque the nuts using a 3/4-inch drive socket and a breaker bar, with a 2-foot length of steel pipe slipped over the breaker bar to increase your leverage.


