

Efficient windward work requires sails with a good lift-to-drag ratio. Mylar laminate sails hold their shape throughout their useful life, well enough for all but the most discerning racers, which often ends in spectacular failure. Polyester sails, on the other hand, are often retired long before they are structurally weak, because they have stretched out so badly they are no longer efficient to windward. Finally, there are more durable products, including Hydranet and Lite Skin, which deliver superior shape holding and durability—at a price. We’re going to focus on mundane polyester sails, since they are most likely to need a recut within their useful life.
Eventually every owner of polyester sails faces a simple question. Is it efficient to recut my sails, or should I just save my dimes towards a new set? Often 80 to 90 percent of the original shape can be recovered, if the sail is in good enough shape to justify the work. You might even be able to do it yourself. But first, we need to understand the process a bit better.
FIRST STEPS
Washing. An occasional wash can reduce the tendency to mildew by removing the food source. But our advice is not to obsess over removing stains to the point where the sail is weakened. Laminate sails require special care (see “Quick and Safe Sail Cleaning”).
Basic Repairs. Almost certainly there are a few loose stitches, and perhaps even some webbing that needs replaced. Examine the batten sleeves and end caps. Luff and foot tapes can wear on the rigging. Slug attachment webbing may need renewed. Limited restitching by hand, following the existing needle holes, is easy and helps gain experience with a sailmaker’s palm. Since you will be pulling doubled thread, there is no need to make two passes to fill the zig-zag pattern.
Get a book. The Sailmaker’s Apprentice by Emilono Marino is probably best known, but we’d recommend The Care and Repair of Sails by Jeremy Howard-Williams. It’s more digestible and has a good discussion of recutting sails for beginners, including a good focus on simple recuts.
UV covers. If the sail needs a recut and a new UV cover, it may be time for a new sail. Or if you just want to squeeze a few more seasons out of an old dog, consider a painted UV stripe (See “The Case of the Painted Jib”). We’ve been testing this for going on three years without a chip yet. But you need to use to be the right paint.
Trimming Stretched Sails. It’s been said many times before, but before you give up on a sail as stretched out, try some vigorous adjustments. Hauling the halyard extremely tight pulls the draft forward and flattens the body of the sail. Really haul on it. However, due to mast track friction, particularly in sails that hoist with the boltrope inside the luff groove, not all of the tension reaches the foot. Put a tackle on the cunningham hole and really haul down. A 6:1 cunningham purchase is not excessive on a dinghy; you can use up to 12:1 on a 30-ft. boat. If the jib is hanked-on and does not have a powerful halyard winch, add a downhaul comparable in purchase to the cunningham. (Note: Although hauling the jib halyard tight helps move the draft forward, release the tension before furling the sail. The excess tension is very hard on the bearings and makes furling the sail more difficult. Light halyard tension will prolong the life of your furler.)
OBJECTIVE
What are we trying to accomplish? Reduction in leeway? Better pointing? Quiet an annoying leech flutter? First, take some pictures. Then make an honest assessment of the condition structural condition of the sail. Is the fabric still fairly firm? If not, it will just keep stretching. Are the seams still intact? Is there any delamination? If the answer is “yes,” there is probably no cure (see “Fixing Laminate Sails Part II“). If the sail is structurally compromised, there is no point in spending the money, though it might be an interesting DIY learning project. What have you got to lose? That’s how I learned.
Laminate Sails. Because of complexities in sewing laminates and the unforgiving nature of non-stretch sails, we’re going to leave this to the pros. If you must, examine how the original seams were sewn. A thin non-woven reinforcement fabric may be incorporated in the seams to prevent tearing. Sometimes a woven tape is laid over the seam before sewing. Seams may be glued. Copy the original method, or the sail will tear down the needle holes as though a “tear here” line was added. Also, high-tech sails are less forgiving of minor alteration errors, because the fabric does not stretch at all, often creating wrinkles and stress concentrations around the smallest error. Expect it to be a learning process and proceed very carefully.
Tri-radial and crosscut sails with the seams incorporated into batten pockets are more complicated. For tri-radials the simplest approach is to cut right across the existing seams, creating new seams where needed. You will still need to rework the luff tape and leech tabling. For full batten sails, changing battens and tension is probably all that is practical. The battens help these sails hold shape, and by the time the sail is stretched enough to need a recut, it is due for replacement. If you must adjust broad seam or tighten the luff, installing new seams is probably best, but this is complicated by working around the boltrope. Probably not worth the effort, other than perhaps a slight tightening of the leech (which can be done under a patch, without creating a whole new seam).
LUFF SHAPING
When a sail is built, the luff rope (aka boltrope) has a small amount of tension on it so that it can take some of the halyard tension, but over time may shrink as much as several feet, making it impossible to properly tension the luff. This sail will become too full forward and possibly wrinkled under high sheet tension. Thus the first step is to really haul on the halyard, cunningham or downhaul. If you can find data on the original sail plan, this may tell you how far it should stretch.
The rope can be eased in one of two ways. If the rope is free-floating in the luff tape, held in place only by hand stitching at the head and tack, you can cut the hand stitching and ease the tension in the rope and hand sew it in its new position. Retain the boltrope by sticking a pin through the luff tape a few feet up before cutting the stitching loose. We once had the rope shoot up the luff two feet before we could add a new piece! It was recovered with a makeshift “harpoon” formed by a straightened fishhook soldered to the end of a coat hanger.
Once the rope is free, slide the tape to uncover the rope, splice additional rope to the tail with a long splice and let it slide up into the tape. On sails where the bolt rope does not extend beyond the cunningham hole, it is acceptable to simply stitch it down there.
Unfortunately, often the rope is not free floating, either by design or because the luff tape is too tight. In this case it is probably simpler to replace the luff tape so that it can be repositioned. This can also be an opportunity to remove some cloth from the sail.
Full battens are another common problem; the boltrope is either stitched or simply pinched too tight to move past the batten box. The front of the pocket also makes it more time consuming to release and restitch the boltrope. In these cases, the amount of work required is probably not worth the payoff in performance.
Luff Re-shape. The luff of the sail may seem like a straight line, but in fact it has a slight positive arc running from the head to the tack. This curve controls fullness in the forward third of the sail. Jibs often have a slight negative curve section in the upper third to allow for headstay sag. Mainsails for masts with prebend have more luff round to compensate. Fullness in the forward half of the sail can be reduced by removing some of this rounding. However, this is a low stress area of the sail, and thus stretch and excessive draft forward is rare. A ¾-in. PVC pipe can make a good flexible batten for remarking the curve. But if the sail was originally well made, you should be able to follow the original curve.
Boltrope adjustment should be the only work at this edge of the sail. The only time we ever fooled with the curve was on a mainsail from a sport boat with a lot of mast bend that was retasked to a more sedate cruiser with a straight mast.
GENOA LEECH HOLLOW
Sail designers (and yacht designers) like to maximize sail area, but supporting leech is always a challenge. Careful broadseaming can carry a straight luff, and battens are often added (complete with their own problems), but eventually the leech becomes either floppy or hooked, and you wish it would just go away. In fact, that might be the best answer for an older sail.

better shape out of a full batten sail, changing battens and batten tension is probably all that is practical.
A negative curve of about 2 percent (a little more can’t hurt) of the leech length is generally suggested for older sails, or about 1 foot for 35-40-foot luff. The sacrificial cover will have to come off, of course; perhaps it is due for replacing it anyway. Or you might even replace it with paint, which has proven to be an economical alternative, but you must use the right paint. (See “The Case of the Painted Jib”).
Foot round (the negative curve in the foot) follows the same basic rules. A curve of about 1 percent of the foot length is typical for older sails. Some jibs have a shelf foot formed into them, through the use of darts. This can result in lumps on forestay when furled. Easing a few of the darts can help the sail roll better, but you may have to reduce the round.
Is there fluttering on the foot? Try tightening a line if there is one. Try adding several small darts along the foot (smaller than those used to create a shelf), about twice the length of the portion and flutters , typically only about ¼- to ½–in. Locate the darts at about ²/₅ and ³/₅ of the distance along the foot, which places them closer to the center rather than evenly spaced. Cover with patches.
PS Tech Editor Drew Frye has done recut his own sails three times—a polyester main, polyester genoa and a nylon reacher. We would consider it a last resort after trying more outhaul, more halyard tension, cunningham tension and stiffer battens, and before buying a new sail. However, in each case it worked, adding years to the useable life of the sails.
STIFFER BATTENS
Full battens influence sail shape in several ways. Learning to use them to full advantage can tweak a sail to the conditions or even salvage an older sail.
The obvious function is to support the leech, but this is not done as a cantilevered beam, holding the roach into the wind. Battens are not that stiff. Mostly, support is provided by tensioning the fabric, like a tent, and that requires adjustment.
Smaller sails, such as on beach cats, have a cord tackles built into the leech end of each batten. It’s not there to hold them in place, it’s there to provide adjustment. In light winds or lumpy water, flexible battens and high tension maximize draft. In stronger winds you ease up, just enough to get the wrinkles out, which flattens the sail. But this also reduces roach support, which can be a problem with older sails. Back in our cat racing days we adjusted tension between races to suit changing wind and wave conditions.
of a shrunken luff cord. See “Survey: Mainsail Track Hardware” for expert advice on mainsail luff slide-car systems.
The cruiser trying to salvage a blownout sail should consider two changes. First, lower the sail and tighten all of the battens. Not to the point where they could spring out of the pockets like arrows, but quite snugly. Is the leech better supported? Has the draft moved? Is the sail too full, or perhaps only too full in certain areas? If it is good enough, you are done.
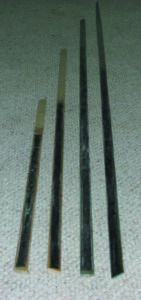
The leech is still falling off? Is the draft too great forward? The solution may be stiffer battens. These can be purchased, and are rated for stiffness in pounds (the standard is the centered weight required to bend one meter of unsupported batten one inch). Measure the stiffness of your existing battens and try to reduce this bend by 50 percent. Another alternative is to add a few layers of carbon unidirectional fabric on each side, according to how much stiffness you need to gain and how much spaces there is in the pocket (see adjacent photos). You can also taper the stiffness, since more flex near the mast is often desirable, and less at the leech (beach cat battens are normally tapered). This worked on Frye’s PDQ 32/34. It was not a permanent fix. In three years, he replaced the sail entirely and saw much better improvement.
CONCLUSION
By dropping a few bucks with the local sailmaker or rolling up your DIY sleeves, a recut can extend the useful life of a structurally sound sail a few more seasons. A sewing machine can save a lot of time, but Frye carried out most of his recuts with hand sewing, only rarely working with someone who understands machines or enlisting the help of a pro.
If you are working with a large valuable sail we recommend take good pictures and getting a professional opinion. However, if you have a worn out old dog on a smaller boat, you might as well have a go at it, there’s little to lose and you’ll learn about sails. Minimal adjustments are best.
Photos help both the sailmaker and the DIYer diagnose what’s wrong. For example, if your sail is too full forward, that might be why you’re having trouble pointing. Excessive fullness aft might explain excessive helm angle, heel, and leeway.
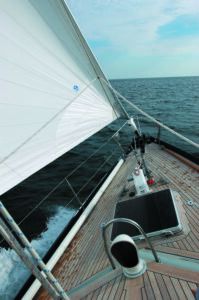
Start by getting a good shot of your sails’ shape as soon as you get them. This provides a baseline as your sails age and stretch. Take another set of photos each year, whether you feel there is a problem or not, just to build the record.
If you are taking the sail to a sailmaker for maintenance anyway, share the pictures and listen to what he says. If the sail is cross cut or has full length battens they can provide adequate visual reference points. Otherwise, add a minimum of two draft stripes, breaking the sail into equal thirds. These are typically 1-inch wide contrasting self-adhesive tape applied parallel to the water. For the mainsail, a builders square against the boltrope is good. For the jib, mark the luff level with the clew and work your way up from there. If possible avoid applying over seams; the tape may wrinkle and peel. Put them on both sides. You can also use them as learning aids as you pay with halyard and batten tension.
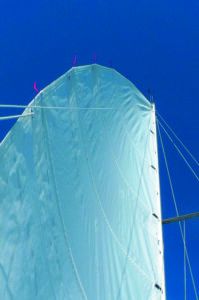
Hold the camera on a diagonal angle, making sure to include all of the draft stripes. Lie on the deck, slightly to the windward of the foot, in the middle, and as low as possible. Line up the luff end of the lower draft line in one corner and the leech end in the opposite corner. You’ll need a wide lens: most smartphones have fairly wide angles.
Take the pictures in 7-10 knots of wind; lighter winds won’t fully stretch the sail and stronger breezes can backwind the main, require sheeting out or reefing, and heel many be excessive. Keep the rig settings (downhaul, lead positions, sheeting, outhaul, vang, and traveler) the same each time. Make sure the telltales are flying. Include the boom with the mainsail if possible.

Many shape issues on older mainsails can be corrected by using the Cunningham and outhaul to find the ideally luff and foot tension— especially when reefed. Pay particularly attention to sail shape when reefed, as this is usually typically a time when you want a flatter sail.
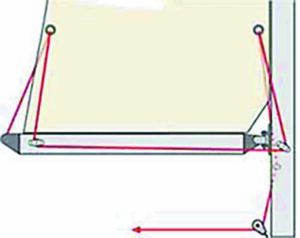
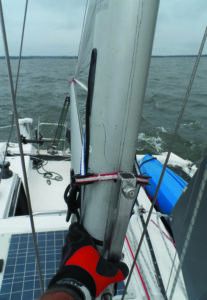
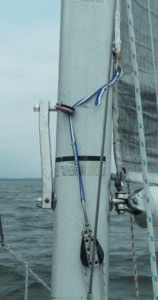
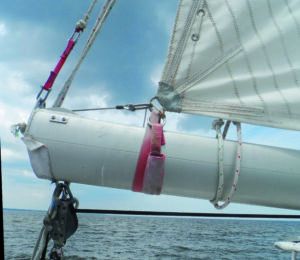
1. An effective single-line reefing system will pull the tack forward and the clew aft. To reduce friction, you can add turning blocks at the tack and foot.
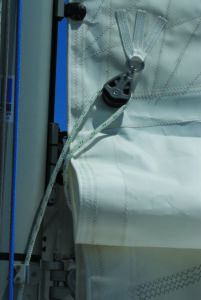
2. A well reinforced eye at the tack for the first reef point supports a block to improve purchase. Note how the tack is led forward to a cam cleat to bring the sail forward. You might also do this with the Cunningham on a bigger sail.
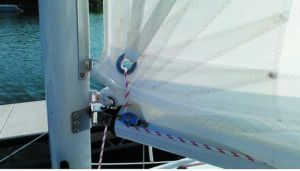
3. Excessive tightening of the outhaul on this mainsail has resulted in too much tension at the tack. Without a strap or a new lead that carries the tackline forward, this slug will eventually tear up the leach.
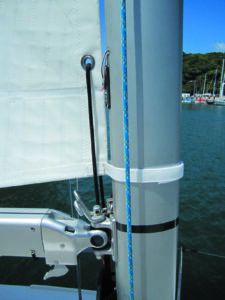
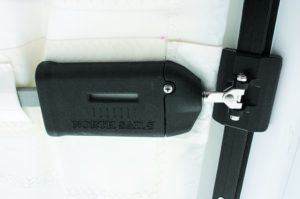
4. A velcro strap on this J-80 mainsail tack helps relieve the strain on luff slides. This can be particularly useful for sails that have a luff tape that slides into the mast.
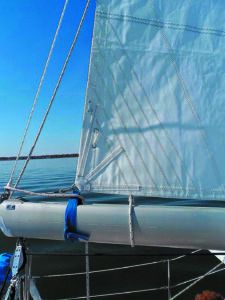
Loose footed mainsails have an advantage over an attached foot since they can be more easily flattened or opened by adjusting the outhaul tension. Switching from an attached foot to a loose footed sail is usually as simple as securing the clew shackle to the existing final slider, which should be reinforced for this purpose. Unfortunately, the car or slugs are often undersized or prone to jamming, rendering the outhaul nearly useless. A clew strap is the easiest solution.
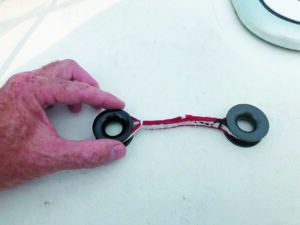
1. A sail tie with hitches is the simplest solution to keeping the tackline down, but there are better choices.
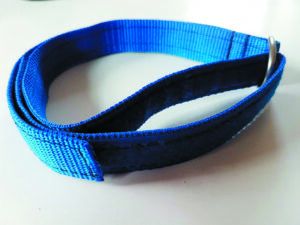
2. A hook-and-loop strap with a D-ring is quicker and easier to use.

3. By applying the fuzzy side of self-adhesive Velcro to the underside of the clew strap and coating the boom with Sailkote, the outhaul adjustments are easy. This also works on the bottoms of sliding cabinet drawers.
4. Tubular webbing slides over the buckle in this DIY clew strap, protecting the boom from scratches and dings.
When I took the mainsail of my Corsair F-24 to a sailmaker to have the luff tape replaced, he suggested a DIY option. He pointed out the stains where the aluminum had rubbed off, and how those must be the high friction spots. What follows were his suggestions, which are still working a season later.
• Remove the old self-adhesive repair tape.
• Remove the batten caps (attached with screws).
• Remove the damaged bits of cloth. They’re not doing anything but adding thickness and friction.
• Repair with 6-ounce self adhesive Insignia Cloth as follows:
• Cut into tapes 3 inches wide.
• Overlap the damage by about 1.5 inches. Bevel the corners, apply with the boltrope centered on the tape, wrapping around both sides.
• Stitch the tape close to the boltrope to prevent loosening. Use #4 whipping twine with 3/16 to ¼-inch basting (straight) stitches.
Removing the damaged cloth and two layers of old repairs reduced the bulk. The 6-ounce Insignia Cloth is much heavier than the original bolt rope cover and is wearing fine. The sail goes up and down much easier than before, and areas where the Mylar was growing weak were reinforced.
The same repair works for chafe damage under slug attachments. The main cause of chafe is attaching slugs with metal shackles instead of sewing them on with webbing or lashing them on with 1/8-inch twine.
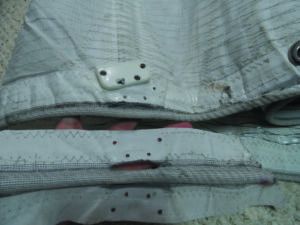
1. Typical luff tape damage, with the batten receptacle removed.
2. Bevel the corners of the tape.
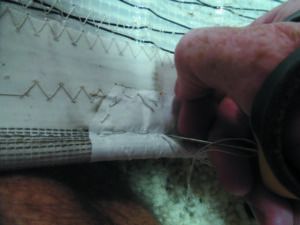
3. Stitch down tight in the corner between the bolt rope and the sail cloth. No need to sew down the edges of the tape, but you can if you like.
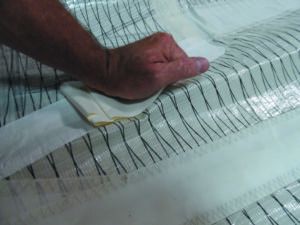
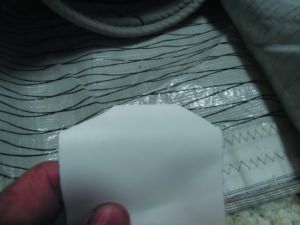
4. Rub the tape down hard over a firm surface. If you don’t have a seam rubber (or even if you do), place the release tape on top of the tape to reduce friction and rub it down more securely.
5. The repaired mainsail is back in action.
One of the simplest DIY sail recut projects, reshaping a crosscut sail also has the advantage of being reversible if you don’t like the outcome. It does not require reworking reef cringles, batten pockets, luff tape, or bolt rope, or cutting or adding cloth, only resewing existing seams with an altered amount of overlap. If the new shape doesn’t work out, put everything back where it was, the only remaining evidence being a harmless row of needle holes.
This works on reachers, jibs, and mainsails that have stretched, and as a result are both too full and have the draft blown aft. The primary limitation is that it’s only simple on crosscut polyester or nylon sails.
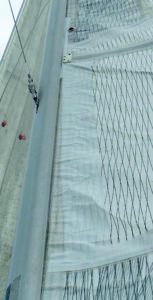
1. Take photos. With the boat sailing close hauled in a moderate wind, take photos while lying on your back under the sail. You need to be able to see the seams from luff to leech over the top 2/3 of the sail. The draft of the bottom third is controlled primarily by outhaul (mainsail), or by sheet lead location and trim (jib or reacher).
2. Draft blown aft. Decide which seams are to be taken up. Normally, at least three seams will be adjusted. These are typically near the top of the sail, since draft in the bottom 1/3 can be controlled with outhaul (mainsail) or lead position (jib). If the draft in the forward half of the sail is OK, you may only adjust the aft 1/2 to 2/3 of the seam.
3. Loose leech. Often combined with draft blown aft, this may require both reducing broadseam in the forward 2/3 of the sail and tightening the leech. A sailmaker would remove the luff tape and put on a new one, but a simpler answer is to cut the tape and then sew a replacement tape over about 8 inches of the leech, overlapping the cut. Not as pretty, but just as strong.
4. Full battens. A full batten sail complicates the process, since those seams cannot be adjusted. On the other hand, the draft in those portions of the sail can be reduced by using stiffer battens.
5. Seams. Rip the stiching out of the seam and release the basting tape so that the cloth is free.
6. Shape. Pull the taut the sail cloth from the start and finish of the opened seam. It should be taut enough to remove wrinkles, but not enough to stretch the cloth. The cloth should overlap with the broadseam pulled out.
7. Mark. Draw the new line with a pencil.
8. The tricky part. Mark a new broad seam curve, between the old seam and the no-broadseam line you just drew. If you restitch the seam on the no-broadseam curve, the sail will be flat, with no draft to support the leech, which will fold over and flap. Instead, you want to remove between 25-40 percent of the existing broadseam, depending on how severe the stretch is. Mark a new seam between the old seam and the line.
9. Restitch. Even after you’ve resititched, leave all the extra cloth. You’ll want to hoist the sail first to see if you like it. In fact, there is no need to remove the excess overlap, other than cosmetics.
There is no need to do all of the seams at the same time. Try just two and see what it looks like. This should tell you how many seams need adjustment, confirm the amount of the revision, and suggest whether the lowest seam should be adjusted a lesser percentage to smooth the transition. The top seam is usually adjusted the full amount, since that is where the leech hook is often worst, and—on mainsails— because the mast provides some of the draft at the top.
This article was originally published on December 19, 2021 and has been updated.


