

Seamanship is about big concepts and small skills. They work together, but we see them differently and they represent different types of learning. Big concepts involve passagemaking and piloting decisions, like knowing when it’s time to bear away from a lee shore even though it adds miles to the passage, or recognizing that you and your crew are better off hunkered down, and that, even though everyone is itching to move on, departure day can wait.
Small skills, on the other hand, help us master the little problems, preventing them from growing bigger when conditions turn for the worse. Just as importantly, these skills make everyday sailing easier, and keep little things from wearing you down—a goal that becomes more urgent as we age. Seamanship is learned by seeking and sharing experiences, carefully debriefing after challenging days, and recognizing that the difference between an epic day and disaster is narrower than we think.
Micro-skills are what I’d consider a subset of small skills. They are small technical adjustments that soon become second nature if we repeat them enough—like how to best orient our body when using the primary winch, or how to safely move to the foredeck without ever letting go of a handhold. These are best learned through blocked practice, and the few days I’ve spent focused on a single skill have done more to make sailing easier for me than hundreds of unfocused days. Whether it is an easy sailing day, or one involving challenging conditions, it is the focus on learning that makes the difference.
While the globetrotting sailor who is spending years on the move would benefit from learning things like weather routing, diesel engine repair, and how to machine-sew canvas, the typical coastal sailor can make better use of their time perfecting their sailing skills.
BLOCKED PRACTICE
Go sailing, by all means, but then go back and master each individual operation through blocked practice, that is blocking out time to concentrate on one particular element of sailing. Focus on one skill—perhaps coiling a rope or loading and unloading a winch—until you learn the most functional way and it becomes muscle memory.
DOCKING SKILLS
Even old salts find themselves in docking situations that challenge their boathandling abilities. It took buying a cruising catamaran for me to really master docking. The slip was only 16 inches wider than the boat and I had to back in to load passengers. My first experience was under sail (both engines failed on delivery trip), and we went in nose first. No problem, because I knew how to sail. But learning how to back in under power was ugly. My dock mates good-naturedly told me that “what happens in Deale stays in Deale.”
The next time out was different. I’d read some twin engine docking tips and read how an instructor taught a trawler owner to back in using blocked practice.
With my 12-year-old as crew, we went to school, step by step. We tried different approaches. I tried different ways of coping with the wind and tide. When things started to go wrong—and they did many times—rather than force it and learn the wrong way to do it, I pulled around and tried it again, always debriefing what I did wrong or could do differently.
After just a few sessions of blocked practice, I could slide the boat in pretty as a picture. Over the years I gained experience in every wind and tide combination, often circling around for a fresh go with different rudder and throttle application, using each variation as a new learning opportunity instead of a source of frustration.
Same with tacking, reefing, furling, and on and on. Learn these skills one small step at a time. Often the best time to do a little blocked practice is right when it went wrong. Try the task again in the conditions that beat you, while the experience is fresh.
MARKING YOUR SETTINGS
Marking ropes is not just for racers. I mark my centerboard line so that I know when it is fully up, half way down, and completely down. I mark furler lines, so I can let out a specific amount of genoa, and not have to struggle to pull it back in because I unfurled too much. A dot of tape on the deck can mark the corresponding lead setting for the genoa. Shroud tensioners are marked for light wind and heavy wind settings. We don’t mark things we can easily see (outhaul), and we don’t use numbered tapes, just a simple whipping on the line or a dot of tape.
WINCHES
A smooth tack is the result of many actions working together, but being able to work a winch efficiently greatly reduces the labor.
Watch timing. If the sheet is released at the right moment and the clew pulled across at a rate that matches the turn, the jib can be trimmed in just before the wind fills it. Only a few turns should be needed to perfect the set. Fumble with the release or pulling the slack across, and there will be a lot of grinding to do.
Prep the lines. Flake the working sheet so it will run. Remove the handle from the working winch so you can remove the line easily. Put a turn on the lazy winch and take one to two turns off the working winch (without easing the sheet).
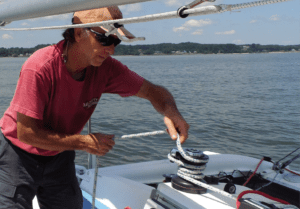
Take care loading and unloading a winch. Spin turns off the top of the loaded winch; release all of them in light winds but leave one if it is blowing so that you can control the release to avoid flogging and tangles. If you are alone, and need to release the loaded sheet from across the cockpit and you have self-tailing winches, try this trick. Wrap the loose tail of the captive sheet in the opposite direction of the wrapped coils (still firmly held in the self-tailing jaws) so that a quick tug will pull the sheet out of the tailer.
Care with cam cleats for gusty conditions. A cam cleat located on the bulkhead below the winch will allow instant one-hand release from any position. If the cam cleat is hard to release, it is because you do not have enough turns on the winch; it should carry no more than hand tension.
Position your body. Get your shoulders over the winch. Like lifting with your legs, use your whole body and big muscles, not your elbows and rotator cuff. Use a 10-inch handle on bigger boats.
Remember to flake. A winch puts a half twist on a line for every turn you load. Flake the rope between tacks.
THE TILLER DANCE
In “The Many Faces of Tiller Extensions,” we not only review the hardware, but discussed the basics of passing the extension during the tack. Even without an extension, there are good and bad ways to move around the tiller during a tack, the goal being to maintain a steady rate of turn synchronized with the trimming of the jib, and to manage the lines at the same time. The traveler bridge can complicate things. The right answer may be to move across before the tack. The best sequence when singlehanding and with crew will be different.
SAIL TRIM
In many cases, the ideal sail trim involves adjustments to the traveler (for the mainsheet) and barber hauler (for the jib).
Dumping the main sheet will put the boat on her feet faster by reducing heeling moment aloft, but unless the jib is eased in a matching manner at the same instant you also lose drive and choke the slot; the jib becomes full, overly powerful, and probably flogs at the same time.
On boats with no backstay (most multihulls and boats with B&R rigs) much of the forestay tension comes from the mainsail and mainsheet tension, so easing the mainsheet causes the forestay to sag and the jib to become more full, right when you want it flat. When the lull comes, hauling the main sheet back in is hard work.
Instead, ease the traveler. Or using vang sheeting; keep the vang on hard and ease the sheet, which will then work like a traveler. Both of these methods require tackle powerful enough to adjust easily under load.
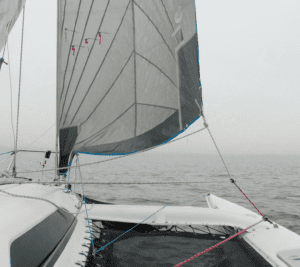
Flatten and depower the jib by letting the barberhauling out slightly and sheeting hard. Roll up some sail if necessary. Furling the jib is easier to do off the wind, with the jib blanketed behind the main; you can head downwind briefly to make the job easier. In a strong breeze, the ease of furling off the wind will be well worth the distance you lost.
If the boat is still overpowered, reefing the main will help even more. Then come back to your true course, and see if this isn’t better.
USING THE AUTOPILOT
The electronic helmsman is nearly an extra crewman, one that’s smart about some things and dumb about others.
Keep enough way on. In very light winds, or motoring into the wind slowly to set the main, the autopilot is not good at anticipating and correcting. They don’t know how to goose the throttle or steer preemptively. For best performance, you need at least 3 knots of boat speed.
Avoid headseas. Autopilots have to work harder if you are headed directly into the waves. If you motor at an angle to the waves (about 15-25 degrees), the autopilot can often hold a steadier course.
Use the autopilot’s compass. When the wind is aft of the beam and there is a side or following sea, using the autopilot’s compass setting is often better than steering by apparent wind, because the pilot cannot anticipate surfing, yawing, and their combined effect on the apparent wind.
Stand by with “standby” setting. The standby setting is better if the boat may stop. For example, put the autopilot on standby if you are singlehanded and use the motor at idle to pull up to the anchor before breaking it out.
Overtack. Auto tack and jibe are preprogrammed to 90 degrees. If you wish to come out of the tack full and by (more than 45 degrees off the true wind) or execute a relatively deep jibe (more than 135 degrees off the wind), push the plus +10 or -10 button 1-3 times before engaging autotack to make this adjustment.
SETTING AND FURLING SAILS
In light winds just about any process works, but above 10 knots minor mistakes can create a lot of extra work.
Mainsail. Head to wind is OK if you are working from the cockpit, but about 10 degrees to one side is safer when single handing or in waves. The boom is less likely to remove you from the cabin top.
Jib. If you plan to deploy a partially furled jib, mark the furler line. Furl on a broad reach, with the sail fully or partially blanketed by the mainsail. Apply light back tension with a sheet to get a nice even roll. An ugly furl or it was too difficult? Let it out, change course if needed, and do it again.
REEFING
The worst time to learn reefing is when you need to. Instead, pick a day with a nice 10-knot breeze and run through all of the reefs, from 1 to 3, and back again. Did anything go wrong? Fix it. Were there any problems controlling the boat?
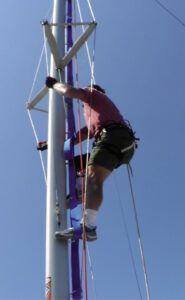
Practice using the autopilot, as though singlehanding. Practice under sail only. As long as you ensure that no loose tails go overboard where they can foul the prop, there is nothing wrong with running the engine slowly when reefing in heavy weather; it can steady the boat up and prevent mistakes. You can use the engine to point a little higher. Practice while wearing a tether to a jackline, because you may need one in rough weather. Do this even if you led all of the lines to the cockpit, because someday something will snag at the mast. Can you reach the end of the boom?
DOCKING
On some days everyone is watching and the wind is foul. Pick a nice day and go to school. Instead of breathing a sigh of relief when the docklines are secured, think about everything you did and do it again, while it is fresh.
• If approaching the dock looks hazardous, anchor out.
• Check the wind and tide before leaving or approaching a dock.
• Always have an escape plan for a missed approach. Calmly circling around is much better than forcing a bad situation. That’s how things get broken.
• Share the plan with your crew. Discuss specifics well ahead of time so that there is no need for last minute instruction. There should be very little need for talk.
• Master contingency anchoring. Once I picked up a floating rope on final approach, killing both engines. I spun away, into the wind and to a safe position with some room to leeward before the boat lost way. All that remained was to slowly walk to the bow, free the anchor, and lower and set carefully. Wait until the boat has stopped, lower until the anchor just touches, and then wait until you can see the rode is angling forward before releasing more rode, gently tipping the anchor. When scope is about 3:1 or 4:1, tug very lightly, just enough to dig in the toe. Wait until full scope (at least 5:1—the water should be pretty shallow) before gently snubbing the rode. You have one shot.
COILING ROPES
There are many good ways to coil a rope (over/under or figure eight), but the main goal is to avoid working twists into the rope as you coil it. If you are getting tangles, try alternate methods until you don’t get tangles. It is not about appearance, it is about function (see “Stopping Mainsheet Twist”).
MOVING AROUND DECK
Practice your movements on deck, so that you are prepared when the boat begins to jump; the sequence can be more important than just holding on. Move from hold to hold, always knowing where you are going next. Maintain a balanced position that is secure against a jolt from any direction. If something felt insecure, try a different path or sequence. Go on deck often. Like flying, climbing, or diving, you only stay safe with skills you practice regularly.
CHOOSING AND USING ACCESSORIES
A common complaint among sailors is that they can’t work while wearing gloves, tethers, PFDs, etc. In many cases, this is because they have not focused on learning how.
Use your safety tether. Practice in moderate weather until you learn the jackline routing and which clipping spots work best (see “Reassessing Clip in Points”).
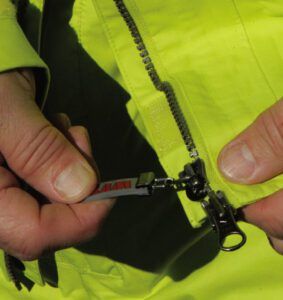
Wear your gloves. Only through use will you discover what changes you might need to make, like adding lanyards to zipper pulls and snap shackles, upsizing some hardware so it can be handled with gloves, or just plain eliminating superfluous items that require you to take off your gloves.
Dress for the weather. A comfortable sailor is an attentive, effective sailor. The layers must be adaptable and quick to change. You can’t just be bundled up; you need to be as free to move as if you are wearing a tee shirt and board shorts. Bring a number of combinations, changing until you learn what works.
NAVIGATION
Get your head out of the cockpit. I recommend regular no-instrument days (see “In a Perfect Position to Fail”). If there are rocks or even shoals around you can use the sounder, but that’s it. No plotter. No radar. No wind instruments. No autohelm. No compass. Just your eyeballs and observations.
Water color tells you about wind, current, and depth. Even in murky waters you can get information; weed bottoms will tend to make the water darker. When it’s rough the water over shoals is a lighter brown with silt. Any Bahamas cruiser should be able to read the shades of blue and green that reveal depth.
Are the waves suddenly steeper? This could indicate a shoal, or could be intersecting tides.
Directional awareness. Unfortunately, our reliance on digital navigation tools means we don’t exercise that part of the brain that helps guide orientation. Can you hold a course based on wave and wind direction alone? Can you reverse course back to an MOB based on the waves? You should not become disoriented by a few turns.
Recognize that charts are not always right. Or more to the point, with layered electronic charts it’s easy to miss something. I’ve seen too many boats hit aids to navigation.
COMBINING SKILLS
The most vital sailing skills usually involve a combination of individual skills that can be refined through blocked practice. For example, MOB recovery requires close range navigation using compass, GPS, and most importantly, your eyes. Can you tack in a repeatable manner, and did you prep the lines for the next tack? How far does your boat carry after a tack and how does it heave to? Practice these separately. How will you haul the swimmer aboard? Practice that separately, drifting on a nice day first. Then practice putting it all together. Maybe you’ll decide that the method that works for you is to take all of the sails down and motor. Best to learn that now, but recognizing that boats motor differently in waves.
CONCLUSION
The big skills come from experience, and books like Ralph Naranjo’s “The Art of Seamanship: Evolving Skills, Exploring Oceans, and Handling Wind, Waves, and Weather” will speed you on your way. For the many small skills required for both safe voyaging and competent day sailing, blocked practice speeds learning and encourages good habits. Sure, you can learn many of these skills and techniques as you go, and over time they will become rote. But life comes at you fast, and sailing can be a harsh school, where the exam comes before the lesson. A little time focused on the essential micro-skills required of day sailing can help carry you more quickly toward more expansive goals, and prepare you for those days when unexpected events catch you off guard.
Many textbooks advise you to practice crew-overboard rescue methods in a variety of sea and wind conditions. While this approach works, you can often make more rapid progress learning by breaking down the task into its component micro-skills and rehearsing those until each of those have become almost second nature.
We use a three buoy rescue dummy for our man overboard trials (right), and often focus on just one of the key elements of a successful rescue.
- Alert, tracking and prep. During this exercise we focus on shipboard routines of communication, both between crew and with nearby ships, and using technology (and of course our eyes) to raise the alert that there is person in the water. The emphasis is on keeping track of the victim’s position at all times, and preparing for return and recovery.
- Return. During this exercise we focus on just one or sometimes two types of recovery maneuvers until we get it right—the Quick Stop, Figure 8, Fast Return, Deep Reach/Run, Lifesling, Under Power (see “Rethinking the MOB Recovery,” PS September 2019). Trying to master them all in a day makes you a master of none.
- Retrieval. This often overlooked element of an MOB rescue is often the most challenging. In this exercise we focus on expediting the safe lifting of a person in the water back on board. Often this requires modifications to the boat, hoisting gear, or PFDs (see “Tether Lanyard Simplifies Recovery,” PS July 2022).
For a complete, organized anthology of our research on crew overboard rescue and prevention, the ebook “Man Overboard Prevention and Recovery,” (www.practical-sailor.com/products) delves deeply into this topic.


Would like explanatory picture or drawing of singlehanded release of captive sheet by wrapping the loose tail in opposite direction of coils on self tailing winch. Also would link to know if hack to make auto pilot tack more than 90* by adding 10-30* is done immediately before and during heading change simultaneously executing tack on autopilot.
Remote Release From Self-Tailing Winch. A sheet is wrapped 3-5 times around the drum, over the feeder, and then a 3/4 turn in the self-tailing jaws. For maximum hold, a slight tug is applied to set the rope in the jaws. To release remotely, instead of allowing the tail to drop on the floor in front of the winch, gently lead the tail around the winch in the reverse direction, and then over to where you will be positioned. Do NOT apply tension during this process. To release the line, pull on the tail. This will peel the line out of the self-tailing jaws.
This is fine for easing a sheet slightly. The remaining turns will provide friction. Normally, it is desirable to have enough turns on the winch so that the self-tailing jaws are only holding light hand tension. If there are insufficient turns, the jaws will be overloaded and may slip, and will undergo excessive wear. However, because you want the rope to slip rather quickly during a tack, it is best to reduce the turns to the minimum that will hold, no more than 2-3 turns. Do this just before tacking, as one of your tack preparations. Do not trim a self-tailer with too few turns.
Tacking Through More Than 90 Degrees. Press the +10 button one or two times immediately before pressing the +10 and +1 buttons simultaneously to initiate the autotack. This will cause the boat to turn 100 or 110 degrees. Helpful in rough conditions and also in very light winds. In steep waves the boat may stop and go into irons, which is bad. In very light winds, turning past your true course helps the boat accelerate. In all cases, accelerate to your best windward speed before starting a tack. Easing the main a little at the mid-point can help, and cut the jib loose the moment it backwinds, aiming to get it trimmed in exactly as the turn is completed (but not before). It takes a little practice, since the helmsman cannot adjust the rate of turn to match the actions of the jib trimmer or the speed of the boat.
Re: tacking and other quick-release of self-tailing winches.
A better method is to mount a cam cleat on the bulkhead below the winch and secure the tail in that, instead of the self-tailing jaws. I have had this arrangement on three boats; two came that way from the factory. Smart builders.